> ## Documentation Index
> Fetch the complete documentation index at: https://zuperinc-section23.mintlify.site/llms.txt
> Use this file to discover all available pages before exploring further.
# Hover Web
## Overview
The Zuper and Hover integration enables roofing service teams to manage property measurements seamlessly, all within the Zuper platform. With this integration, you can:
✅ Order a new measurement directly from a Zuper job.
✅ Sync existing Hover projects to Zuper jobs.
✅ View, edit, and download measurement data.
✅ Access 3D model via Hover.
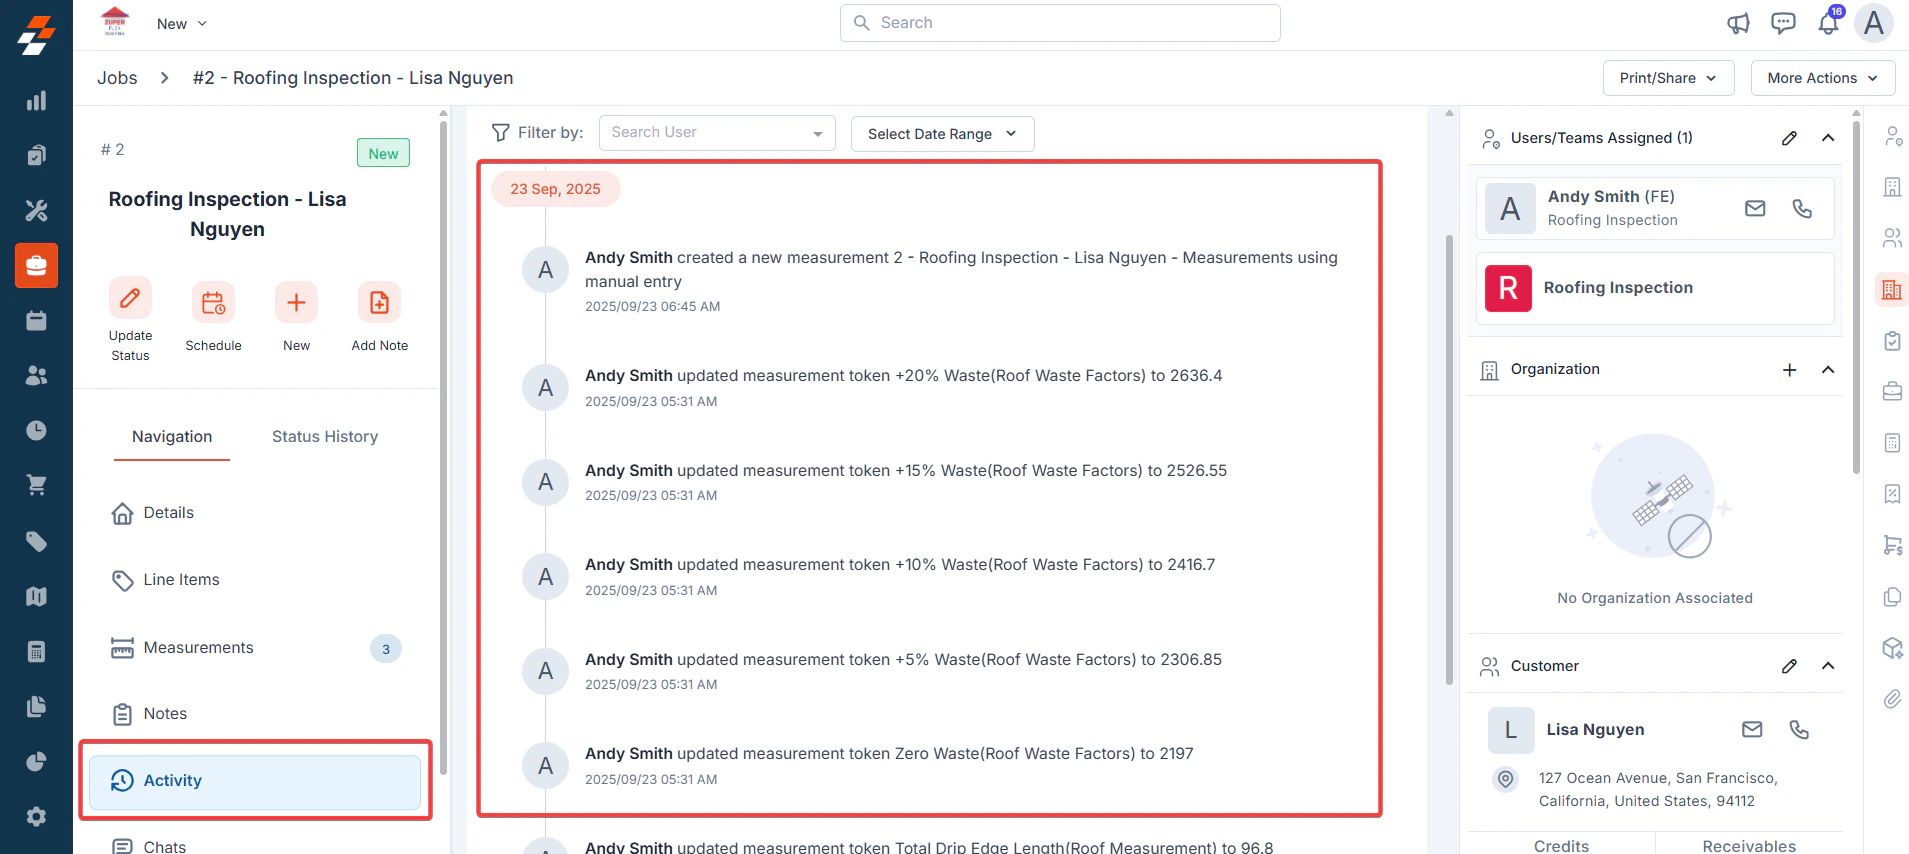
✅ Track all measurements in Zuper’s job activity.
This integration enhances accuracy, visibility, and efficiency across your roofing workflow — from measurement to execution.
## Plan Requirements for Hover Integration
To use the Hover integration with Zuper, ensure that your subscriptions on both platforms support integrations.
| **Section** | **Details** |
| :------------- | :------------------------------------------------------------------------------------------------------------------------------------------------------------------------------------------------------------------------------------------ |
| **Zuper** | The Hover integration is available only on **Core** and **Premium** plans.
If you are on the **Starter** plan, you must upgrade to Core or Premium to access Hover. |
| **Hover** | The **“Pay as You Go”** plan does not support software integrations.
You must be on a Hover plan that includes marketplace integration to connect with Zuper. |
| **Next Steps** | If you are unsure about your plan:
- Contact **Zuper Support** at [*support@zuper.co*](mailto:support@zuper.co) to confirm or upgrade your Zuper plan.
- Contact your **Hover representative** to verify your Hover subscription. |
## **Custom Roles**
You need to enable the permission in a custom role to allow users to order measurements from Hover.
**Note**: By default, only admins or users with the “**Order Measurement from External Provider**” custom role permission can place orders for measurements.
1. Navigate to **Users & Teams > Custom Roles**.
2. Click **New Role** or edit an existing one.
3. Enter a **Role Name** (e.g., "Roofing Technician") and **Description**.
4. Select the Jobs module from the List of Modules under Permissions.
5. Search for **Order Measurements from External Provider** in the Jobs Permissions section.
6. Toggle the switch to **On**.
7. Review and enable other related permissions: Click **Save Role** to apply changes.
8. Assign this role to relevant users or teams.
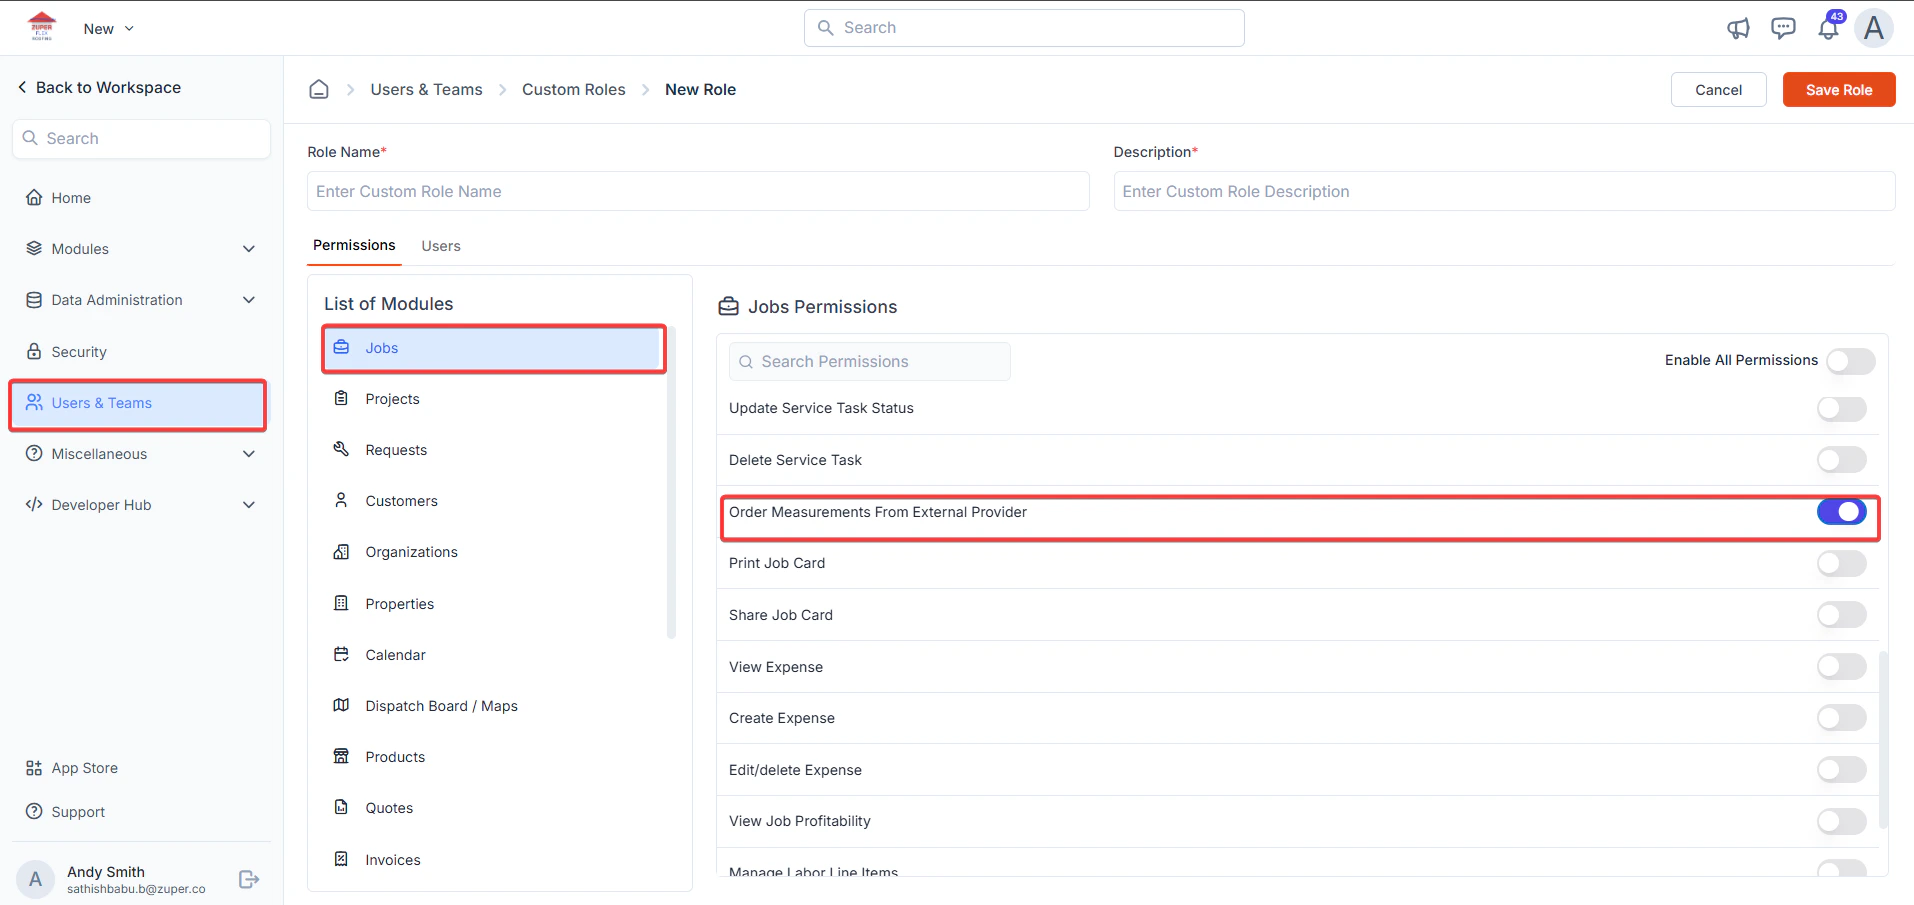 Once set, users with this role can initiate measurement orders from job details.
## **Managing Measurement Tokens**
Measurement tokens define the specific data points (e.g., lengths, areas) that Zuper pulls from external providers. You can enable or disable these to tailor what appears in your job details page.
Read more from [here](https://docs.zuper.co/Settings/Modules/Jobs/Configuring_Measurements)
## **Connecting to Measurement Providers**
Zuper supports integrations with leading roof measurement services to fetch data like aerial-derived roof specs, 3D visualisations, and high-precision reports.
Read more from [here](https://docs.zuper.co/Settings/Modules/Jobs/Configuring_Measurements#connecting-to-measurement-providers)
## How to Enable the Hover Integration?
1. Log in to your Zuper app, click the “**User**” icon, and tap on the “**App Store**”.
Once set, users with this role can initiate measurement orders from job details.
## **Managing Measurement Tokens**
Measurement tokens define the specific data points (e.g., lengths, areas) that Zuper pulls from external providers. You can enable or disable these to tailor what appears in your job details page.
Read more from [here](https://docs.zuper.co/Settings/Modules/Jobs/Configuring_Measurements)
## **Connecting to Measurement Providers**
Zuper supports integrations with leading roof measurement services to fetch data like aerial-derived roof specs, 3D visualisations, and high-precision reports.
Read more from [here](https://docs.zuper.co/Settings/Modules/Jobs/Configuring_Measurements#connecting-to-measurement-providers)
## How to Enable the Hover Integration?
1. Log in to your Zuper app, click the “**User**” icon, and tap on the “**App Store**”.
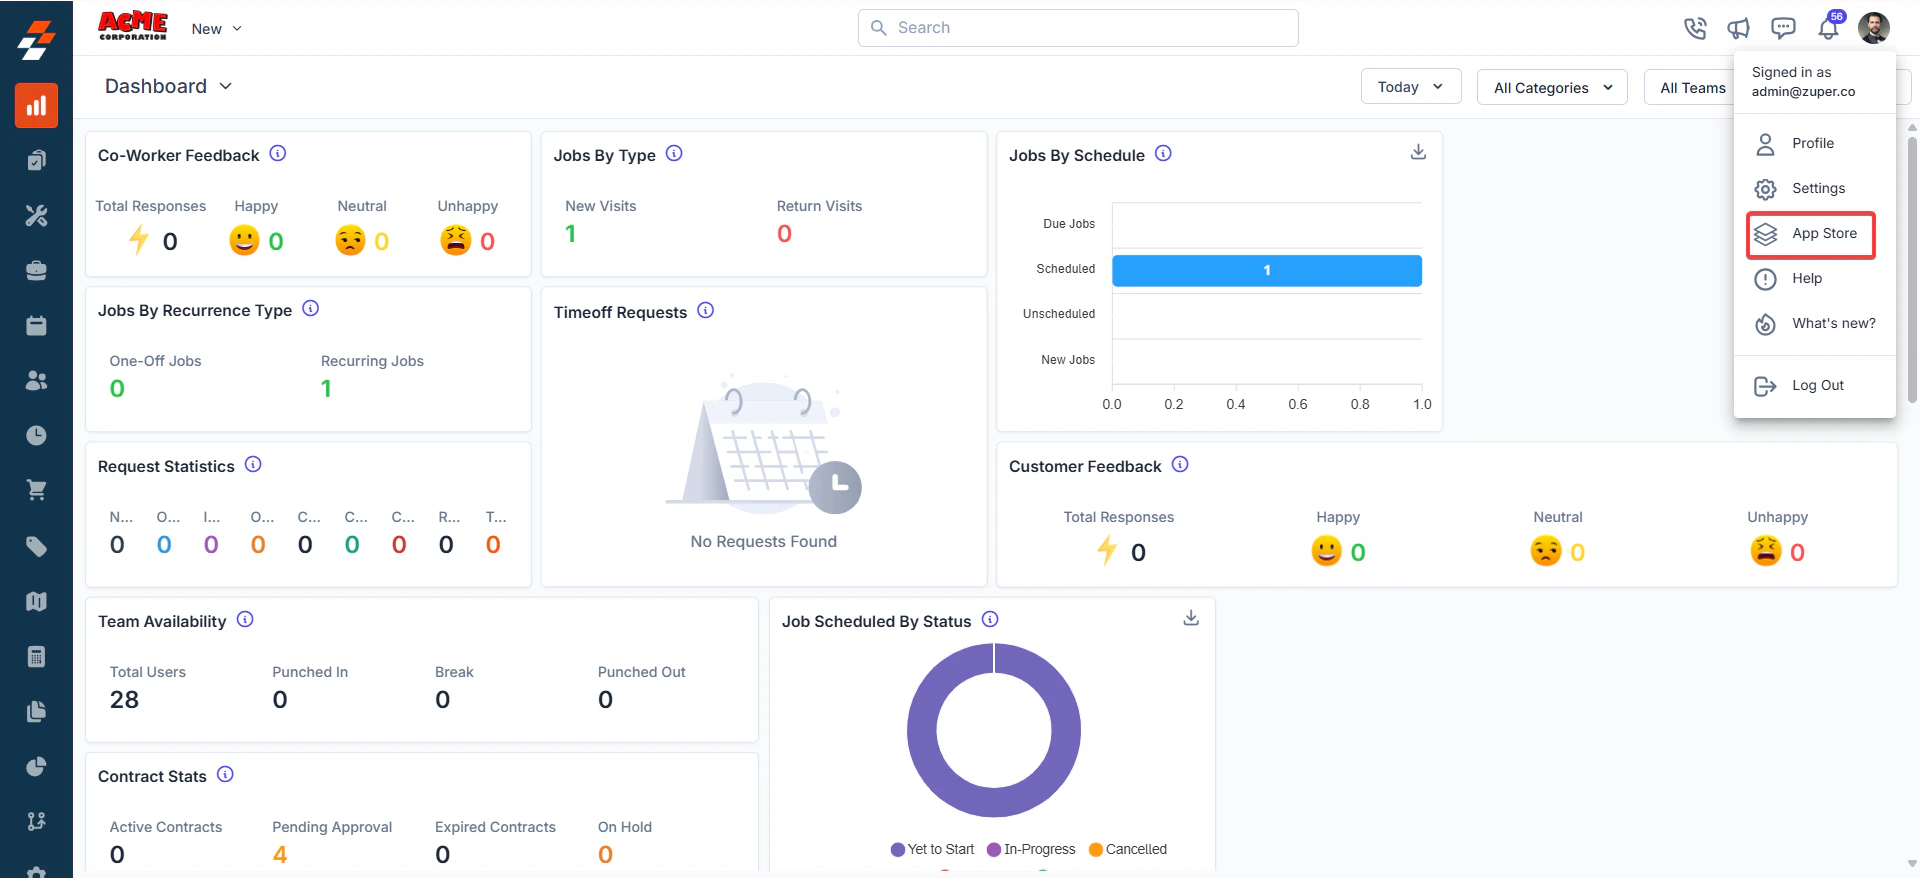 2. Under the “**Browse by Category**,” select the “**Measurements & Estimations**” option and choose “**Hover**.”
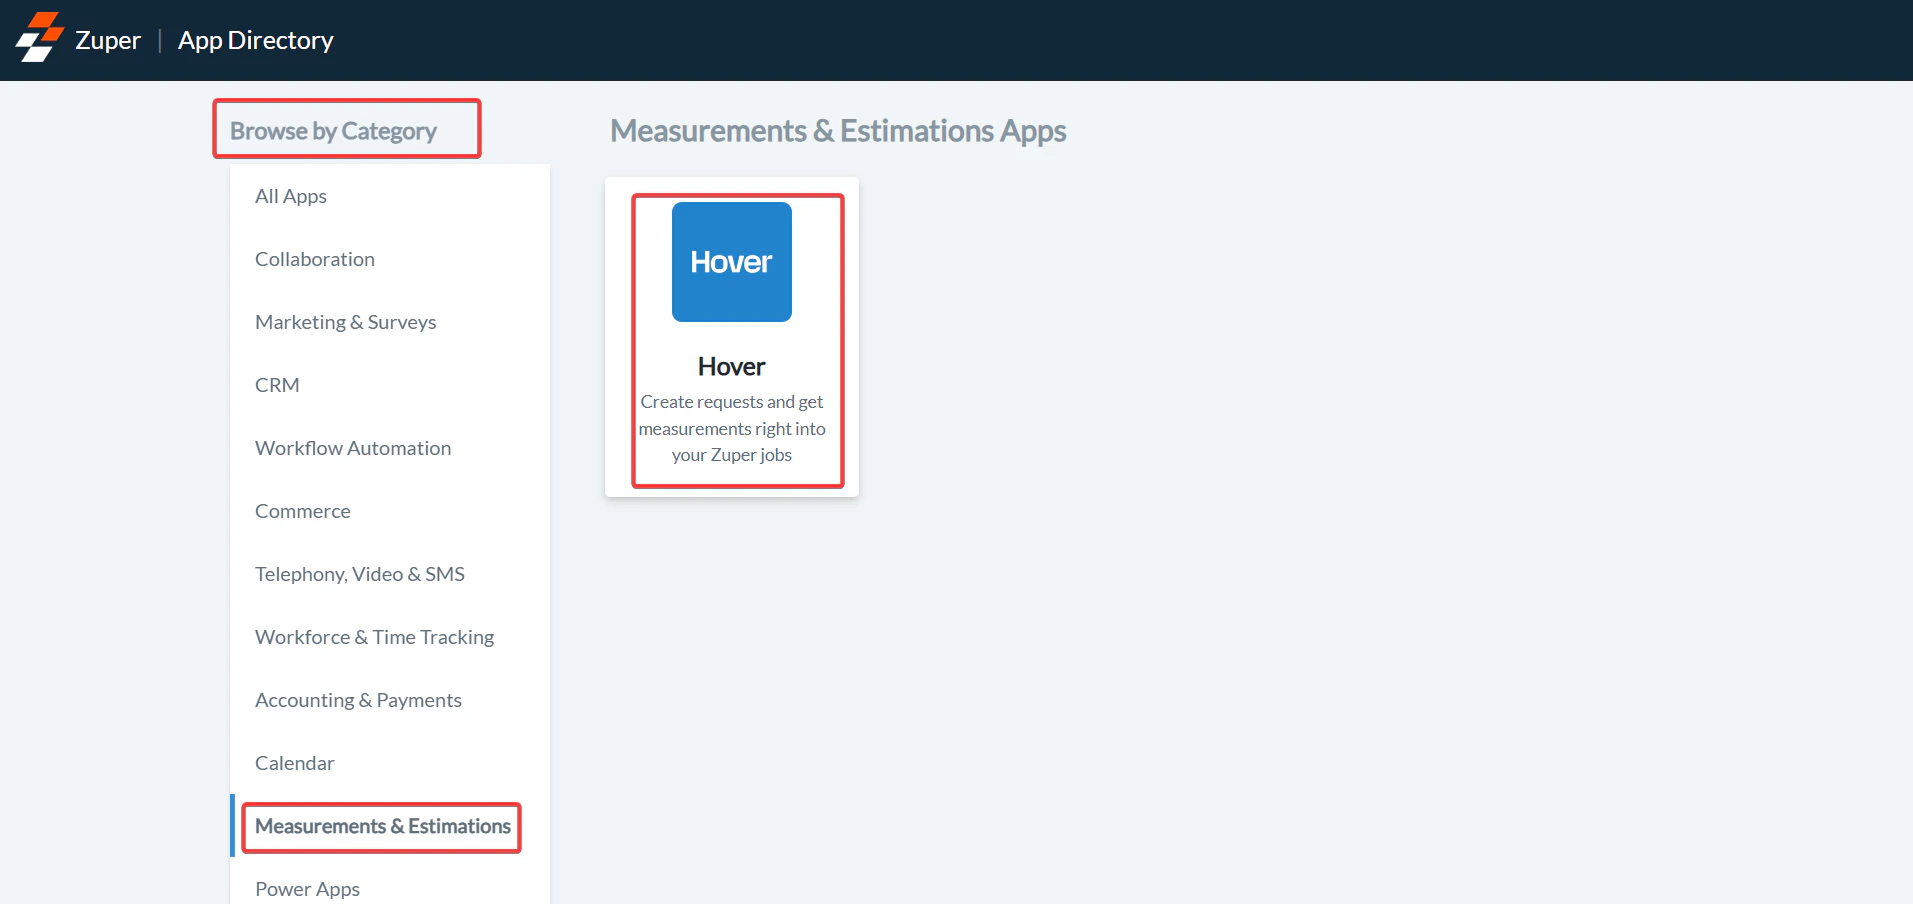 3. On the Hover app page, click “**Install Hover**.”
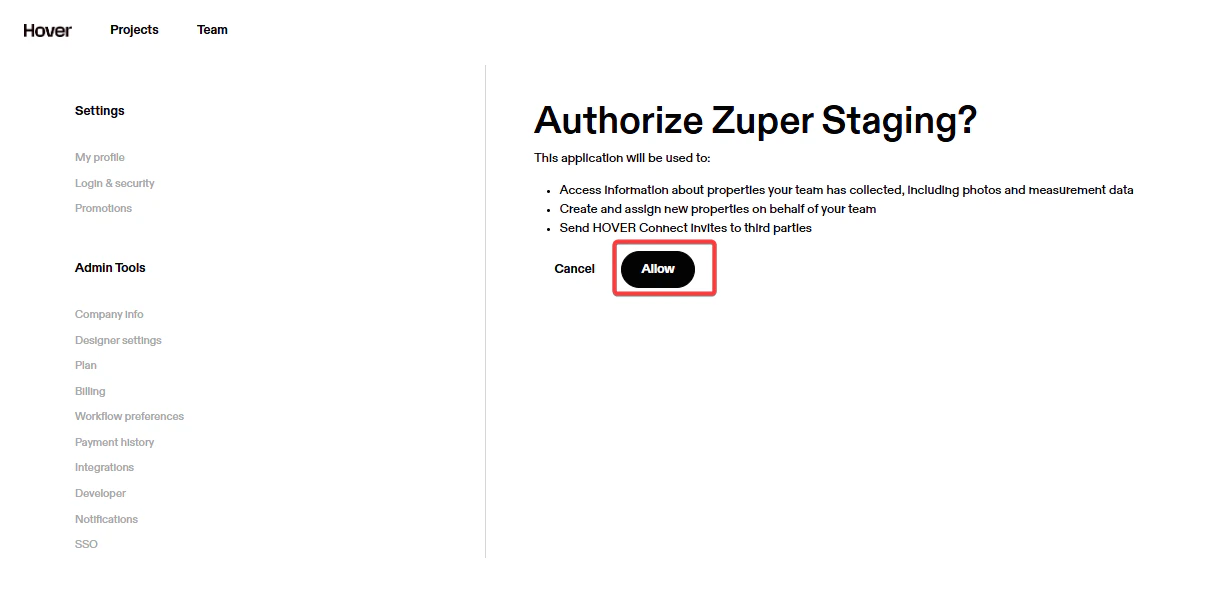
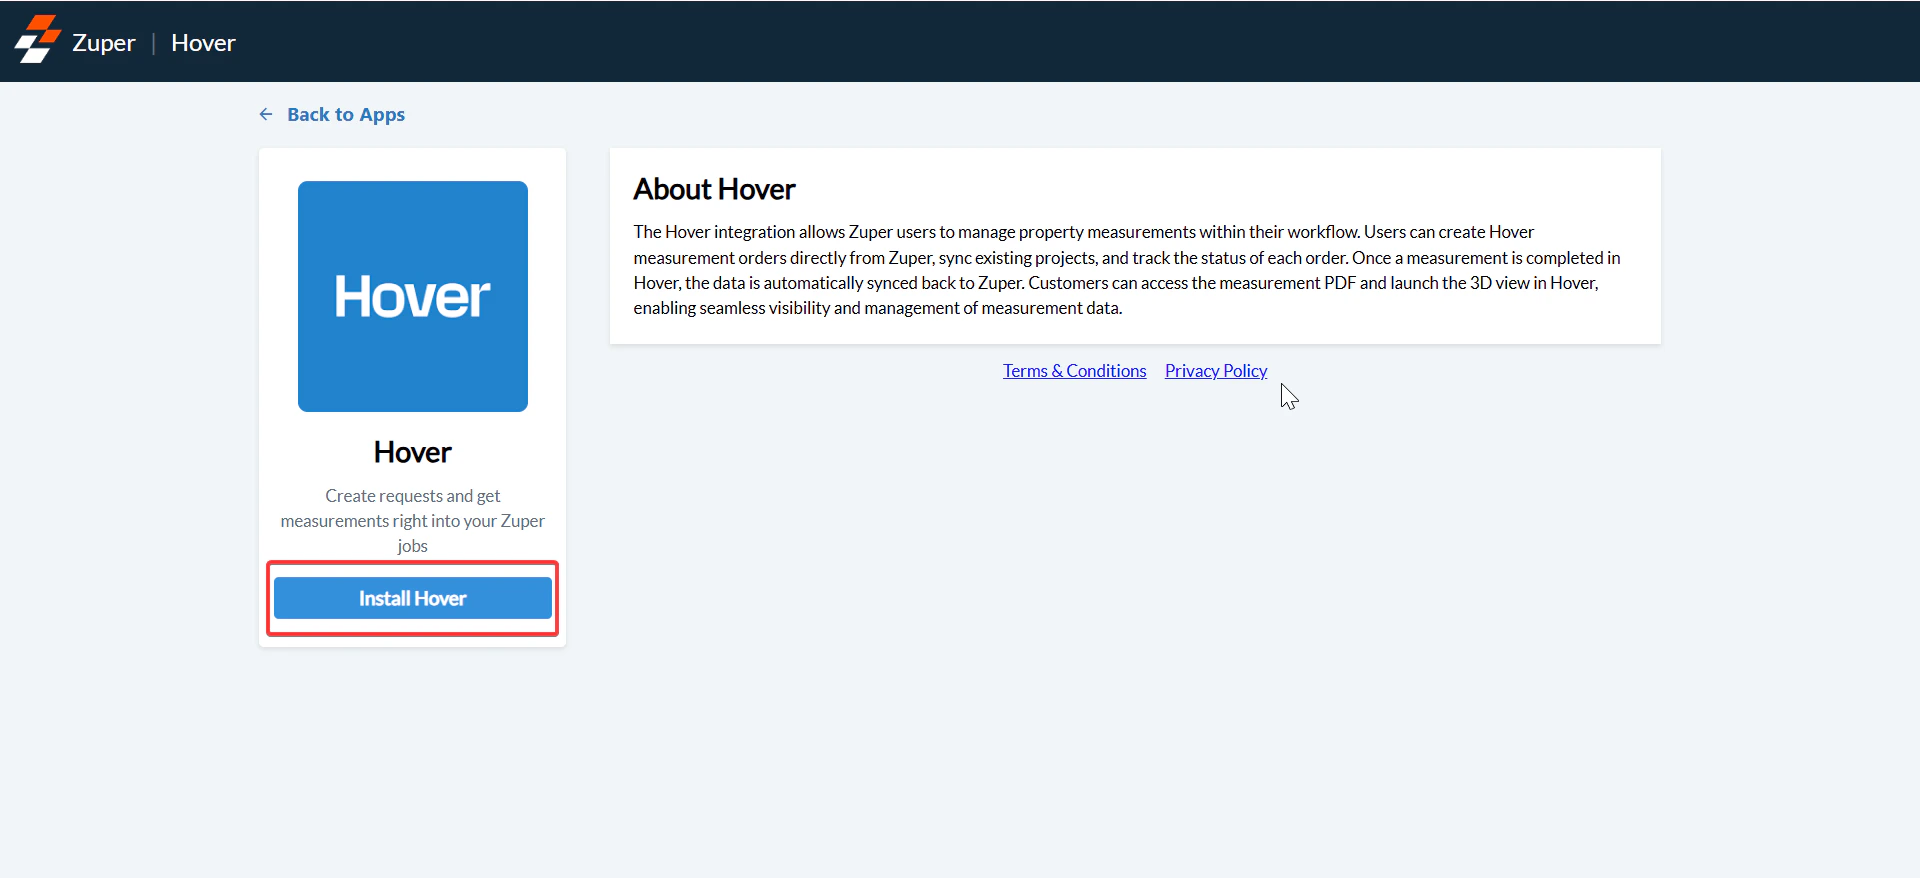 4. You will be redirected to Hover for authentication. Click “**Allow**” to authenticate.
Note: Only Hover Administrators can complete the authentication.
4. You will be redirected to Hover for authentication. Click “**Allow**” to authenticate.
Note: Only Hover Administrators can complete the authentication.
 ## **How to Generate a Zuper API Key**
You need a Zuper API Key to complete Hover setup:
Zuper API Keys are essential for securely authenticating and authorising access to the Zuper API. These keys enable seamless integration with Zuper’s services, allowing developers to build robust applications that leverage real-time data and functionality.
**Navigation**: *Settings -> Developer Hub -> API Keys*
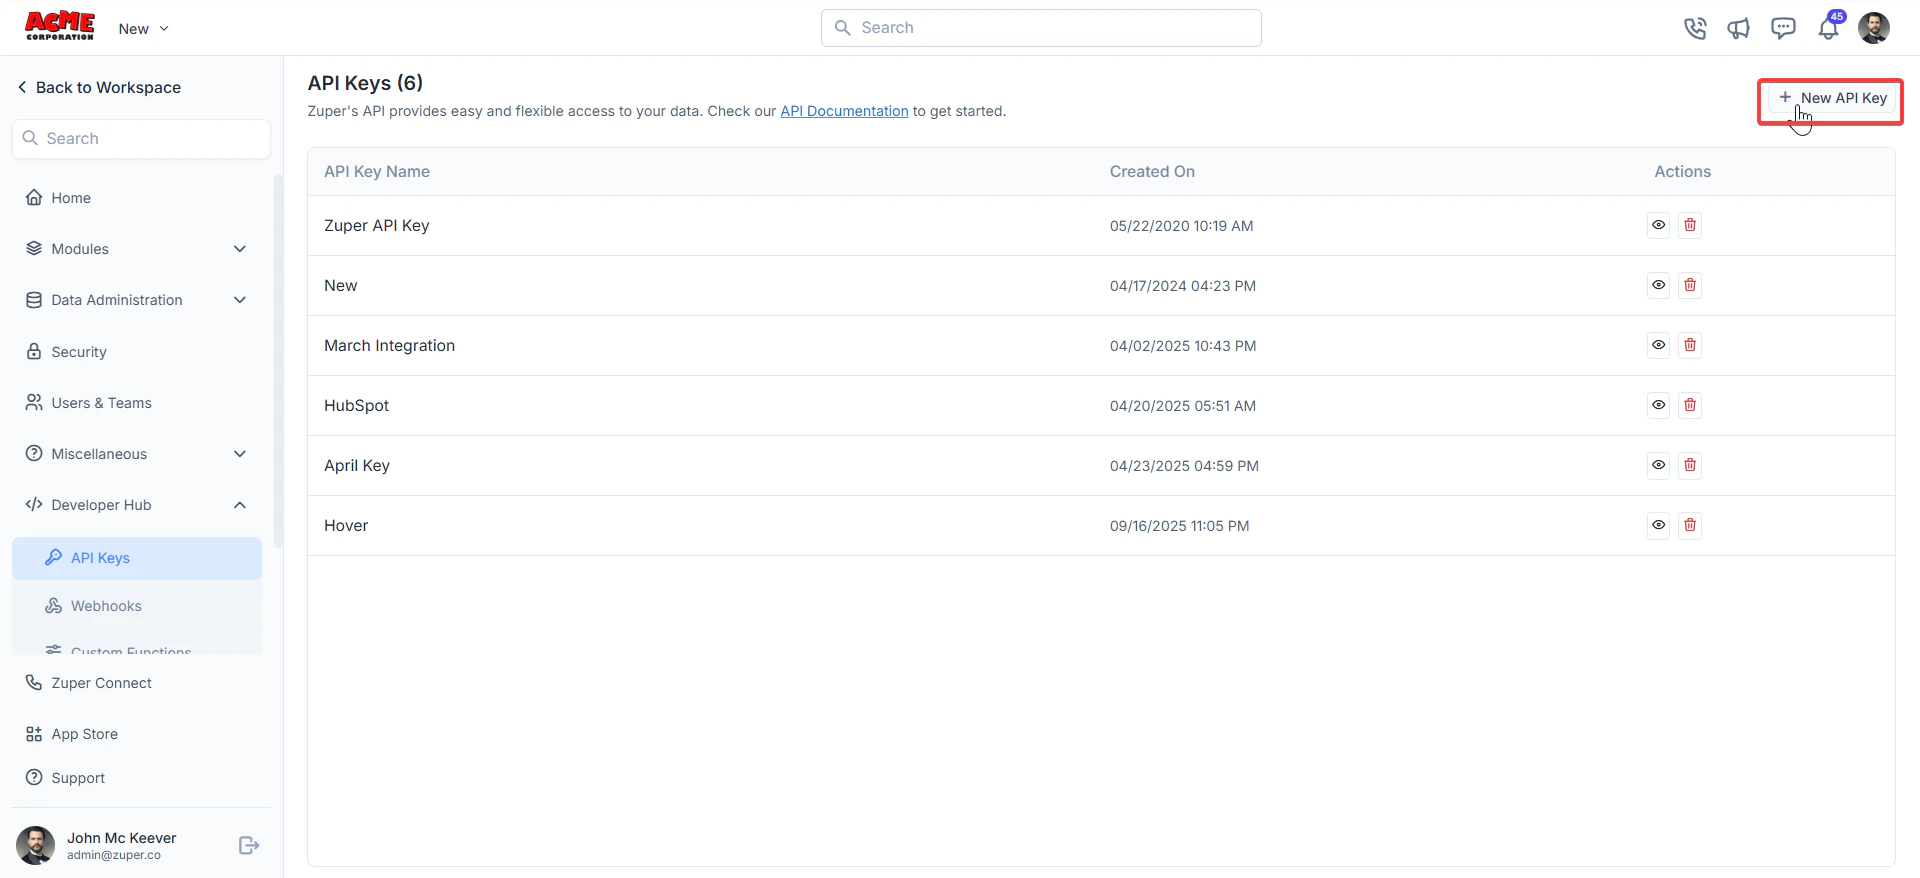
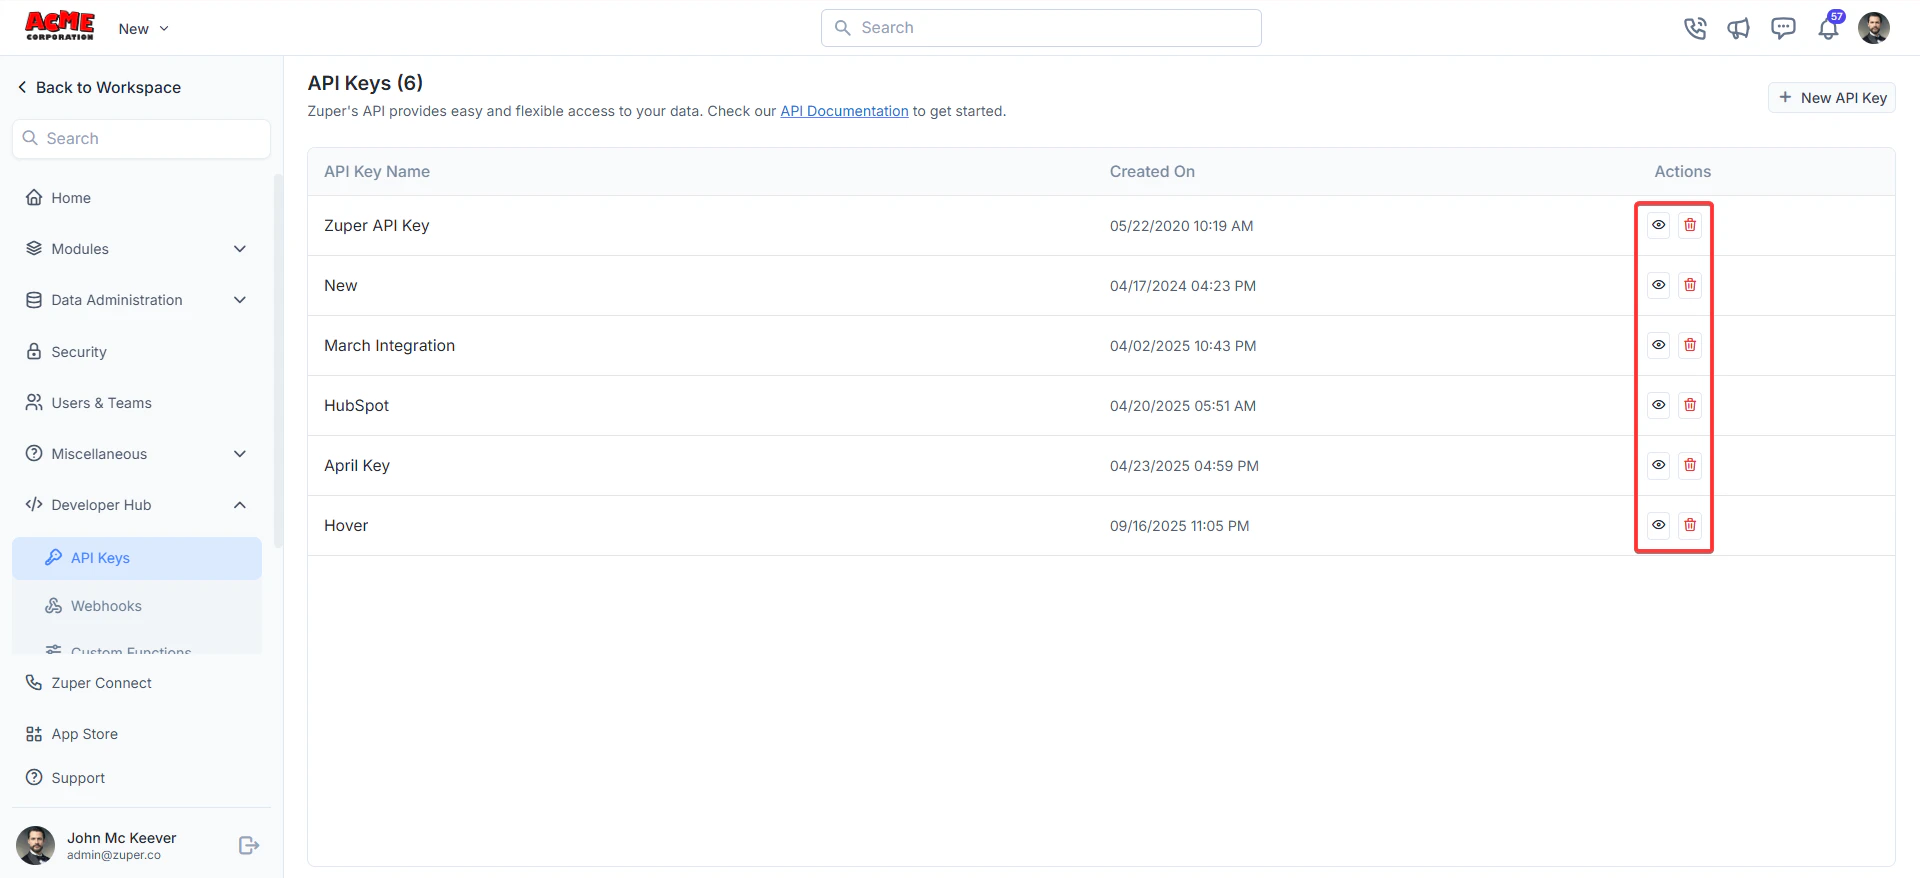
1. From the settings, select “**Developer Hub**,” choose “**API Keys**,” and click “**+New API Key**.”
## **How to Generate a Zuper API Key**
You need a Zuper API Key to complete Hover setup:
Zuper API Keys are essential for securely authenticating and authorising access to the Zuper API. These keys enable seamless integration with Zuper’s services, allowing developers to build robust applications that leverage real-time data and functionality.
**Navigation**: *Settings -> Developer Hub -> API Keys*
1. From the settings, select “**Developer Hub**,” choose “**API Keys**,” and click “**+New API Key**.”
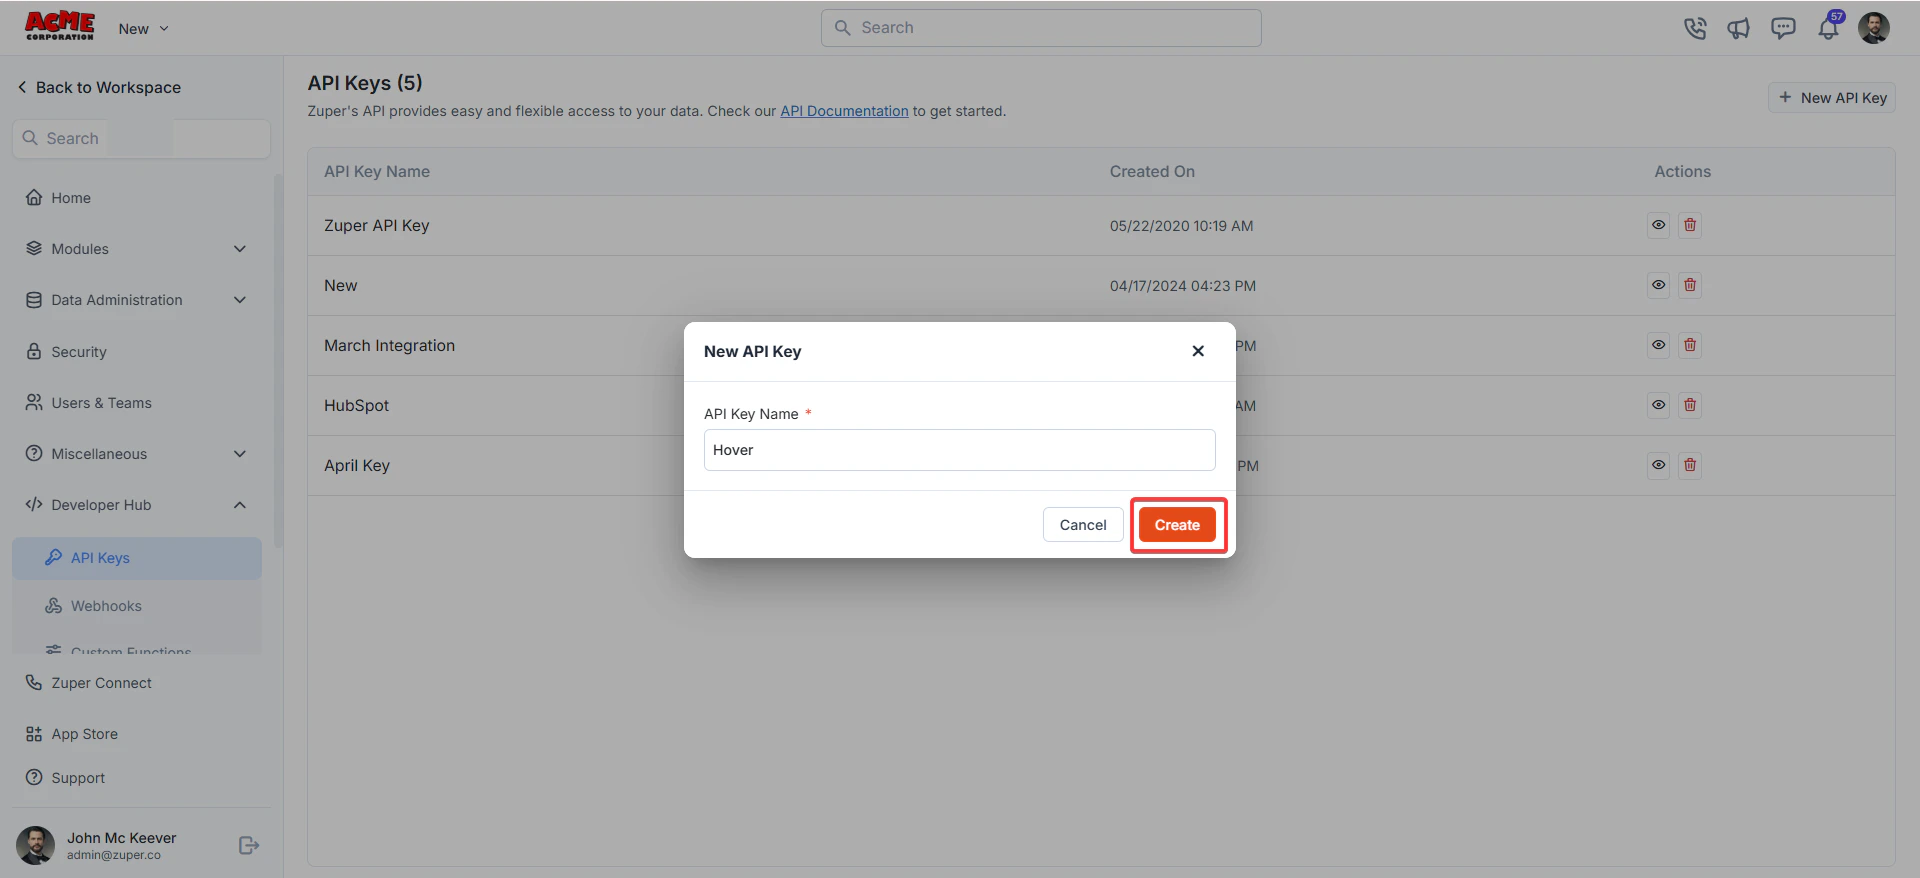
 2. A “**New API Key**” dialog box appears. Enter the “**API Key Name**.” Click the “**Create**” button to generate the API key.
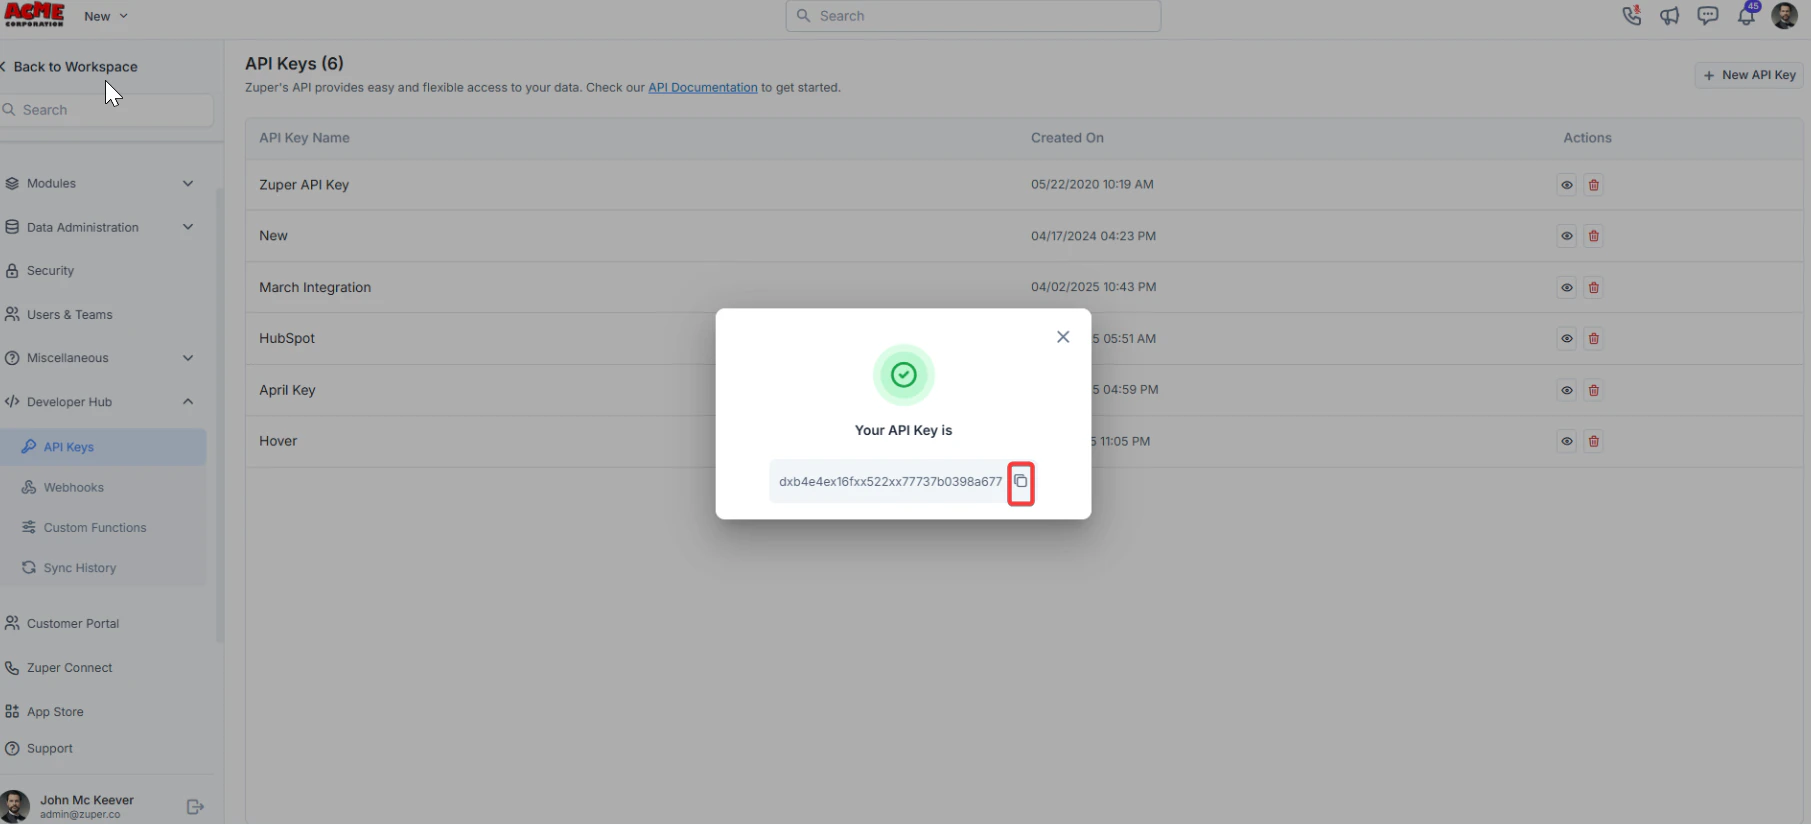
 3. The API key is successfully created. Click the copy icon to copy the API key. Paste it into the Hover configuration settings in Zuper
 4. Under “**Actions**,” you can view or delete the API key.
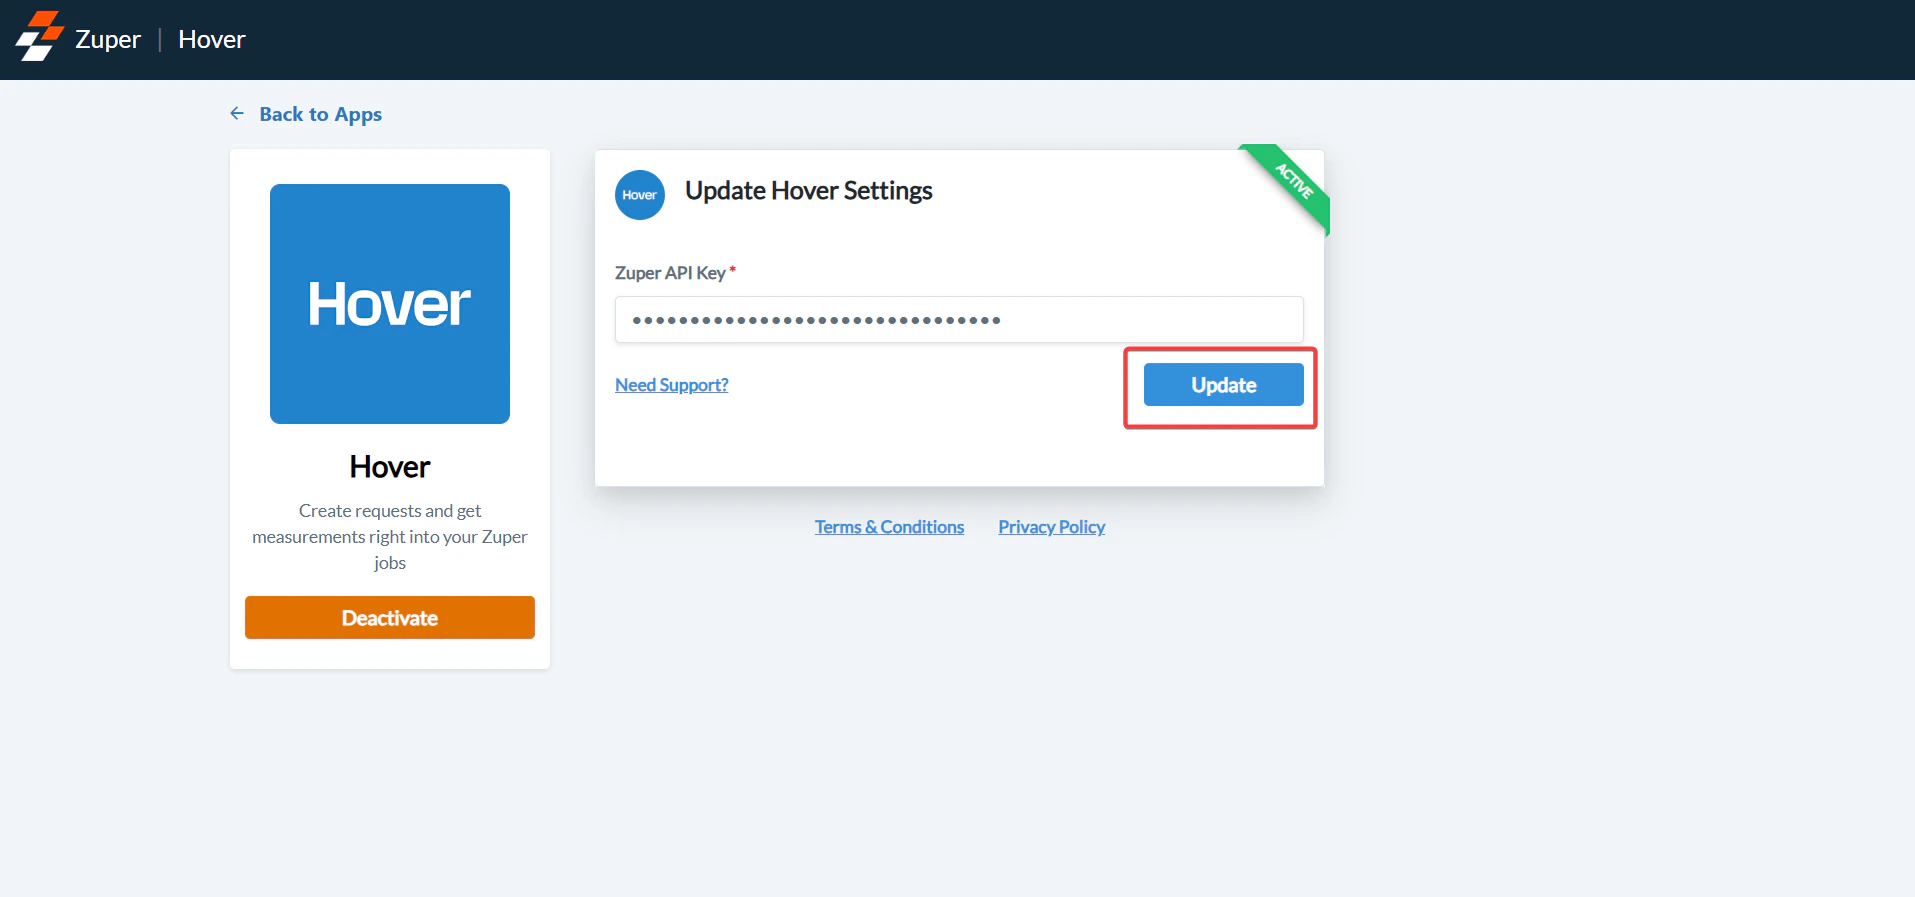
 5. Click Configure Settings in the left panel of the Hover app page. Enter your Zuper API Key.
Click “**Update**.”
5. Click Configure Settings in the left panel of the Hover app page. Enter your Zuper API Key.
Click “**Update**.”
 ✅ Your Hover integration is now active and ready to use!
## How to Order a New Hover Measurement?
* From any job in Zuper, you can request a new measurement:
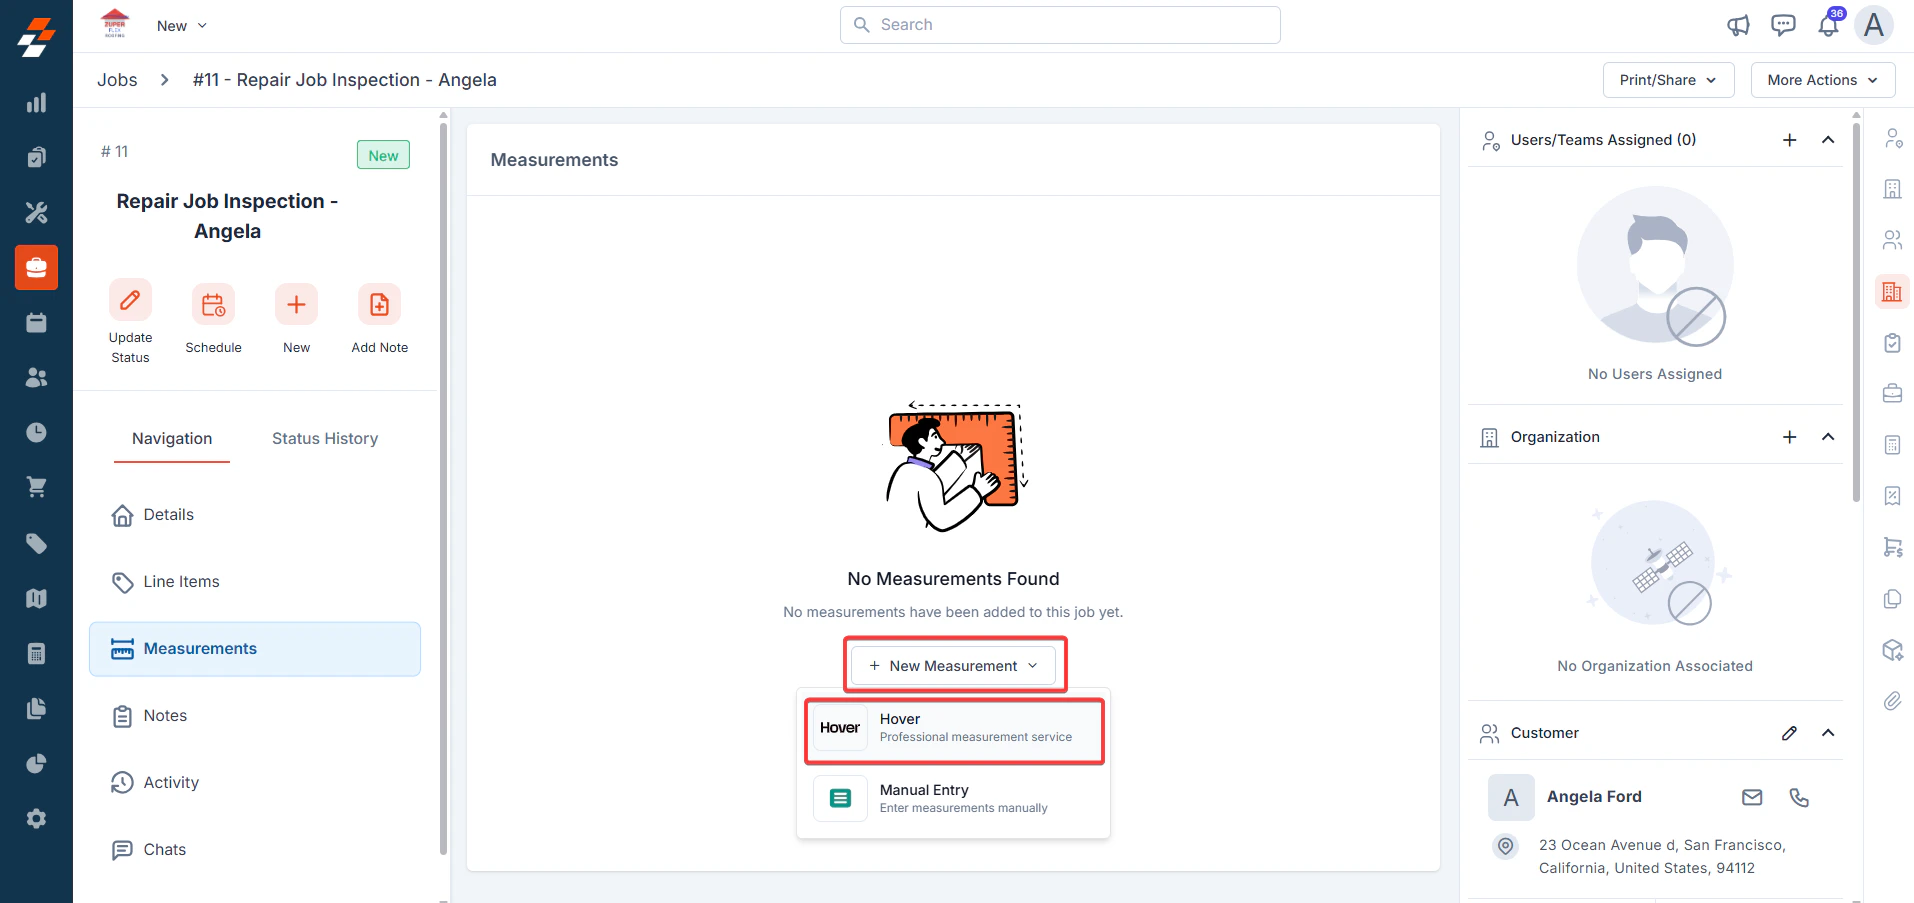
* Open the Job Details page. Go to the **Measurement** tab.
* Click **+ New Measurement**.
✅ Your Hover integration is now active and ready to use!
## How to Order a New Hover Measurement?
* From any job in Zuper, you can request a new measurement:
* Open the Job Details page. Go to the **Measurement** tab.
* Click **+ New Measurement**.
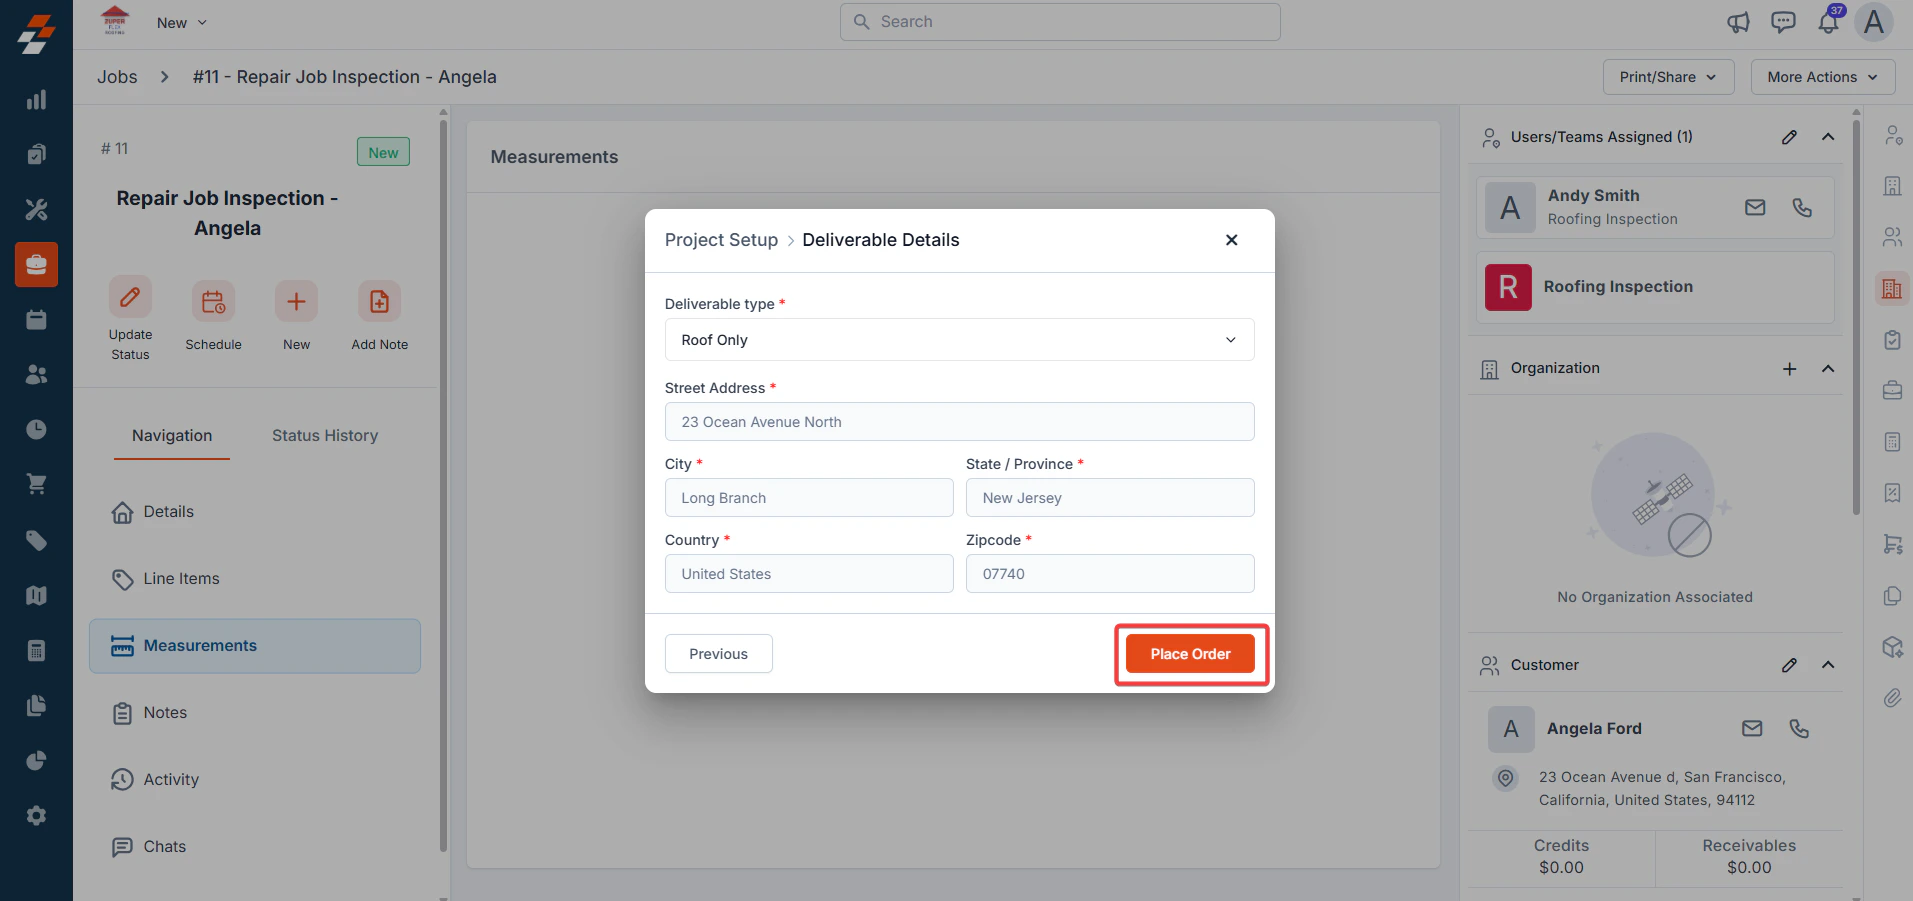
 ### **Option 1: Create New Measurement**
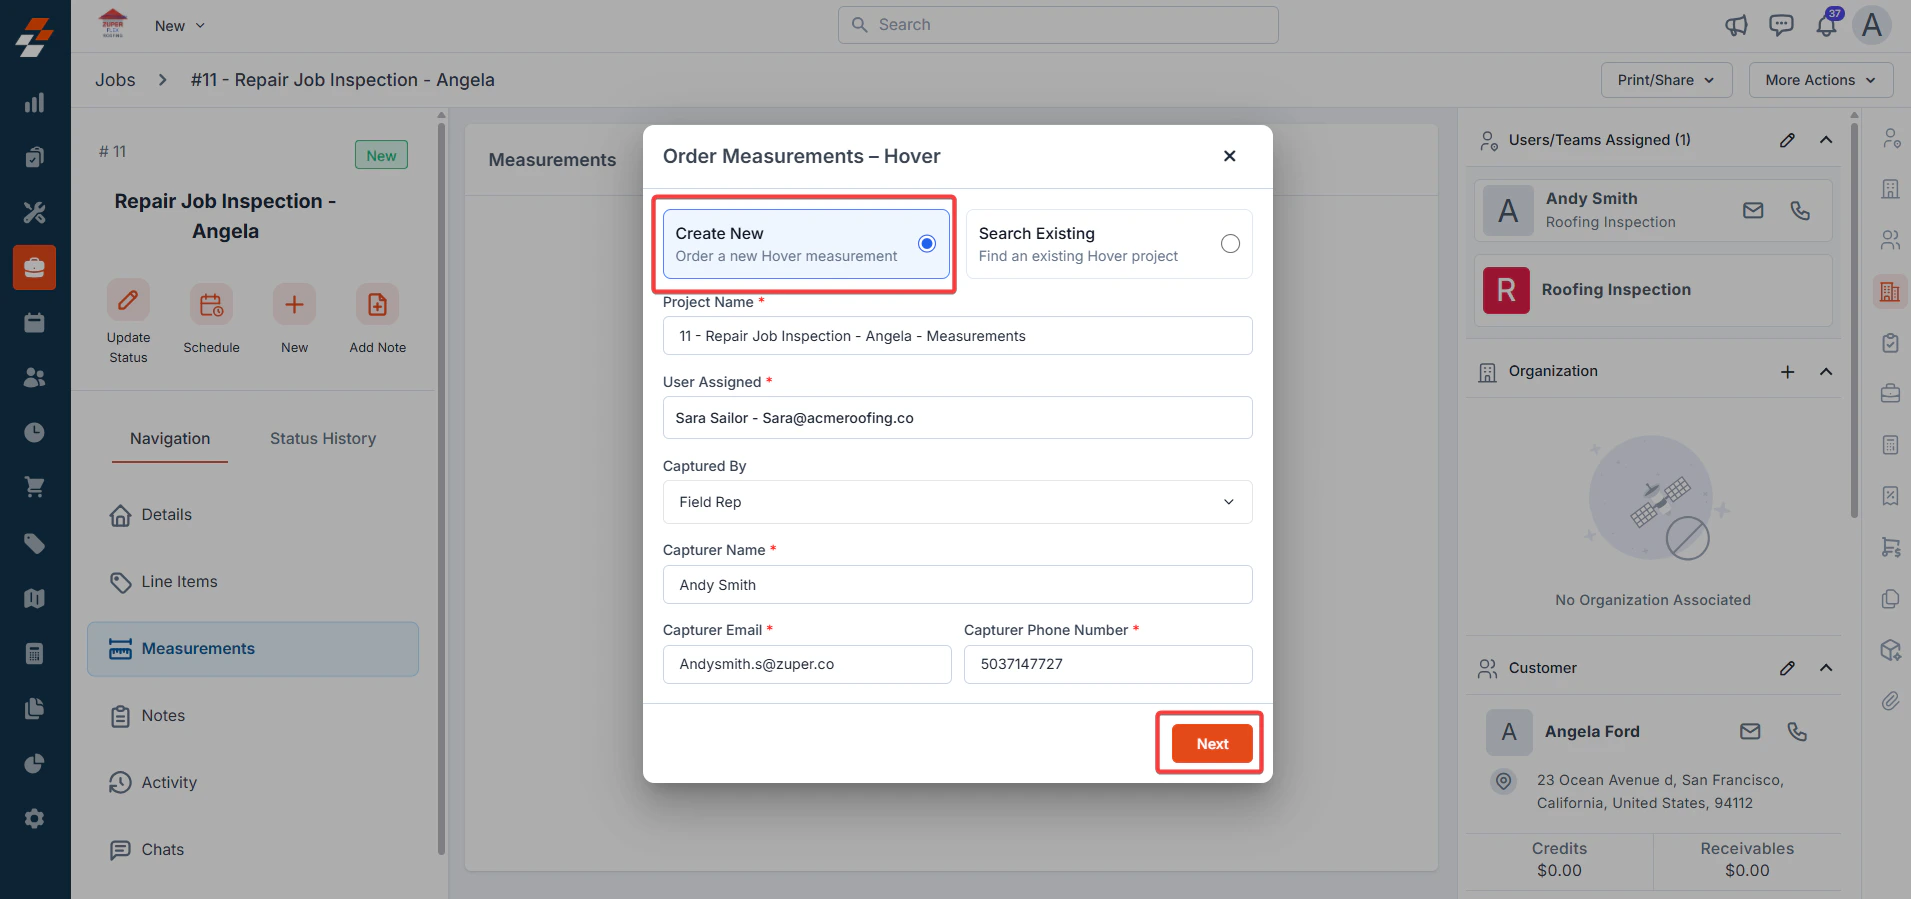
Fill in the following details:
**Project Name -** By default, this field is automatically populated with the **Zuper Job Title** (the name you assigned when creating the job, e.g., *“Smith Residence – Roof Replacement”*).
**Capture By** – Choose who will capture the property images in Hover:
* **Field Rep**
* Auto-fills with the assigned field rep’s name, email, and phone number.
* Use this if your on-site crew will capture images through the Hover app.
* **Homeowner**
* Auto-fills with the customer’s contact information stored in Zuper.
* Helpful when you want the homeowner to take their own property photos through Hover.
* **Professional**
* Manually enter the contact information of another professional (e.g., subcontractor or estimator).
* Use this if someone outside your team will handle the image capture.
**Note**: The homeowner will receive an email/text invitation to capture images directly from their device.
* **Deliverable Type** – Defaults to “**Roof** Only.”
### **Option 1: Create New Measurement**
Fill in the following details:
**Project Name -** By default, this field is automatically populated with the **Zuper Job Title** (the name you assigned when creating the job, e.g., *“Smith Residence – Roof Replacement”*).
**Capture By** – Choose who will capture the property images in Hover:
* **Field Rep**
* Auto-fills with the assigned field rep’s name, email, and phone number.
* Use this if your on-site crew will capture images through the Hover app.
* **Homeowner**
* Auto-fills with the customer’s contact information stored in Zuper.
* Helpful when you want the homeowner to take their own property photos through Hover.
* **Professional**
* Manually enter the contact information of another professional (e.g., subcontractor or estimator).
* Use this if someone outside your team will handle the image capture.
**Note**: The homeowner will receive an email/text invitation to capture images directly from their device.
* **Deliverable Type** – Defaults to “**Roof** Only.”
 * **Service Address** - Pulled from the Zuper job. To make changes, the service address must be updated directly in the job.
✅ After reviewing all fields, click **Submit**.\
The new measurement request will appear in the Measurement tab as **Pending**.
* **Service Address** - Pulled from the Zuper job. To make changes, the service address must be updated directly in the job.
✅ After reviewing all fields, click **Submit**.\
The new measurement request will appear in the Measurement tab as **Pending**.
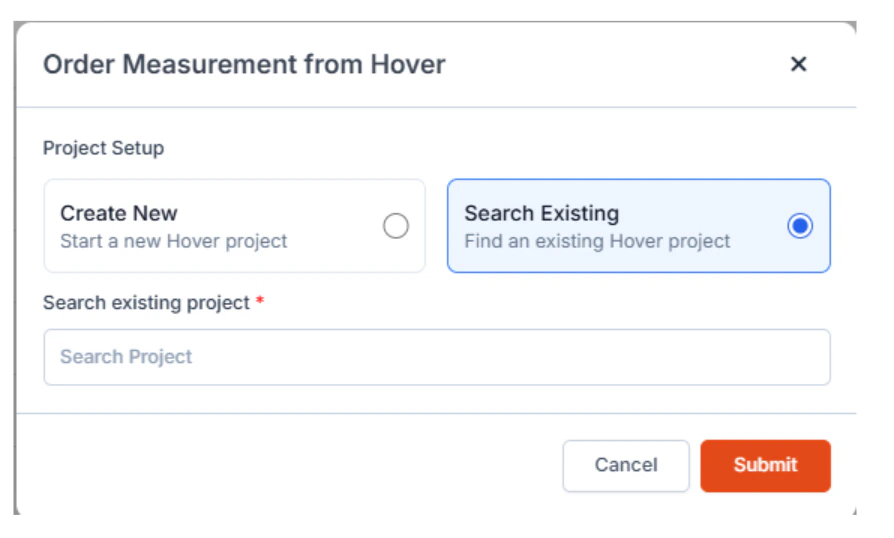
 ### Option 2: Select an Existing Project
If you’ve already created a Hover project for the property, you can link it instead of starting fresh:
1. The service address auto-fills in the search bar.
2. Hover displays all matching projects for that address.
3. Select the desired project.
4. It instantly syncs with the Zuper job.
### Option 2: Select an Existing Project
If you’ve already created a Hover project for the property, you can link it instead of starting fresh:
1. The service address auto-fills in the search bar.
2. Hover displays all matching projects for that address.
3. Select the desired project.
4. It instantly syncs with the Zuper job.
 ## Viewing Synced Measurements
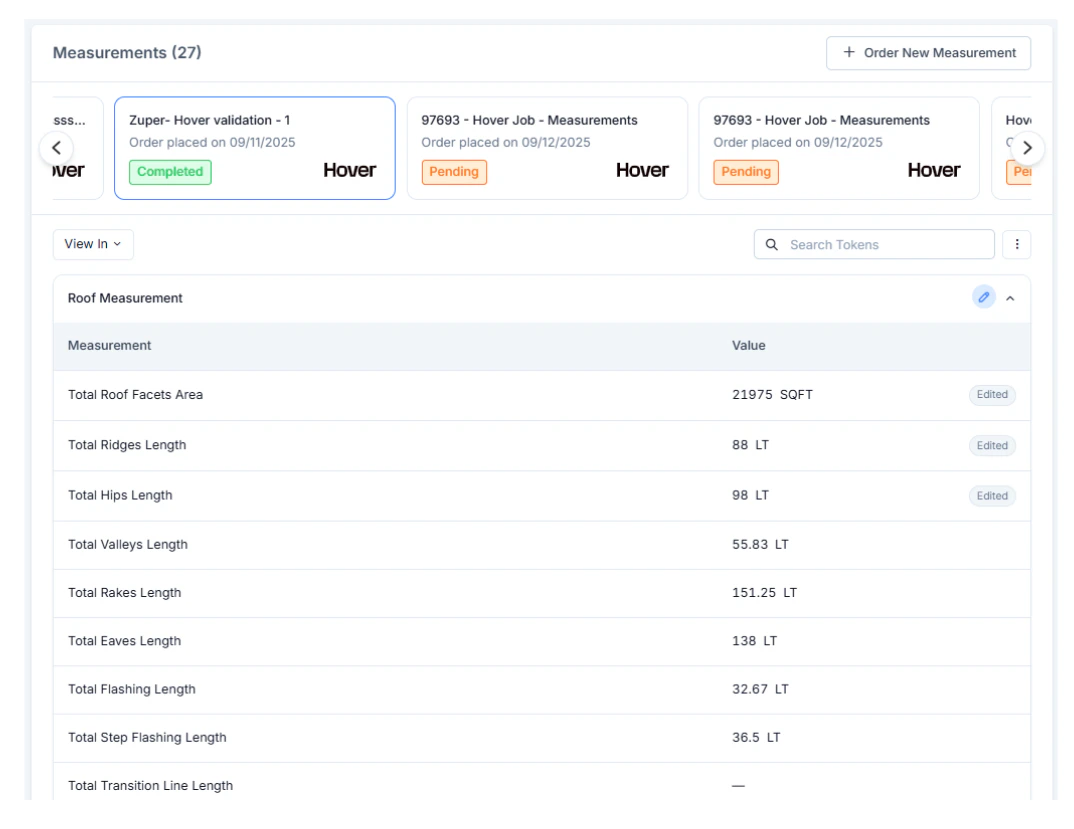
When Hover measurements are available, it automatically syncs to Zuper:
Once measurements are synced back from Hover, you can view and manage them in Zuper.
**Viewing Synced Measurements**
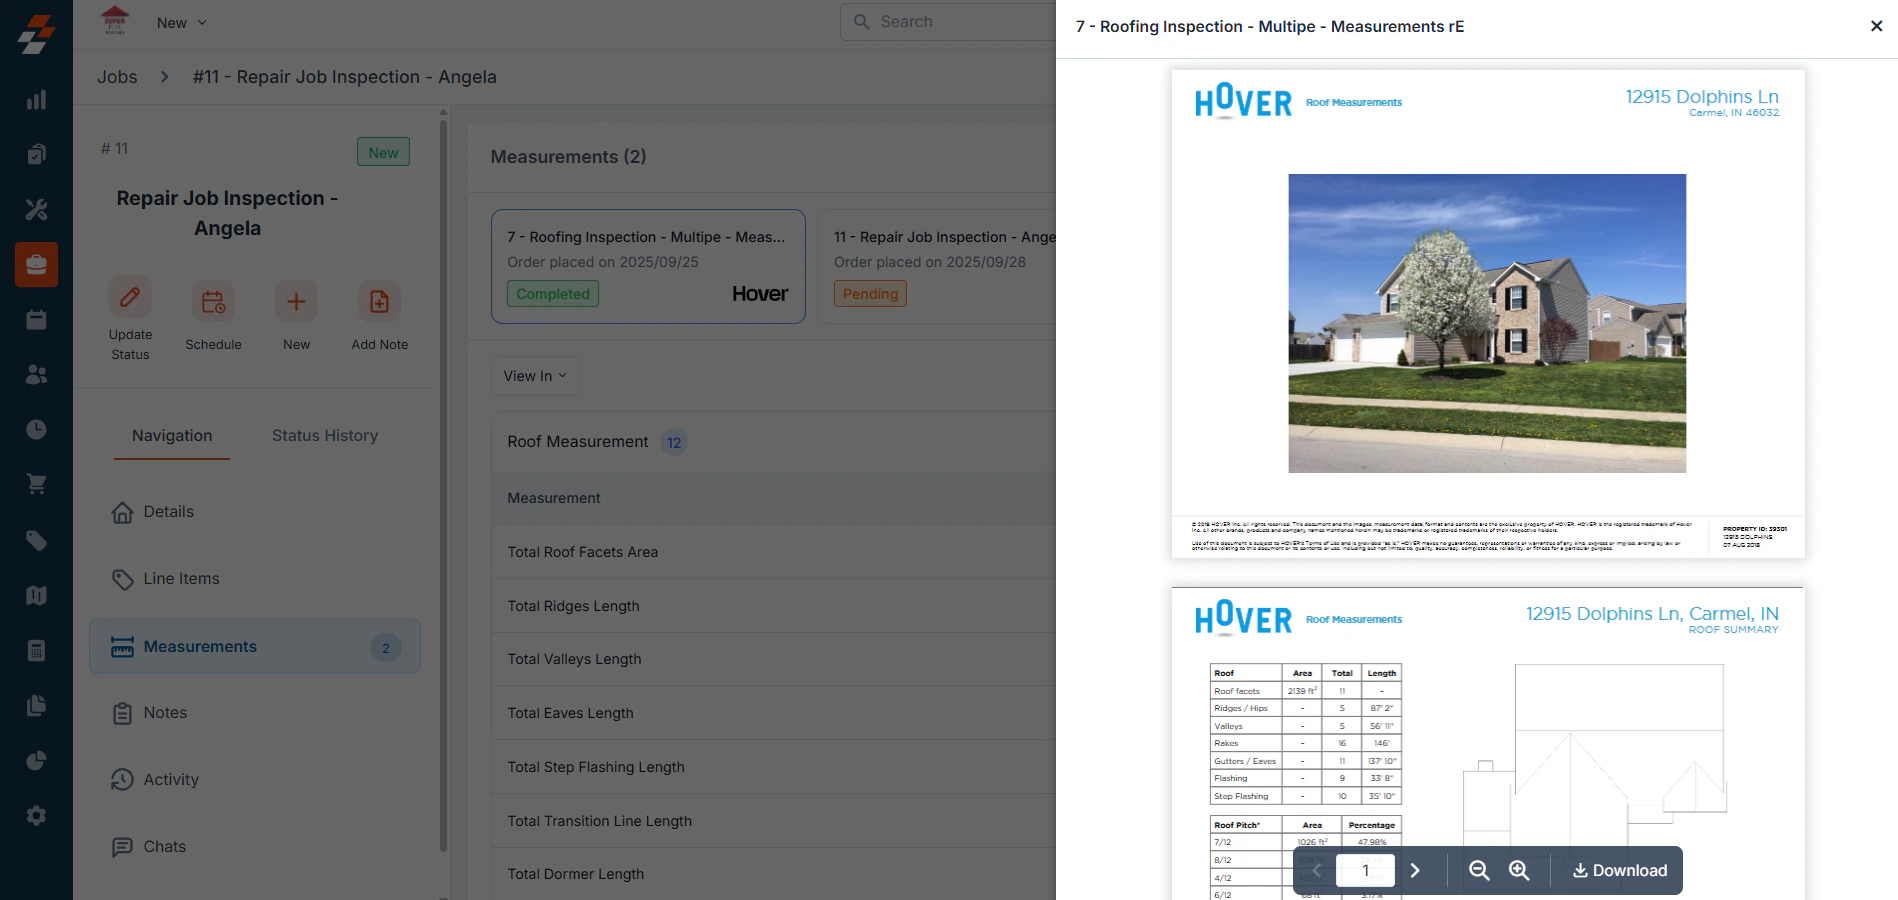
* Go to the **Measurement** tab.
* Click the **Completed Measurement Card**.
* Review synced values mapped to Zuper’s standard measurement tokens.
**Viewing Visual Assets**
* **PDF Reports**: View inline within Zuper.
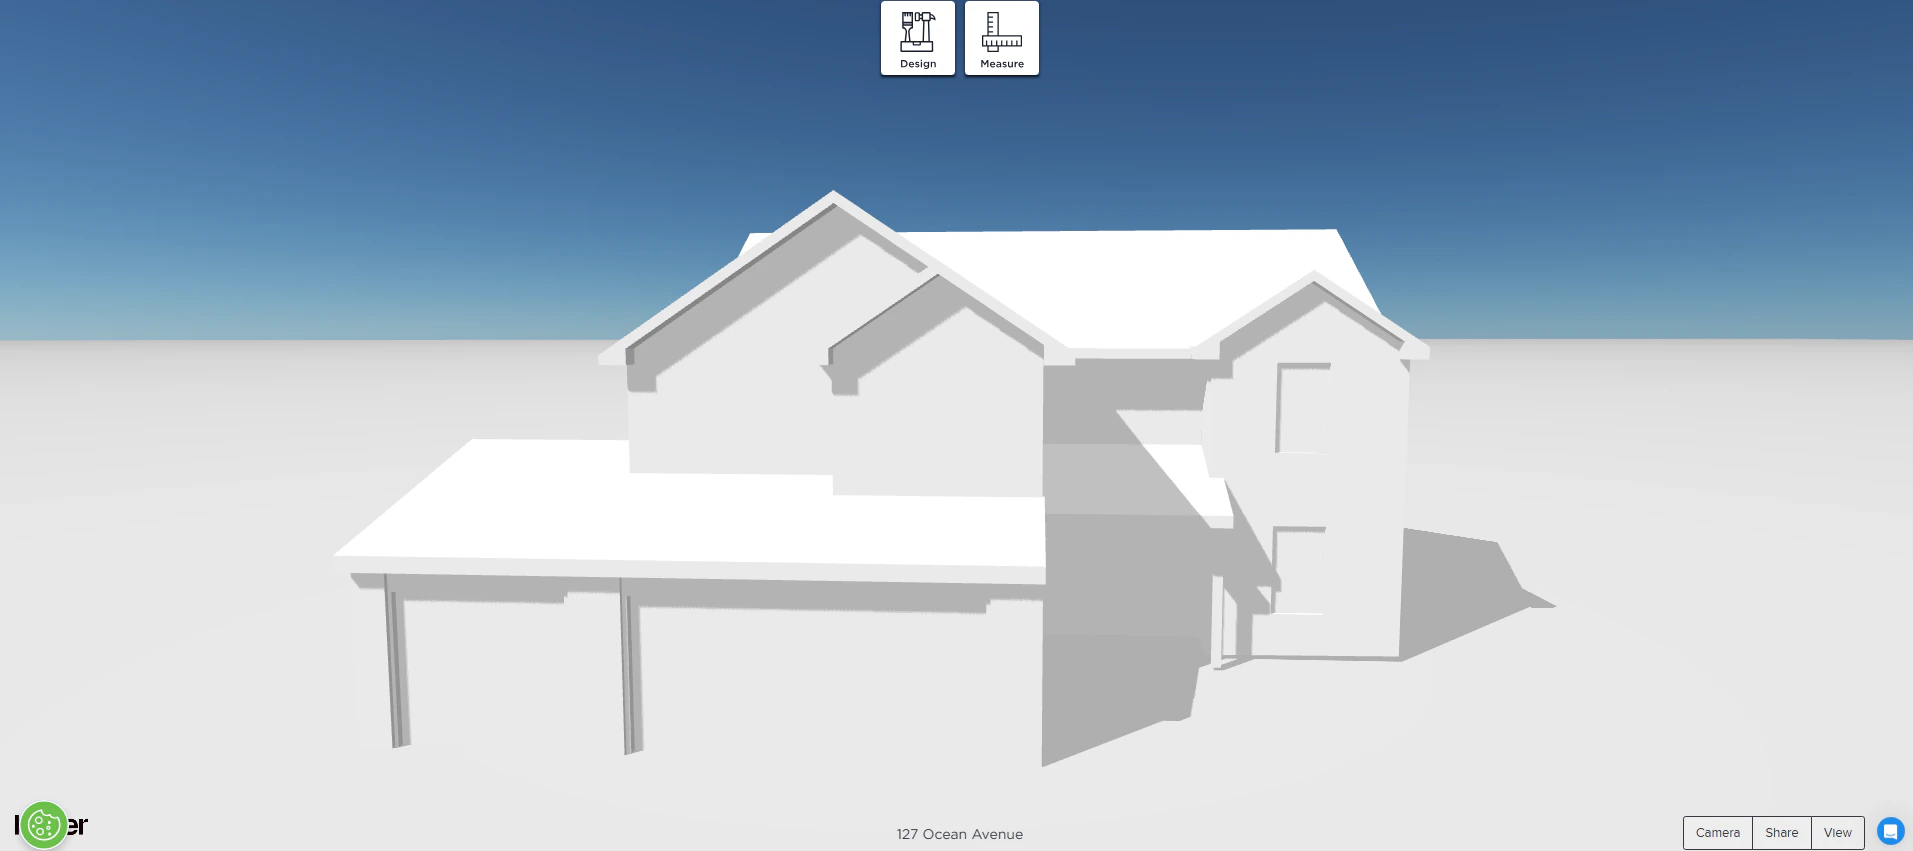
* **3D Models**: Click **View** → opens in Hover (login required).
## Viewing Synced Measurements
When Hover measurements are available, it automatically syncs to Zuper:
Once measurements are synced back from Hover, you can view and manage them in Zuper.
**Viewing Synced Measurements**
* Go to the **Measurement** tab.
* Click the **Completed Measurement Card**.
* Review synced values mapped to Zuper’s standard measurement tokens.
**Viewing Visual Assets**
* **PDF Reports**: View inline within Zuper.
* **3D Models**: Click **View** → opens in Hover (login required).
 **Edit the synced measurements.**
* Click the **✏️ Edit** icon or open the **⋮ menu → Edit**.
* Make your changes and save.
* Edited fields display an “**Edited**” label.
* All edits are logged in **Job Activity**.
**Edit the synced measurements.**
* Click the **✏️ Edit** icon or open the **⋮ menu → Edit**.
* Make your changes and save.
* Edited fields display an “**Edited**” label.
* All edits are logged in **Job Activity**.
 ### **Viewing and Managing Measurements**
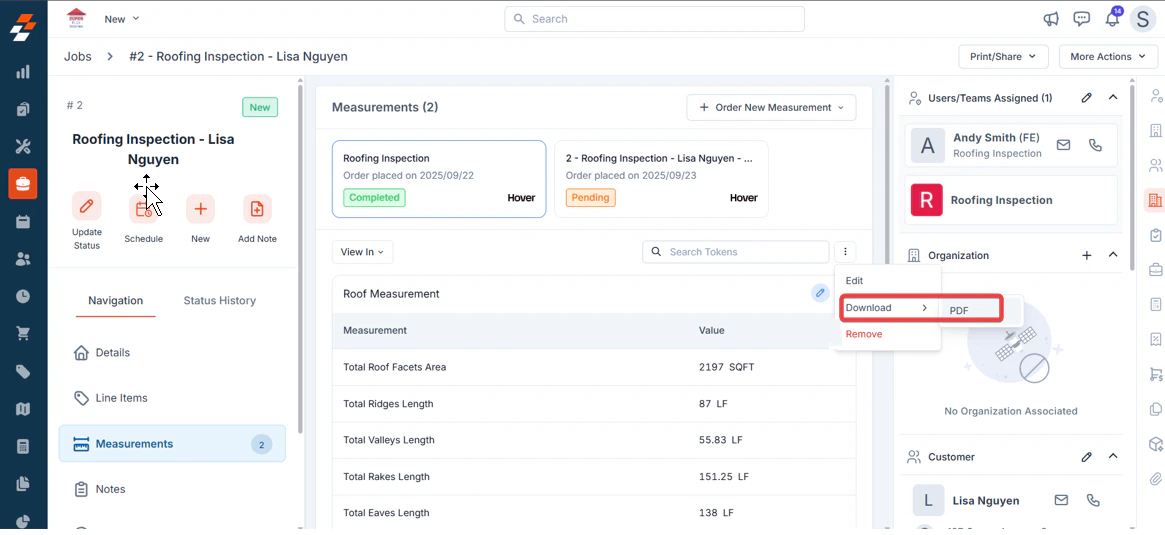
**Downloading Files**
* Open the **⋮ menu** on the Measurement Card and **Download**.
* Save the complete Hover measurement package locally.
### **Viewing and Managing Measurements**
**Downloading Files**
* Open the **⋮ menu** on the Measurement Card and **Download**.
* Save the complete Hover measurement package locally.
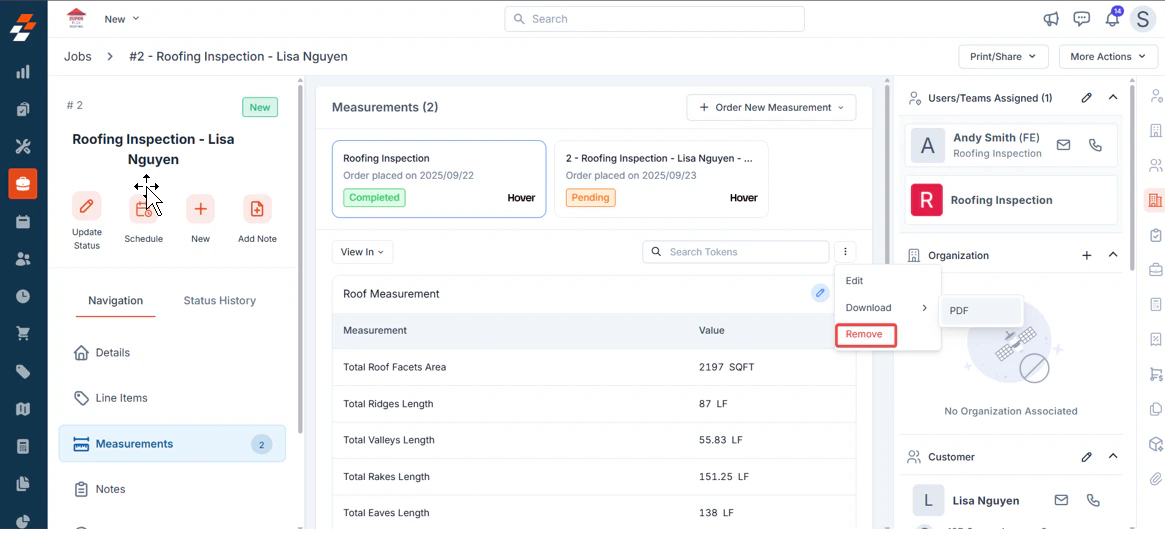
 ### **Removing Measurements**
* Open the **⋮ Menu** → **Remove**.
* Confirm removal.
* Measurement is unlinked from the job, and the action is logged in **Job Activity**.
### **Removing Measurements**
* Open the **⋮ Menu** → **Remove**.
* Confirm removal.
* Measurement is unlinked from the job, and the action is logged in **Job Activity**.
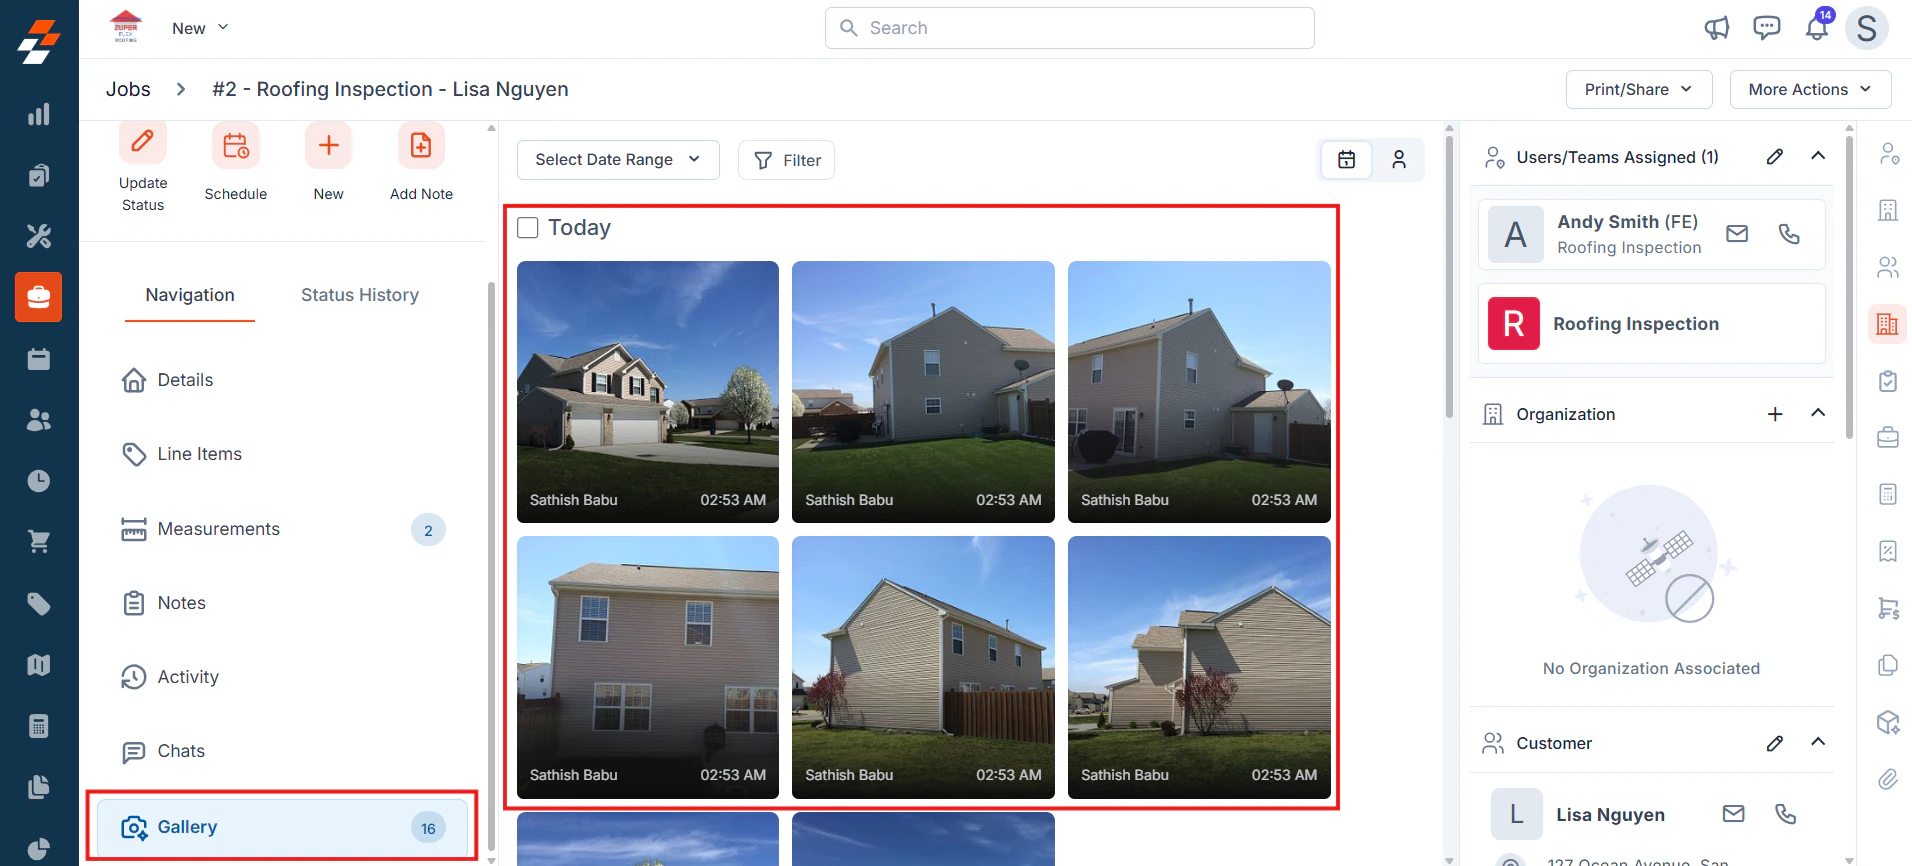
 * Click the “**Gallery**” tab to view all the measurement pictures.
 * Click the “**Activity**” tab to view all the measurement-related activities.
 ## How to Uninstall Hover from Zuper?
1. Click on your Profile Picture in the top right corner of the screen and select the “**App Store**.”
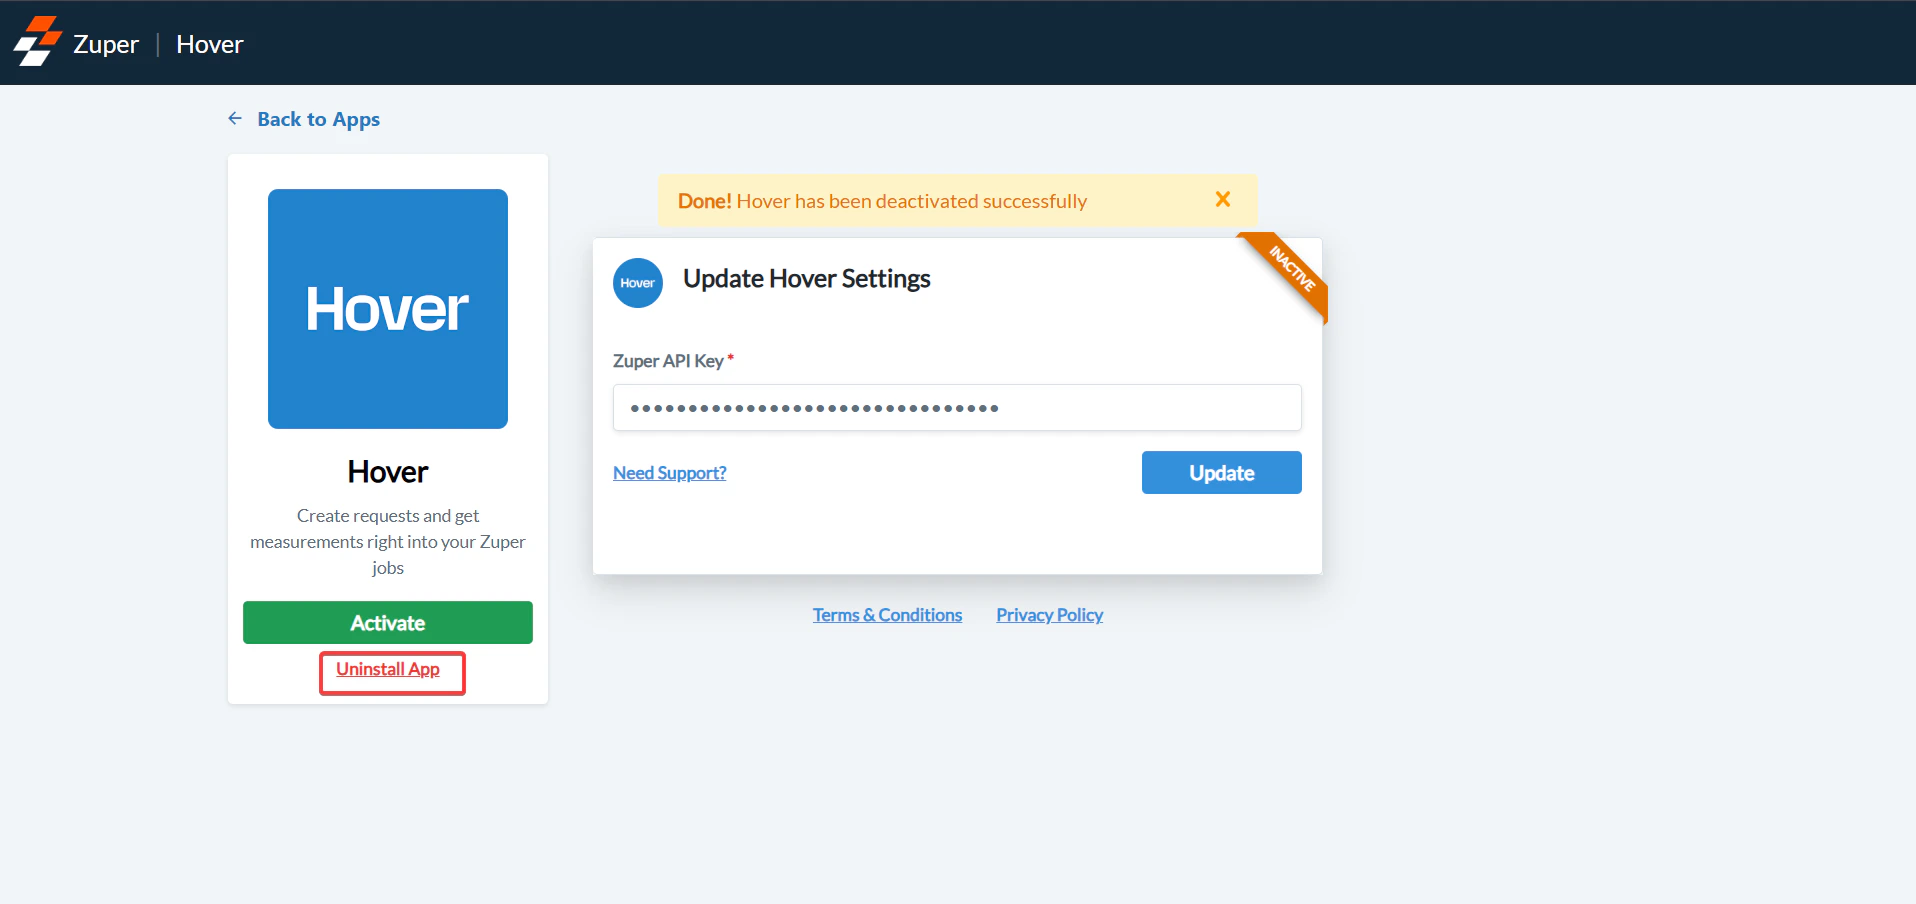
2. Under the “**Browse by Category**,” select the “**Measurements and Estimations**” option and choose “**Hover**.” Click the “**Uninstall App**” button.
## How to Uninstall Hover from Zuper?
1. Click on your Profile Picture in the top right corner of the screen and select the “**App Store**.”
2. Under the “**Browse by Category**,” select the “**Measurements and Estimations**” option and choose “**Hover**.” Click the “**Uninstall App**” button.
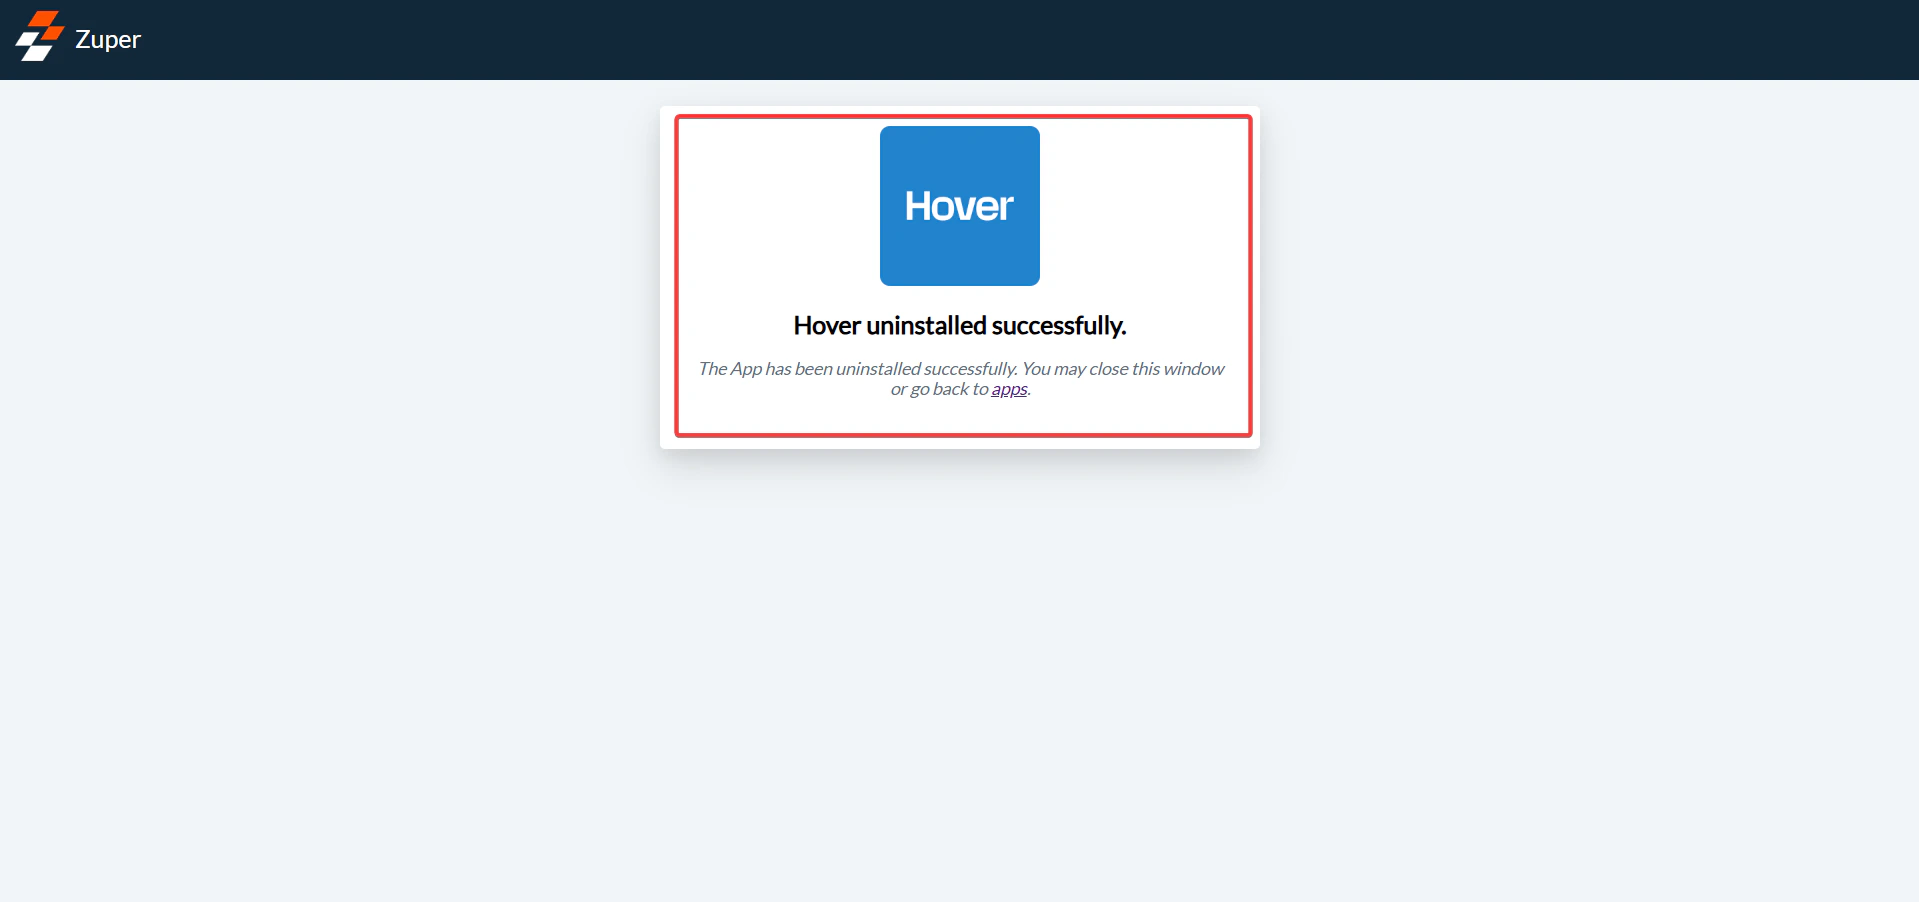
 3. Hover is uninstalled successfully.
 ## Frequently Asked Questions (FAQs)
**Q1: Who can install and configure the Hover integration in Zuper?**
Only Zuper users with Admin privileges can install apps from the App Store. Additionally, the user must be an Administrator in Hover to authenticate during setup.
**Q2: What happens if I enter the wrong API key or email during configuration?**
The integration will fail to sync data. Go back to Settings → App Store → Hover → Configure Settings to correct the details and click Save. You will receive an error to recapture the measurements.
**Q3: Can I link multiple Hover projects to a single Zuper job?**
You can link multiple Hover measurement projects to a single Zuper job.
**Q4: Why don’t I see my existing Hover project when searching?**
Ensure:
The service address in Zuper matches the address in Hover (including unit/apt #).
You’re logged into Hover with an account with access to that project.
**Q5: Are edits made in Zuper synced back to Hover?**
No. Edits in Zuper are local only and do not update the original Hover project.
**Q6: What if a measurement stays “In Progress” for too long?**
You need to reach out to Hover support.
**Q7: Can Field Executives order measurements, or only admins?**
Admins and users with custom role access can order measurements.
**Q8: Will removing a measurement in Zuper remove it in Hover?**
No. Removing a measurement in Zuper only unlinks it from the job. The project remains intact in Hover and can be re-linked later if needed.
**Q9: Where can I view the 3D model of the roof?**
Click View on the Measurement Card, which opens the full 3D model in your browser via the Hover platform. You must be logged into Hover to view it.
## Frequently Asked Questions (FAQs)
**Q1: Who can install and configure the Hover integration in Zuper?**
Only Zuper users with Admin privileges can install apps from the App Store. Additionally, the user must be an Administrator in Hover to authenticate during setup.
**Q2: What happens if I enter the wrong API key or email during configuration?**
The integration will fail to sync data. Go back to Settings → App Store → Hover → Configure Settings to correct the details and click Save. You will receive an error to recapture the measurements.
**Q3: Can I link multiple Hover projects to a single Zuper job?**
You can link multiple Hover measurement projects to a single Zuper job.
**Q4: Why don’t I see my existing Hover project when searching?**
Ensure:
The service address in Zuper matches the address in Hover (including unit/apt #).
You’re logged into Hover with an account with access to that project.
**Q5: Are edits made in Zuper synced back to Hover?**
No. Edits in Zuper are local only and do not update the original Hover project.
**Q6: What if a measurement stays “In Progress” for too long?**
You need to reach out to Hover support.
**Q7: Can Field Executives order measurements, or only admins?**
Admins and users with custom role access can order measurements.
**Q8: Will removing a measurement in Zuper remove it in Hover?**
No. Removing a measurement in Zuper only unlinks it from the job. The project remains intact in Hover and can be re-linked later if needed.
**Q9: Where can I view the 3D model of the roof?**
Click View on the Measurement Card, which opens the full 3D model in your browser via the Hover platform. You must be logged into Hover to view it.