> ## Documentation Index
> Fetch the complete documentation index at: https://zuperinc-section23.mintlify.site/llms.txt
> Use this file to discover all available pages before exploring further.
# Data Import
The All-new Data Import feature in Zuper is designed to simplify and accelerate the process of importing data into the platform, whether you're setting up a new account or managing ongoing operations. This powerful tool allows you to upload essential master data or transaction data directly into Zuper with ease and precision.
**Navigation**: *Settings -> Data Administration -> Data Import*
With the new wizard experience, you can seamlessly complete the steps required to start the import, which is detailed below:
## Step 1: Import Type Selection
We must choose how to import data in this initial step. You can select one of the following options:
**Option 1**: Import using the file or
**Option 2**: Use Saved Template
Select "**Import using file**" to upload a new file from your device, as shown in this example.
 **Module Selection**
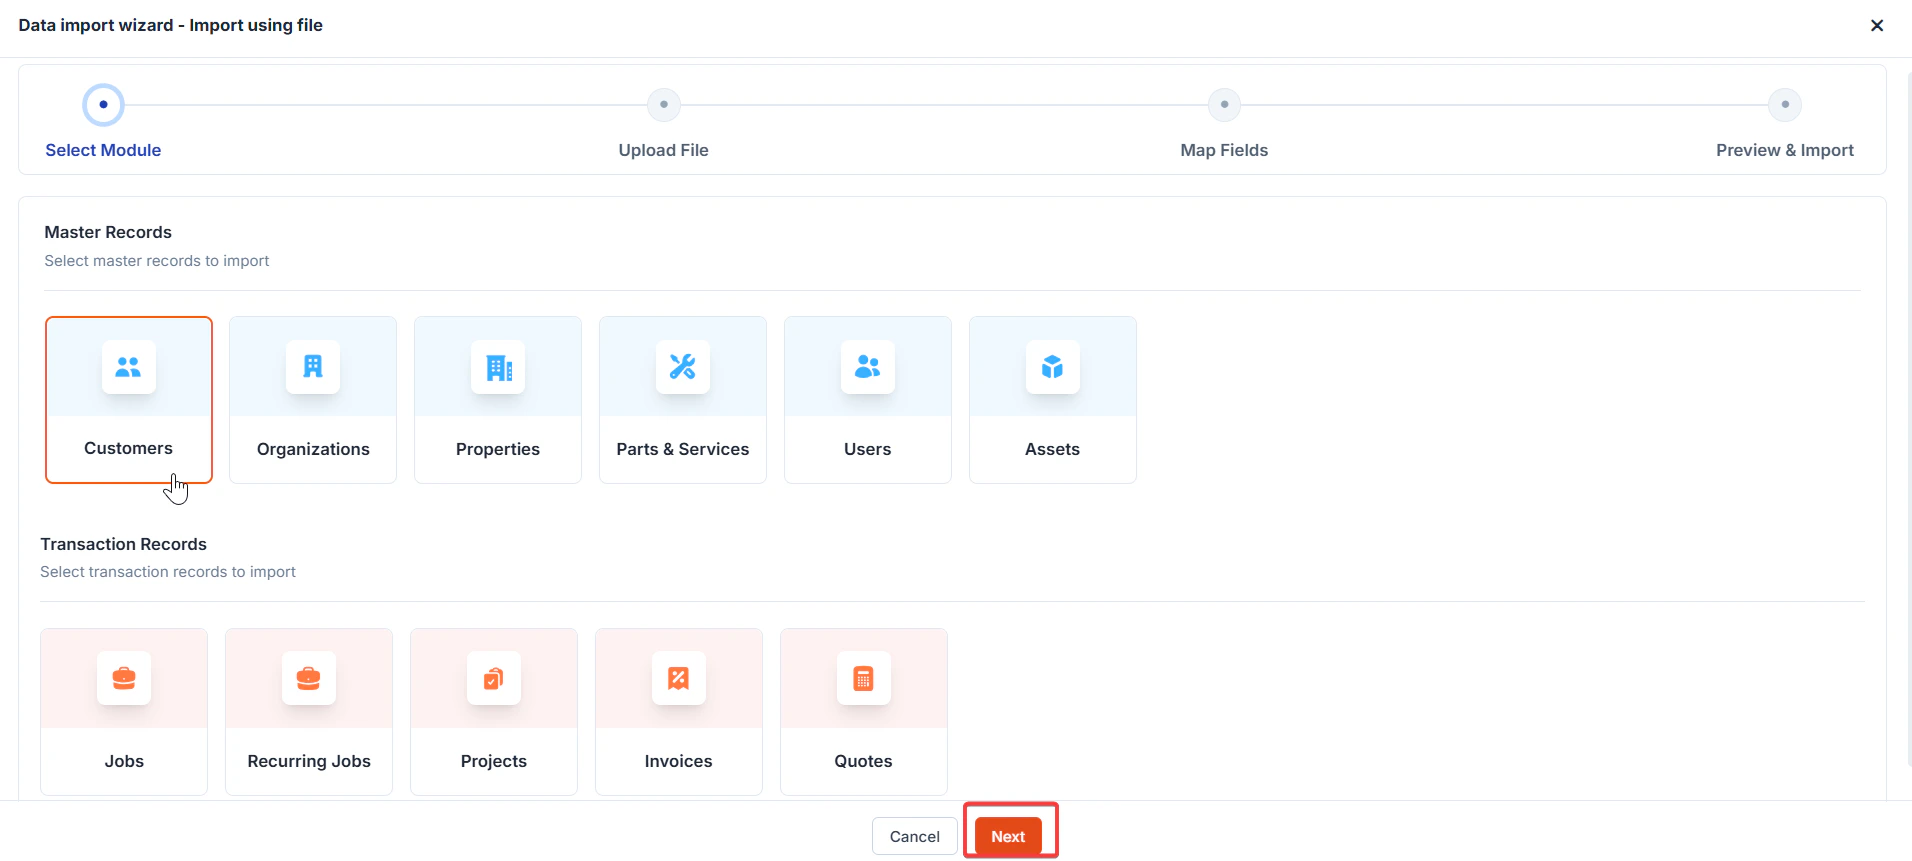
## Step 2: Module Selection
This step lets you choose the module(s) for your data import. Modules are categorized into Master Data and Transaction Data, with specific associations and requirements.
### **Master Data Modules**
Master data modules can be imported independently and associated with other modules. Below is a table of available master data modules and their associations:
| Primary module | Can be selected with (Associated) |
| -------------------------- | ---------------------------------------------- |
| Customers | Organizations |
| Organizations | NA |
| Properties, Customers | Organizations |
| Products, Parts & Services | None |
| Users | None |
| Assets | Customers, Products, Properties, Organizations |
Note: There are no mandatory associations for master data imports. Each module can be created independently.
First-Time Setup Tip: If setting up an account for the first time, consider importing customers, organizations, and properties before importing transaction data like jobs or projects.
### Transaction Data Modules
Transaction data modules often require associated modules and mandatory selections. Below is a table of transaction data modules:
| Primary module | **Can be selected with (Associated)** | **Required Selection** |
| :------------- | :------------------------------------------------------- | :------------------------- |
| Jobs | Customers, Organizations, Assets, Line Items, Properties | Customers |
| Recurring Jobs | Customers, Organizations, Line Items, Properties | Organizations |
| Projects | Customers, Organizations, Properties, Assets, Contracts | Properties, Customers |
| Requests | Customers, Organizations | Products, Parts & Services |
| Invoices | Customers, Organizations, Line Items, Properties | Users |
| Quotes | Customers, Organizations, Line Items | Assets |
* Key Requirement: When importing transaction data (e.g., Jobs), mandatory fields from required associated modules (e.g., Customer Email for Customers) must be included in the mapping to create or merge records.
**Associations**
* When importing multiple associated modules (e.g., Properties and Customers), please ensure that the unique field for the associated modules are mapped.
* Zuper supports one-to-many and many-to-many associations:
o Example: One Customer can be linked to multiple Properties. If a Customer Email appears in two rows of Property data, that Customer will be associated with both Properties upon import.
In this step, select the module for Import, which can be a master or transaction module. For example, Select the “**Customers**” module and click the “**Next**” button.
**Module Selection**
## Step 2: Module Selection
This step lets you choose the module(s) for your data import. Modules are categorized into Master Data and Transaction Data, with specific associations and requirements.
### **Master Data Modules**
Master data modules can be imported independently and associated with other modules. Below is a table of available master data modules and their associations:
| Primary module | Can be selected with (Associated) |
| -------------------------- | ---------------------------------------------- |
| Customers | Organizations |
| Organizations | NA |
| Properties, Customers | Organizations |
| Products, Parts & Services | None |
| Users | None |
| Assets | Customers, Products, Properties, Organizations |
Note: There are no mandatory associations for master data imports. Each module can be created independently.
First-Time Setup Tip: If setting up an account for the first time, consider importing customers, organizations, and properties before importing transaction data like jobs or projects.
### Transaction Data Modules
Transaction data modules often require associated modules and mandatory selections. Below is a table of transaction data modules:
| Primary module | **Can be selected with (Associated)** | **Required Selection** |
| :------------- | :------------------------------------------------------- | :------------------------- |
| Jobs | Customers, Organizations, Assets, Line Items, Properties | Customers |
| Recurring Jobs | Customers, Organizations, Line Items, Properties | Organizations |
| Projects | Customers, Organizations, Properties, Assets, Contracts | Properties, Customers |
| Requests | Customers, Organizations | Products, Parts & Services |
| Invoices | Customers, Organizations, Line Items, Properties | Users |
| Quotes | Customers, Organizations, Line Items | Assets |
* Key Requirement: When importing transaction data (e.g., Jobs), mandatory fields from required associated modules (e.g., Customer Email for Customers) must be included in the mapping to create or merge records.
**Associations**
* When importing multiple associated modules (e.g., Properties and Customers), please ensure that the unique field for the associated modules are mapped.
* Zuper supports one-to-many and many-to-many associations:
o Example: One Customer can be linked to multiple Properties. If a Customer Email appears in two rows of Property data, that Customer will be associated with both Properties upon import.
In this step, select the module for Import, which can be a master or transaction module. For example, Select the “**Customers**” module and click the “**Next**” button.
 **File Upload**
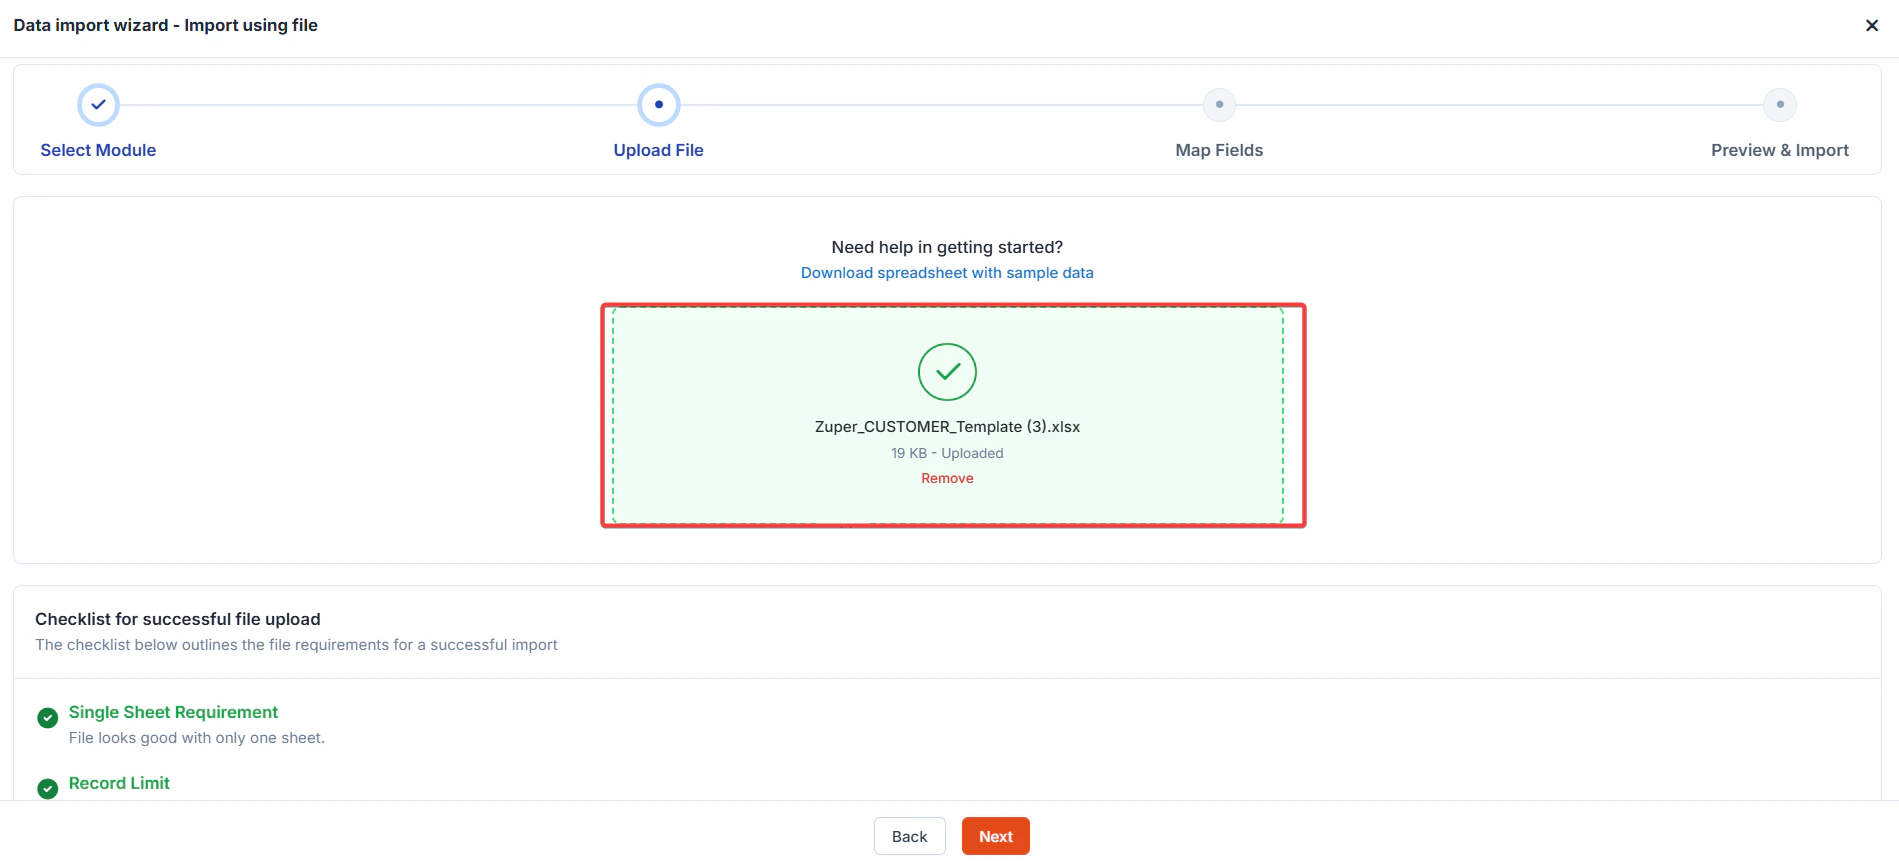
## Step 3: Upload File
Upload your data file with the following requirements:
* File Type: CSV only.
* Size Limit: Maximum 25 MB.
* Row Limit: Maximum 20,000 rows.
* Structure: Single sheet (no sub-sheets).
* Note: These limits are displayed on the upload page.
**File Validation**
After submission, Zuper checks for errors:
* Not in the required format.
* Exceeds file size or row limit.
* Missing column headers.
* Incorrect structure.
* Blank rows within data.
* Locked/password-protected file. You’ll be alerted to correct issues before proceeding if problems are detected.
**Download Template**
* If your data isn’t formatted, download a template for the selected module (single-module imports only).
* After uploading the formatted file, skip mapping and submit directly in Step 4.
Click the “**Download spreadsheet with sample data**” button to download the Excel template in the Upload File screen.
**File Upload**
## Step 3: Upload File
Upload your data file with the following requirements:
* File Type: CSV only.
* Size Limit: Maximum 25 MB.
* Row Limit: Maximum 20,000 rows.
* Structure: Single sheet (no sub-sheets).
* Note: These limits are displayed on the upload page.
**File Validation**
After submission, Zuper checks for errors:
* Not in the required format.
* Exceeds file size or row limit.
* Missing column headers.
* Incorrect structure.
* Blank rows within data.
* Locked/password-protected file. You’ll be alerted to correct issues before proceeding if problems are detected.
**Download Template**
* If your data isn’t formatted, download a template for the selected module (single-module imports only).
* After uploading the formatted file, skip mapping and submit directly in Step 4.
Click the “**Download spreadsheet with sample data**” button to download the Excel template in the Upload File screen.
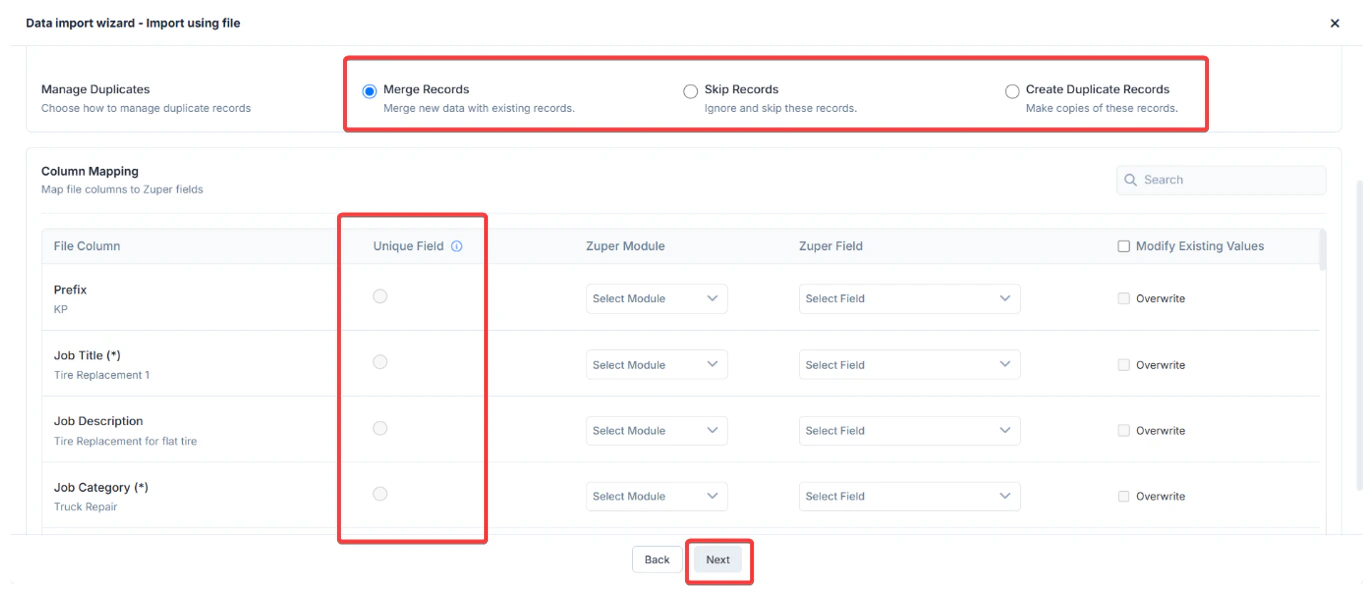
 ## Step 4: Configurations
Configure how your data will be imported, including primary key selection and conflict resolution.
### Primary Key
* Use the “**Unique field**” column to choose a primary key during mapping to identify unique records and prevent duplicates. Note: This only applies to Transaction Modules.
* The primary key validates incoming records against existing data in the system and within the uploaded file.
### Conflict Resolution Options
Select how Zuper handles records with matching primary keys:
1. **Skip**: When a record has the same unique ID as one existing in the system, it skips the record.
2. **Merge**: When a record has the same unique ID as one existing in the system, it updates that record.
3. **Create Duplicates**: When a record has the same unique ID as one existing in the system, it creates a duplicate record.
## Step 4: Configurations
Configure how your data will be imported, including primary key selection and conflict resolution.
### Primary Key
* Use the “**Unique field**” column to choose a primary key during mapping to identify unique records and prevent duplicates. Note: This only applies to Transaction Modules.
* The primary key validates incoming records against existing data in the system and within the uploaded file.
### Conflict Resolution Options
Select how Zuper handles records with matching primary keys:
1. **Skip**: When a record has the same unique ID as one existing in the system, it skips the record.
2. **Merge**: When a record has the same unique ID as one existing in the system, it updates that record.
3. **Create Duplicates**: When a record has the same unique ID as one existing in the system, it creates a duplicate record.
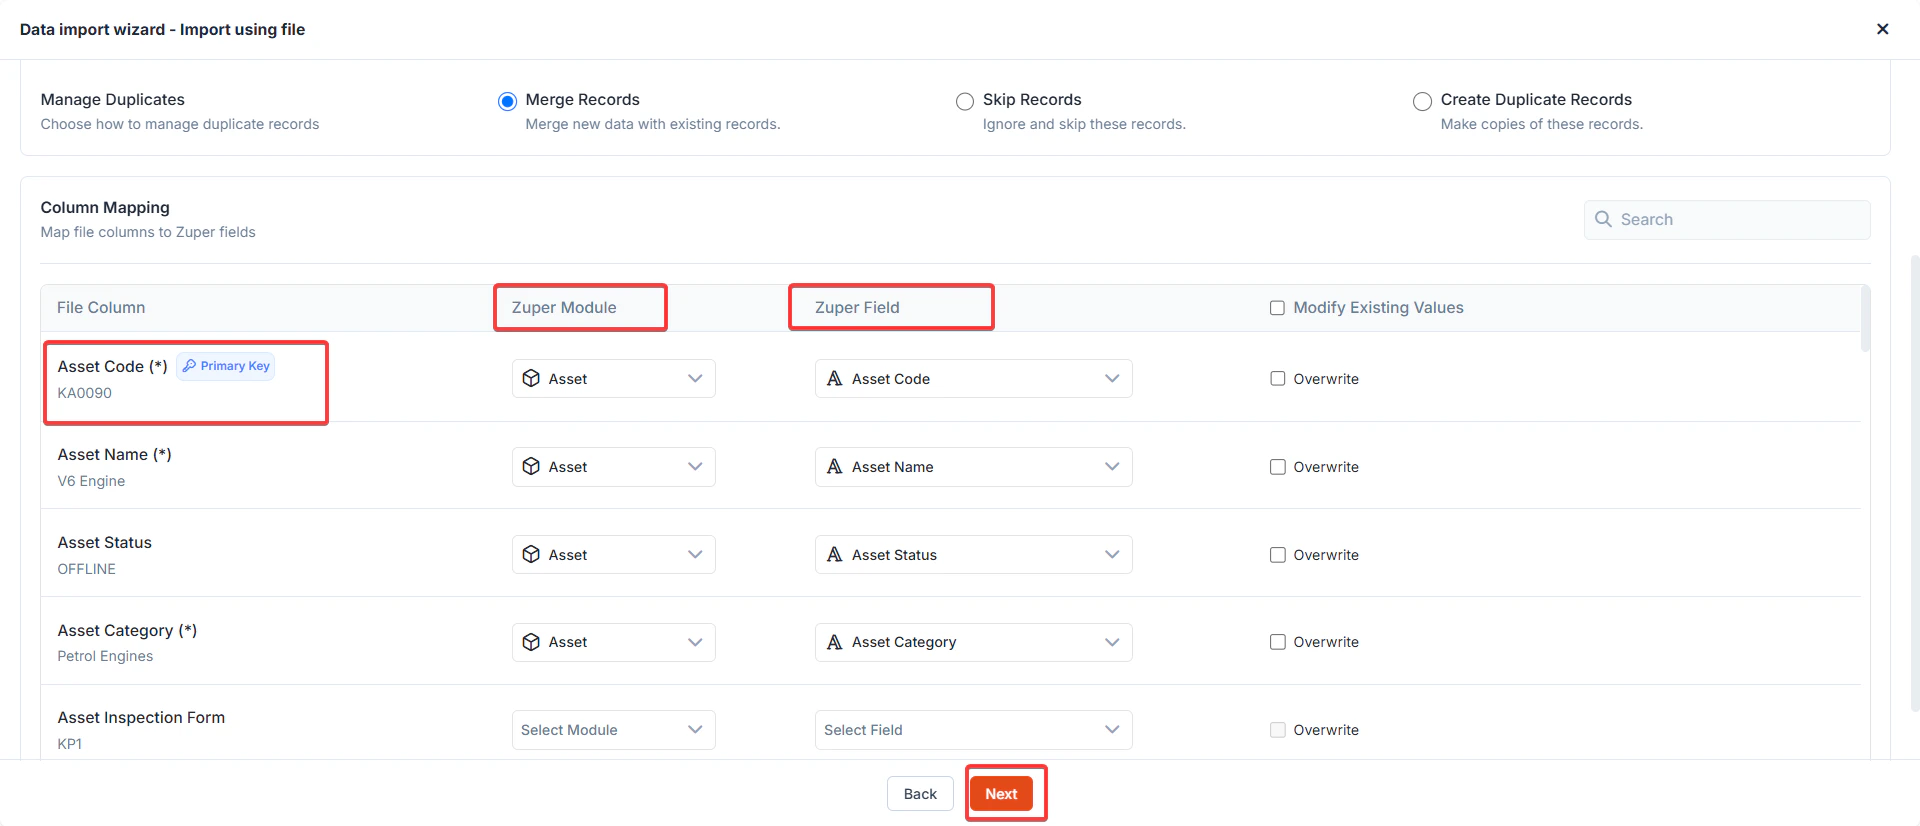 ## Step 5: Data Import – Mapping Table
Map your uploaded file’s columns to Zuper fields using the mapping table.
* **Multi-Module Uploads**: All fields from selected modules appear in the table. Map each “File Column Header” to an “**Import to Field**” after choosing the “**Import in Module**.”
* **Mandatory Fields**: Must be mapped for the import to proceed. Unmapped mandatory fields will block the import and notify the user.
* **Unmapped Columns**: If some columns remain unmapped, confirm whether to proceed with partial mapping.
### Saving Import Templates
* Save your mapping as a template (e.g., “HubSpot Contacts to Customers”) for reuse.
* Specify a name and save it after validation.
### Data Validation
* Mandatory Fields: Ensures all required fields for record creation are mapped.
* Field Values: Validates against acceptable values (e.g., dropdown options).
* Duplicates: Highlights duplicate primary keys in the file.
* Blank Fields: Skips blank values during import.
## Step 5: Data Import – Mapping Table
Map your uploaded file’s columns to Zuper fields using the mapping table.
* **Multi-Module Uploads**: All fields from selected modules appear in the table. Map each “File Column Header” to an “**Import to Field**” after choosing the “**Import in Module**.”
* **Mandatory Fields**: Must be mapped for the import to proceed. Unmapped mandatory fields will block the import and notify the user.
* **Unmapped Columns**: If some columns remain unmapped, confirm whether to proceed with partial mapping.
### Saving Import Templates
* Save your mapping as a template (e.g., “HubSpot Contacts to Customers”) for reuse.
* Specify a name and save it after validation.
### Data Validation
* Mandatory Fields: Ensures all required fields for record creation are mapped.
* Field Values: Validates against acceptable values (e.g., dropdown options).
* Duplicates: Highlights duplicate primary keys in the file.
* Blank Fields: Skips blank values during import.
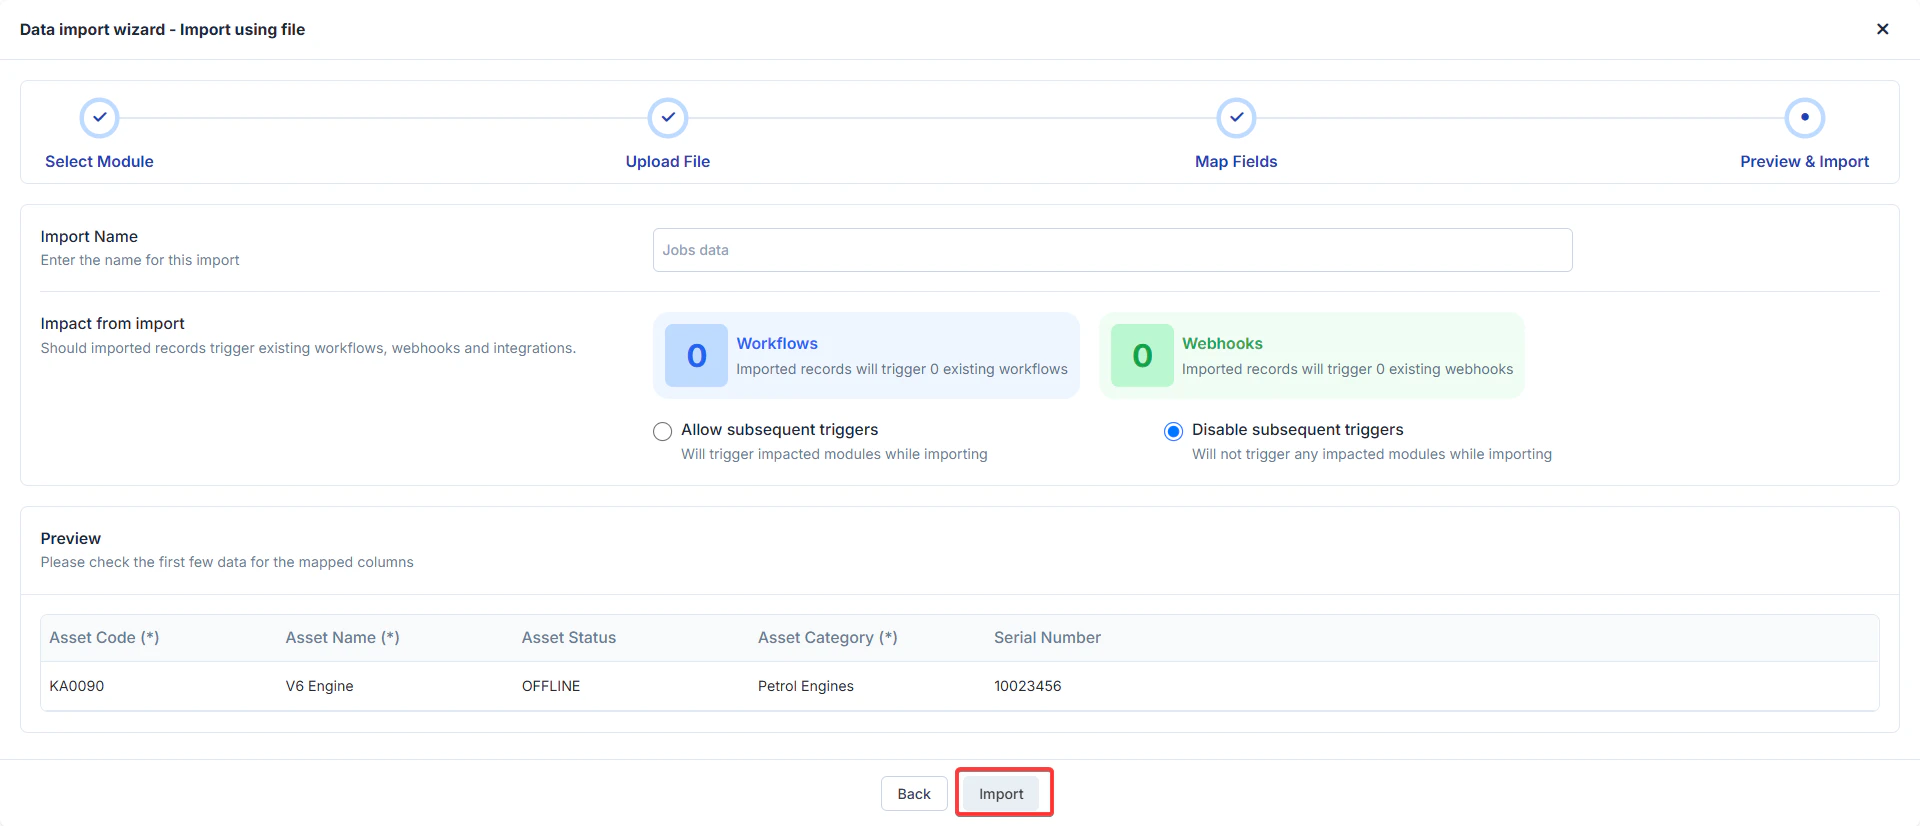
 ### Import Process
Once the mapping is complete, click Import. The process runs asynchronously, and you’ll be notified of the status.
Choose "**Allow subsequent triggers**" to activate existing workflows and webhooks, keeping your data flow dynamic and integrated.
Select "**Disable subsequent triggers**" to prevent unwanted module interactions, ensuring a smooth and focused import process.
### Import Process
Once the mapping is complete, click Import. The process runs asynchronously, and you’ll be notified of the status.
Choose "**Allow subsequent triggers**" to activate existing workflows and webhooks, keeping your data flow dynamic and integrated.
Select "**Disable subsequent triggers**" to prevent unwanted module interactions, ensuring a smooth and focused import process.
 ### Tips for Success
* Ensure your file meets size and row limits.
* Include mandatory fields for primary and associated modules.
* Use templates for repetitive imports to save time.
* Validate data formats (e.g., dropdown values) before uploading.
## Select Module:
In Module Selection, your choice will be recorded.
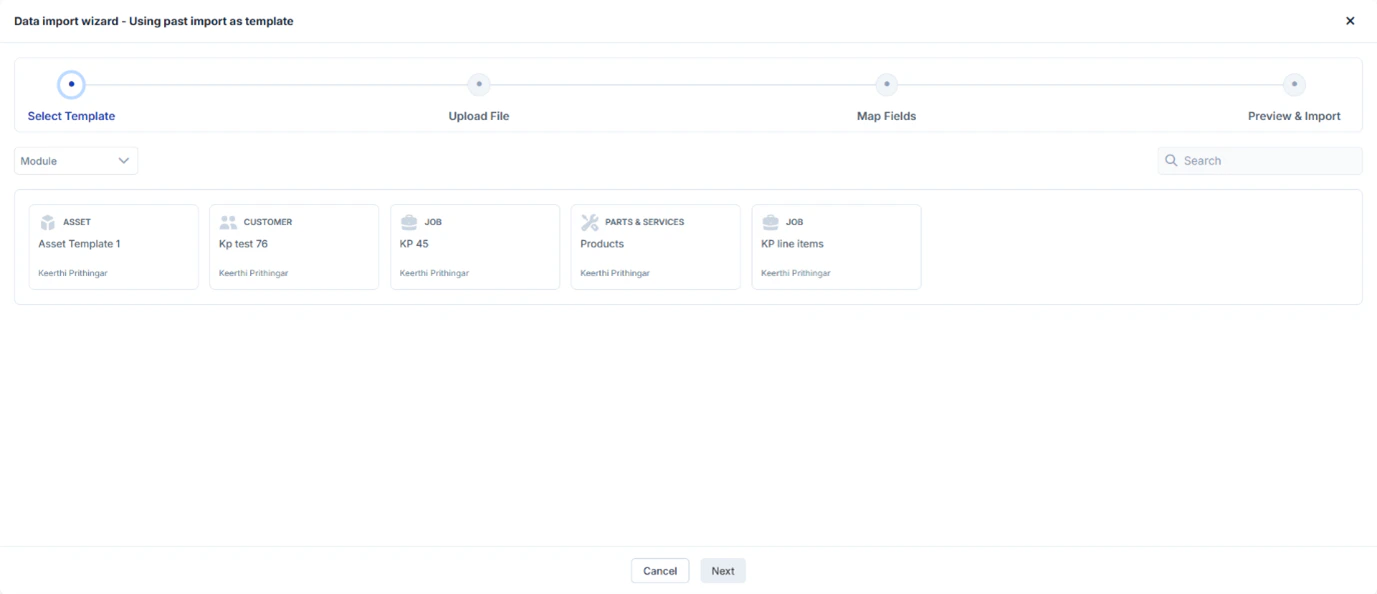
Option 2: Use a Saved Template
* Action: Select "Use a Saved Template" to leverage a previously saved import template.
* Details: A dialog box will display a list of saved templates with the
following columns:
o Template Name: The name you assigned to the template.
o Module Name/s: The module(s) associated with the template.
o Actions: Click "Use Import Template" to proceed.
### Tips for Success
* Ensure your file meets size and row limits.
* Include mandatory fields for primary and associated modules.
* Use templates for repetitive imports to save time.
* Validate data formats (e.g., dropdown values) before uploading.
## Select Module:
In Module Selection, your choice will be recorded.
Option 2: Use a Saved Template
* Action: Select "Use a Saved Template" to leverage a previously saved import template.
* Details: A dialog box will display a list of saved templates with the
following columns:
o Template Name: The name you assigned to the template.
o Module Name/s: The module(s) associated with the template.
o Actions: Click "Use Import Template" to proceed.
 * Next Step: Skips Step 2 and takes you directly to Step 3 Configurations.
o If the uploaded file matches the template’s required format, the mapping in Step 5 will be pre-filled. Otherwise, you’ll be prompted to map fields and proceed manually.
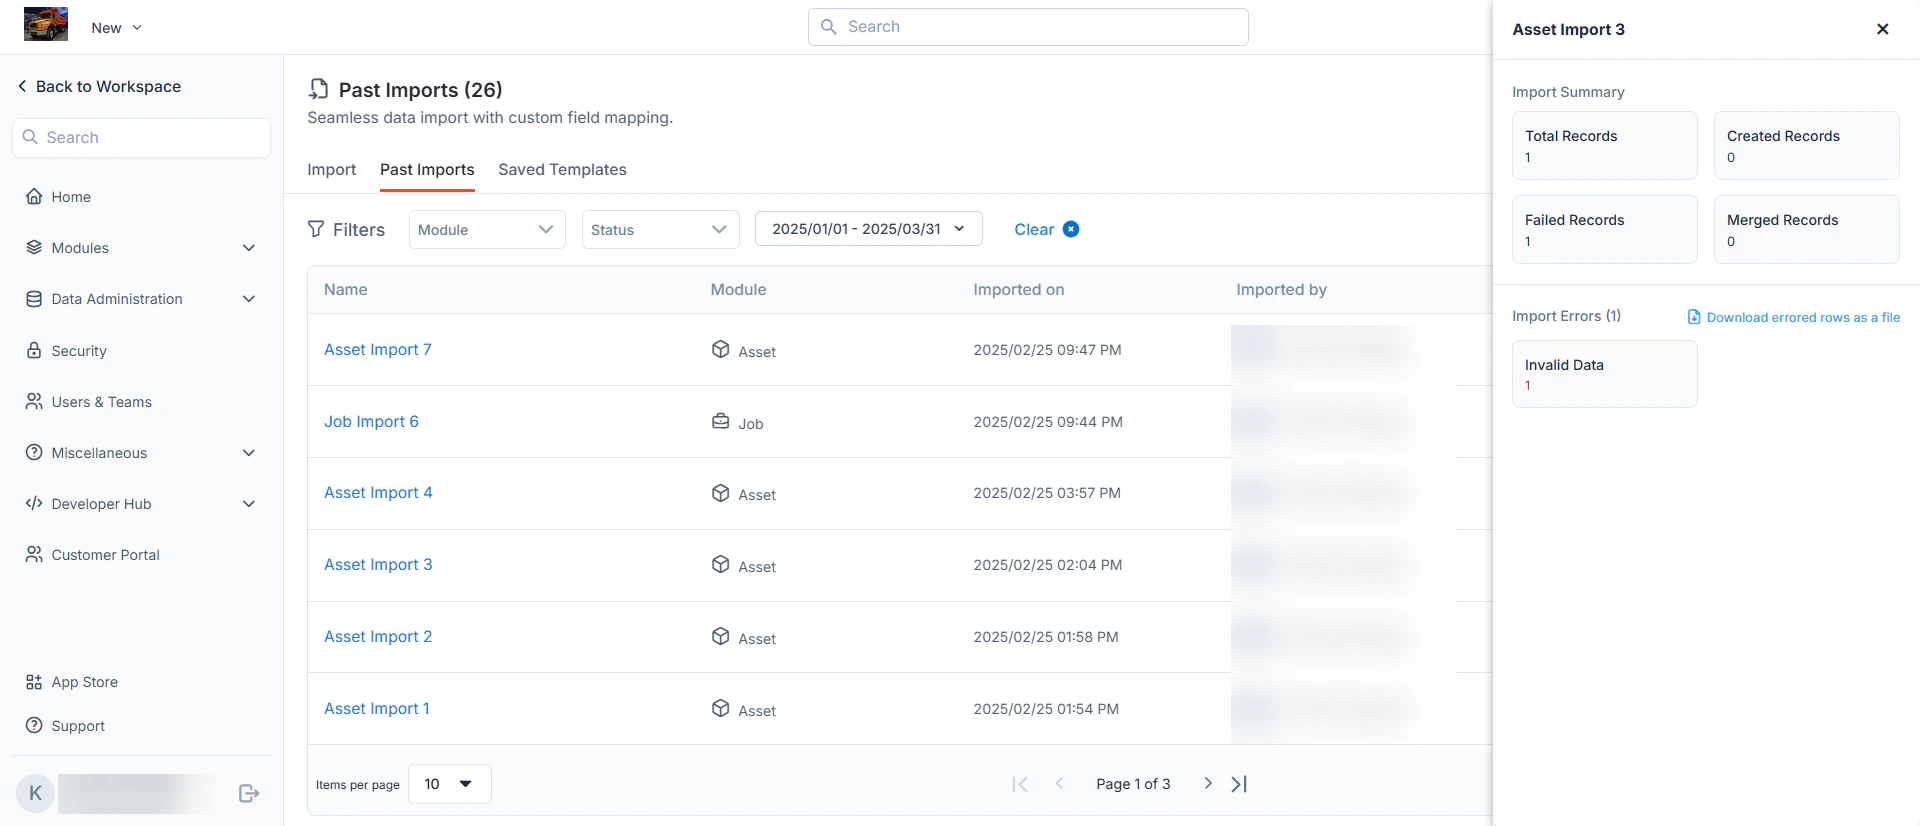
### Past Imports
Zuper Data Import enables you to import data into your workspace effortlessly, utilizing custom field mapping. The "**Past Imports**" section provides a history of your import activities, while the "Import Summary" and **"Import Errors**" sections help you track the success and troubleshoot issues with your imports. This article guides you through managing past imports and resolving data import errors.
### Accessing Past Imports
* Navigate to the Import Section:
o From your Zuper workspace, click on the "**Past Imports**" tab located under the "**Import**" section.
o You’ll see a list of all previous imports with details such as name, module, import date, and the user who performed the import.
View Import Details:
Each entry in the "**Past Imports**" list displays:
* Name: The name of the import (e.g., "Asset Import 3").
* Module: The module associated with the import (e.g.,"Asset").
* Imported On: The date and time of the import (e.g., 2025/02/25 02:04 PM).
* Imported By: The user who initiated the import (e.g., John Wick).
Click an import name to view more details if available.
**Understanding Import Summary**
The "Import Summary" panel provides a quick overview of the import's outcome:
* **Total Records**: The total number of records attempted to be imported (e.g., 1 record).
* **Created Records**: The number of new records successfully created (e.g., 0 records).
* **Failed Records**: The number of records that failed to import (e.g., 1 record).
* **Merged Records**: The number of existing records updated or merged (e.g., 0 records).
**Handling Import Errors**
If an import fails, the "**Import Errors**" section will provide details to help you
troubleshoot:
* Identifying Errors:
o Check the "**Failed Records**" count in the Import Summary.
o The "**Import Errors**" panel will list the number of errors (e.g., 1 error) and the reason (e.g., "Invalid Data").
* Downloading Error Details:
o Click the "**Download errored rows as a file**" link to export a file containing the failed records and error messages.
o Review the file to identify specific issues, such as missing fields, incorrect data formats, or validation errors.
* Common Error Causes and Solutions:
o **Invalid Data**: Ensure all data fields match the required format and contain valid values. For example, check for empty mandatory fields or incorrect date formats.
o **Mapping Issues**: Verify that the custom field mapping aligns with the imported data structure.
o **Duplicate Entries**: Resolve duplicates by ensuring unique identifiers are correctly set.
4. Retrying the Import:
o Correct the errors in your data file based on the downloaded error report.
o Re-upload the corrected file using the "**New**" import option and monitor the results in the "**Past Imports**" section.
## Best Practices
* Regularly review the "**Past Imports**" list to track import history and identify recurring issues.
* Save templates for frequently used imports to streamline the process.
* Clear filters when not in use to ensure you see the full import history.
* Next Step: Skips Step 2 and takes you directly to Step 3 Configurations.
o If the uploaded file matches the template’s required format, the mapping in Step 5 will be pre-filled. Otherwise, you’ll be prompted to map fields and proceed manually.
### Past Imports
Zuper Data Import enables you to import data into your workspace effortlessly, utilizing custom field mapping. The "**Past Imports**" section provides a history of your import activities, while the "Import Summary" and **"Import Errors**" sections help you track the success and troubleshoot issues with your imports. This article guides you through managing past imports and resolving data import errors.
### Accessing Past Imports
* Navigate to the Import Section:
o From your Zuper workspace, click on the "**Past Imports**" tab located under the "**Import**" section.
o You’ll see a list of all previous imports with details such as name, module, import date, and the user who performed the import.
View Import Details:
Each entry in the "**Past Imports**" list displays:
* Name: The name of the import (e.g., "Asset Import 3").
* Module: The module associated with the import (e.g.,"Asset").
* Imported On: The date and time of the import (e.g., 2025/02/25 02:04 PM).
* Imported By: The user who initiated the import (e.g., John Wick).
Click an import name to view more details if available.
**Understanding Import Summary**
The "Import Summary" panel provides a quick overview of the import's outcome:
* **Total Records**: The total number of records attempted to be imported (e.g., 1 record).
* **Created Records**: The number of new records successfully created (e.g., 0 records).
* **Failed Records**: The number of records that failed to import (e.g., 1 record).
* **Merged Records**: The number of existing records updated or merged (e.g., 0 records).
**Handling Import Errors**
If an import fails, the "**Import Errors**" section will provide details to help you
troubleshoot:
* Identifying Errors:
o Check the "**Failed Records**" count in the Import Summary.
o The "**Import Errors**" panel will list the number of errors (e.g., 1 error) and the reason (e.g., "Invalid Data").
* Downloading Error Details:
o Click the "**Download errored rows as a file**" link to export a file containing the failed records and error messages.
o Review the file to identify specific issues, such as missing fields, incorrect data formats, or validation errors.
* Common Error Causes and Solutions:
o **Invalid Data**: Ensure all data fields match the required format and contain valid values. For example, check for empty mandatory fields or incorrect date formats.
o **Mapping Issues**: Verify that the custom field mapping aligns with the imported data structure.
o **Duplicate Entries**: Resolve duplicates by ensuring unique identifiers are correctly set.
4. Retrying the Import:
o Correct the errors in your data file based on the downloaded error report.
o Re-upload the corrected file using the "**New**" import option and monitor the results in the "**Past Imports**" section.
## Best Practices
* Regularly review the "**Past Imports**" list to track import history and identify recurring issues.
* Save templates for frequently used imports to streamline the process.
* Clear filters when not in use to ensure you see the full import history.