> ## Documentation Index
> Fetch the complete documentation index at: https://zuperinc-section23.mintlify.site/llms.txt
> Use this file to discover all available pages before exploring further.
# Configuring Expenses
In Zuper, users can easily upload and record expense receipts against a job. This feature enables seamless expense reporting, allowing you to specify whether the expenses are billable to your customer and reimbursable for your team.
## Prerequisites:
1. Expense is only available on the V3 Web app. If you use V2, you can get started with V3 using the link below. Your login credentials will be the same as those for V2: V3 Live (Production) - [https://web.zuperpro.com/login](https://web.zuperpro.com/login).
2. To enable the Expense for your account, please contact the account admin or email [support@zuper.co](mailto:support@zuper.co).
## User roles and permissions
The actions a user can perform in the Expense feature are determined by their assigned custom roles and permissions. Permissions are set by the admin under **Settings** > **Users & Teams** > **Custom Roles** > **Role's**> **Jobs** and include:
1. Create Expense
2. Edit Expense
3. View Expense
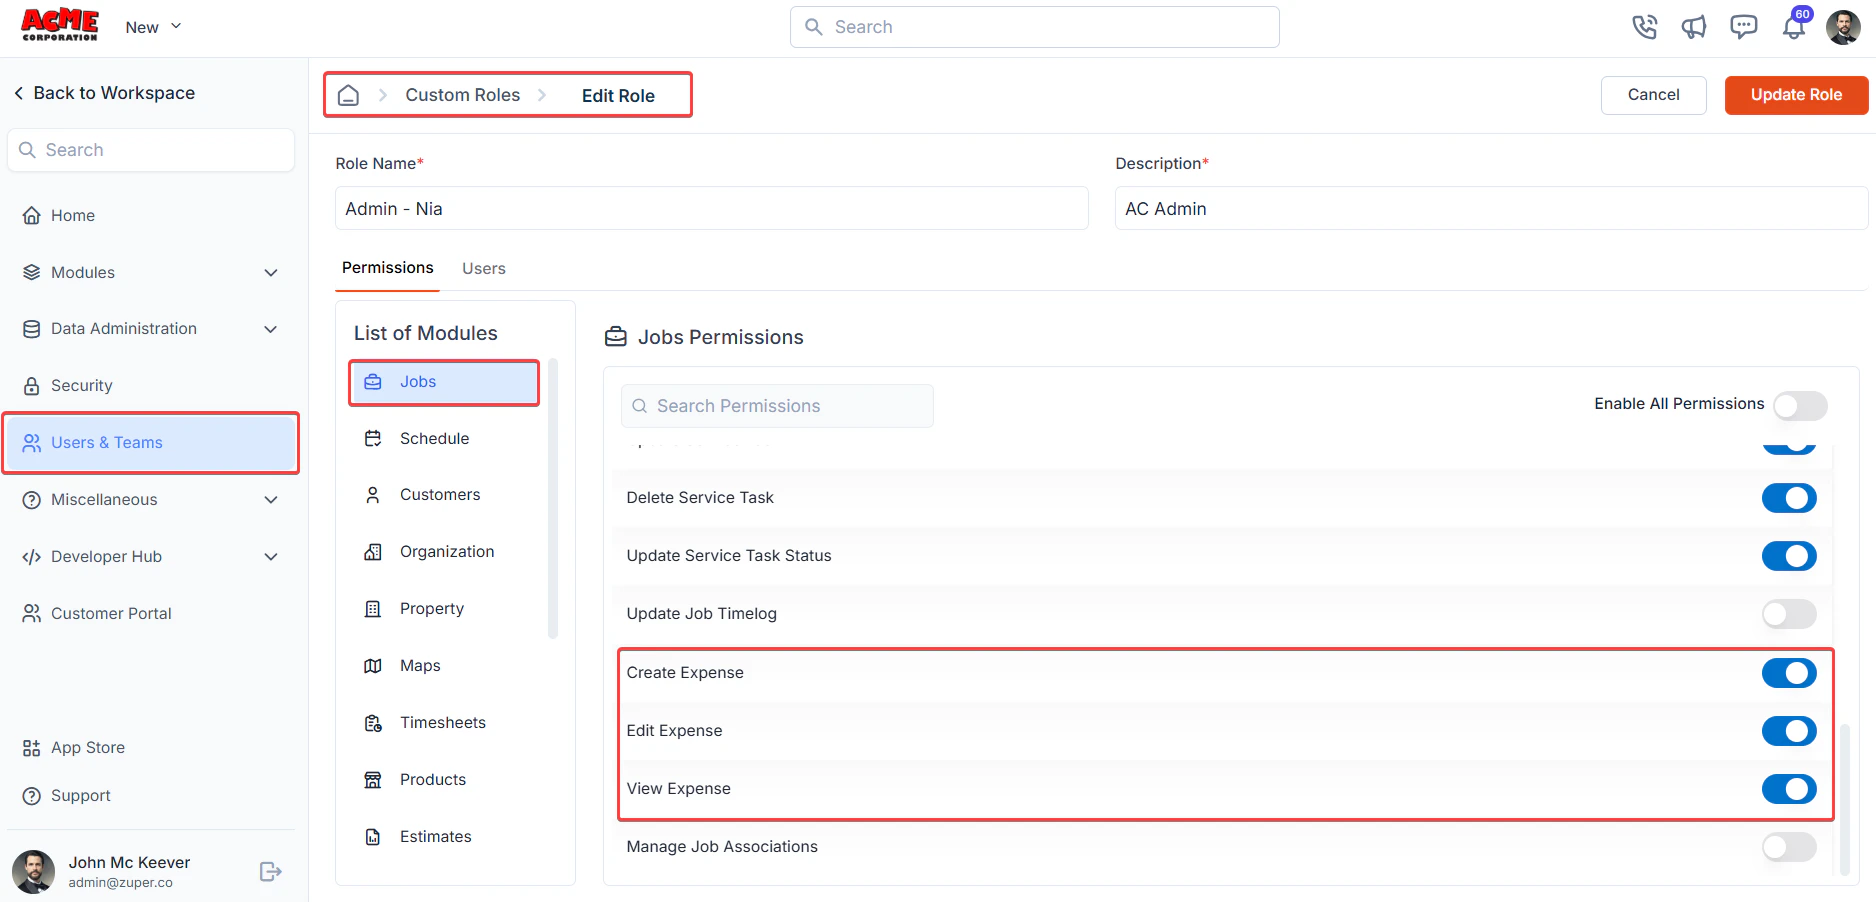 Admins can customize these permissions to meet organizational needs, ensuring appropriate access for each user role.
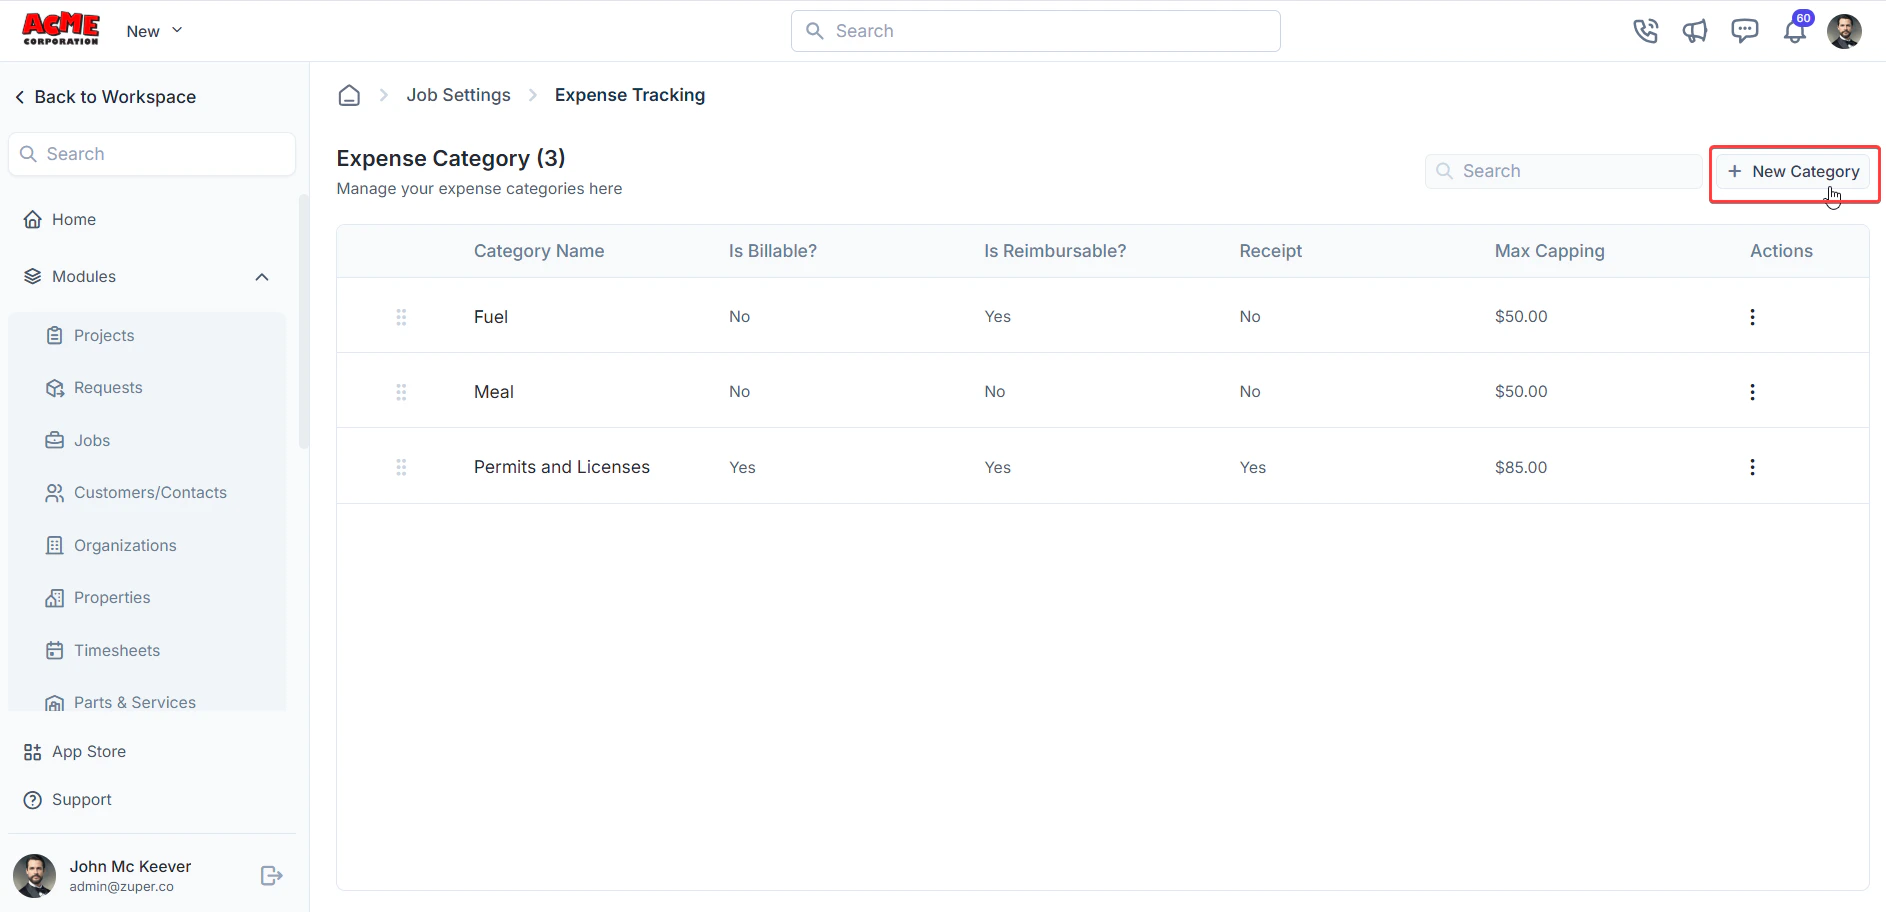
## Configuring expense categories
Creating expense categories in Zuper streamlines expense management by enabling precise classification, efficient tracking, and accurate reporting. These categories help to enforce your company policies, facilitate seamless reimbursements, and simplify customer billing.
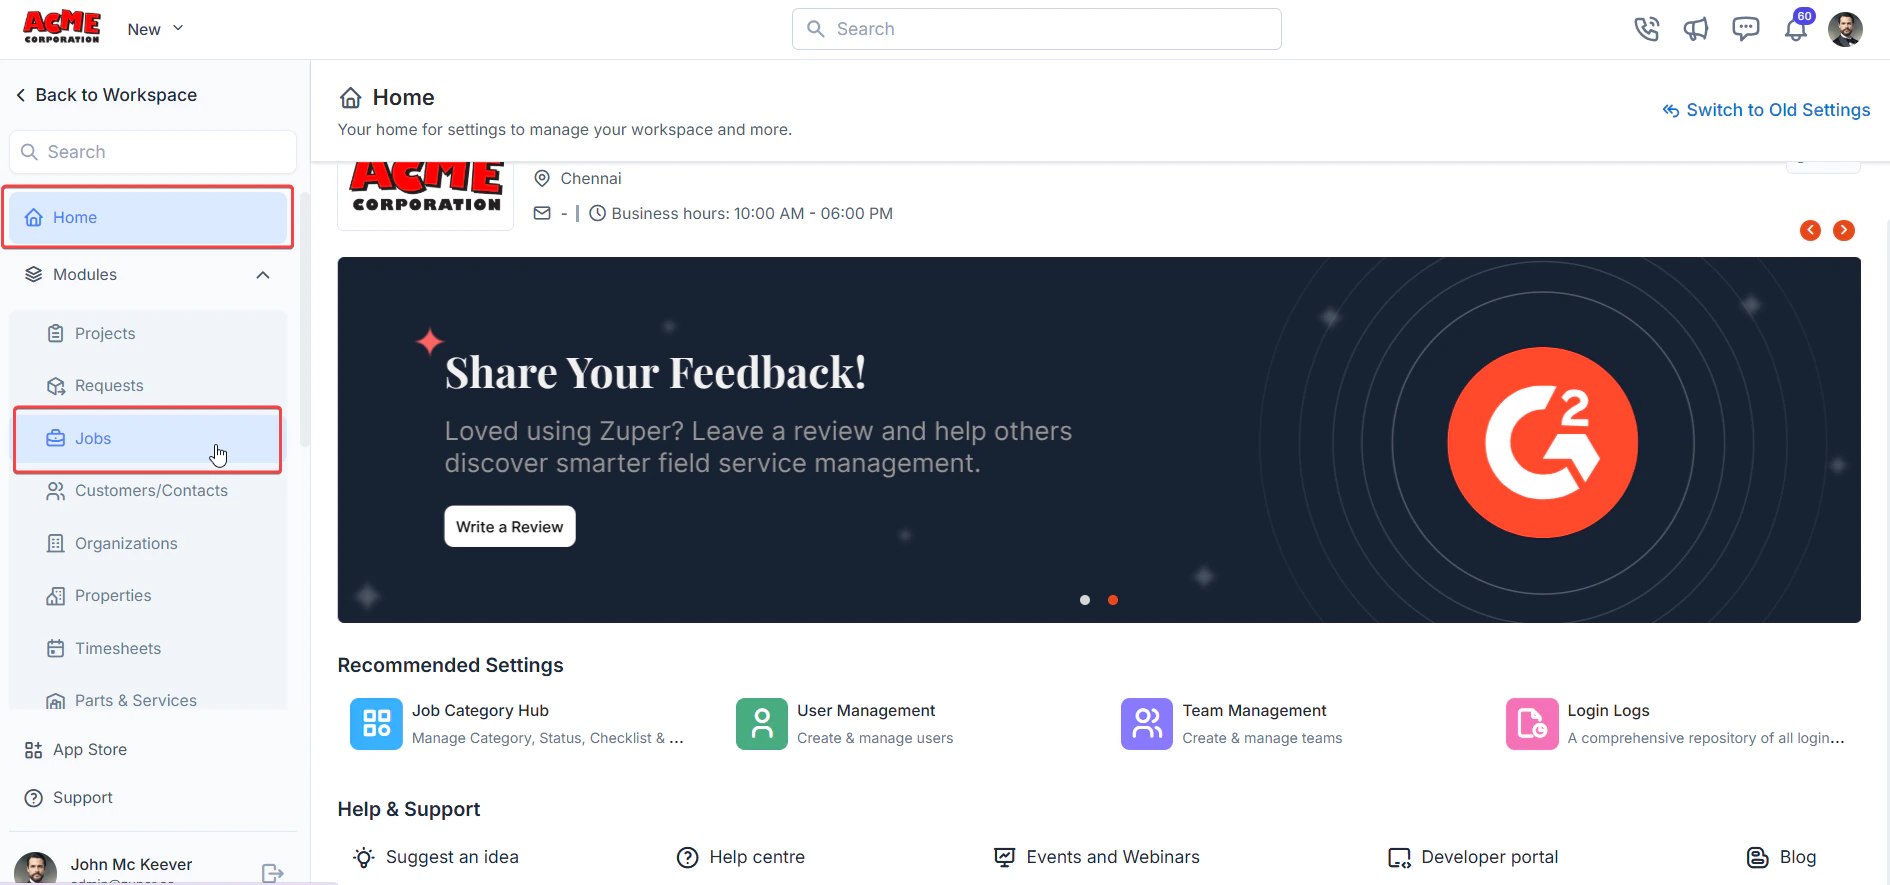
**Navigation**: *Settings -> Modules -> Jobs -> Expense*
Follow these steps to create a new expense category:
1. Log in to Zuper with an admin account.
2. Select the **Settings** module from the left navigation menu.
Admins can customize these permissions to meet organizational needs, ensuring appropriate access for each user role.
## Configuring expense categories
Creating expense categories in Zuper streamlines expense management by enabling precise classification, efficient tracking, and accurate reporting. These categories help to enforce your company policies, facilitate seamless reimbursements, and simplify customer billing.
**Navigation**: *Settings -> Modules -> Jobs -> Expense*
Follow these steps to create a new expense category:
1. Log in to Zuper with an admin account.
2. Select the **Settings** module from the left navigation menu.
 3. Choose the **Jobs** setting from the **Modules**.
 4. Select the **Expense** section.
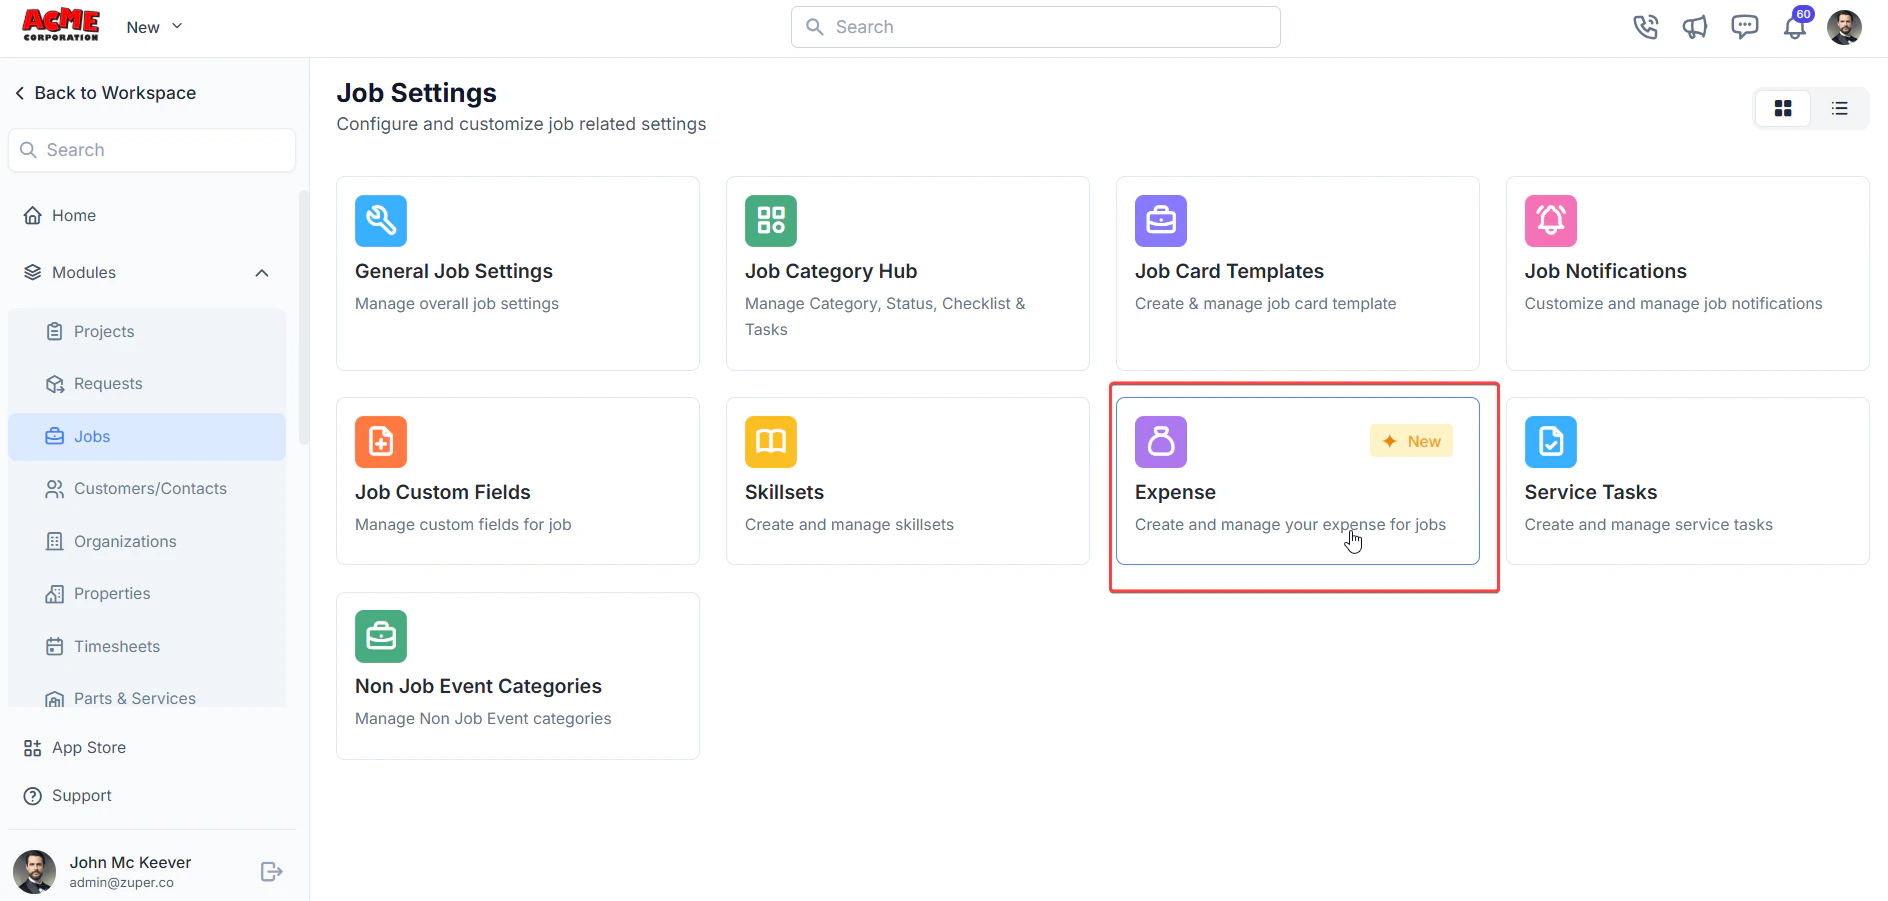 5. On the **Expense Category** *listing* page, click **+ New Category**.
 6. The **Add Category** page opens.
* Enter the **Name** of the expense category.
* Provide a short **Description** for the category.
* Enter the **Default Amount** for the category. This amount will automatically populate when users add an expense item belonging to this category to a job.
* Specify the **Max Capping** for the category, which defines the maximum claimable amount for an expense under this category.
* Configure Expense Policies:
1. Set **Billable** to *Yes* if the expense can be charged to the customer.
2. Set **Reimbursable** to *Yes* if the expense can be reimbursed to the employee/user.
3. Set **Receipt Mandatory** to *Yes* if a receipt is required for the expense.
6. The **Add Category** page opens.
* Enter the **Name** of the expense category.
* Provide a short **Description** for the category.
* Enter the **Default Amount** for the category. This amount will automatically populate when users add an expense item belonging to this category to a job.
* Specify the **Max Capping** for the category, which defines the maximum claimable amount for an expense under this category.
* Configure Expense Policies:
1. Set **Billable** to *Yes* if the expense can be charged to the customer.
2. Set **Reimbursable** to *Yes* if the expense can be reimbursed to the employee/user.
3. Set **Receipt Mandatory** to *Yes* if a receipt is required for the expense.
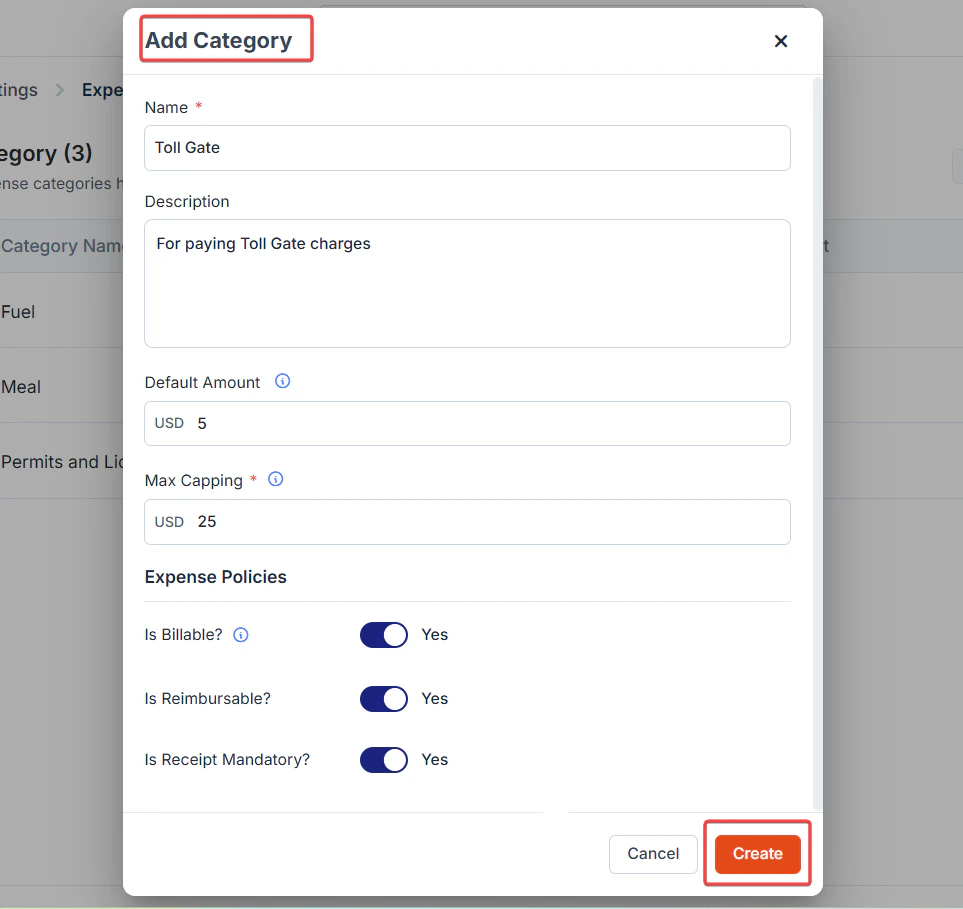 * Click **Create** to save the new expense category.
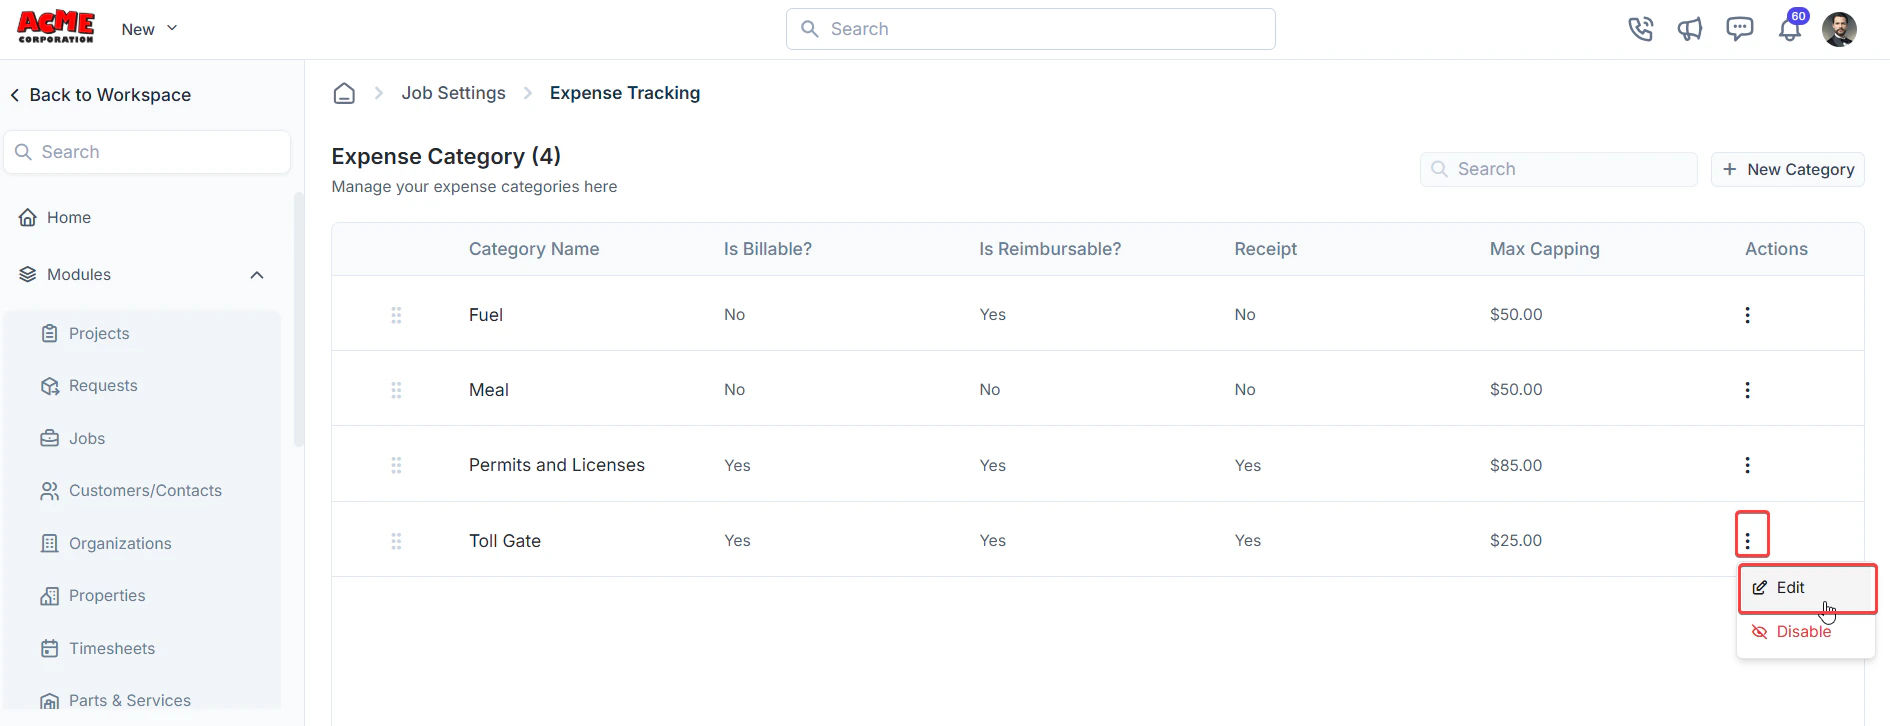
The expense category is now successfully created.
### Editing an expense category
1. On the **Expense Category** listing page, click the **kebab** icon next to the specific expense category.
2. Select the **Edit** option.
* Click **Create** to save the new expense category.
The expense category is now successfully created.
### Editing an expense category
1. On the **Expense Category** listing page, click the **kebab** icon next to the specific expense category.
2. Select the **Edit** option.
 3. The **Edit Category** dialog box opens.
4. Make the necessary changes.
3. The **Edit Category** dialog box opens.
4. Make the necessary changes.
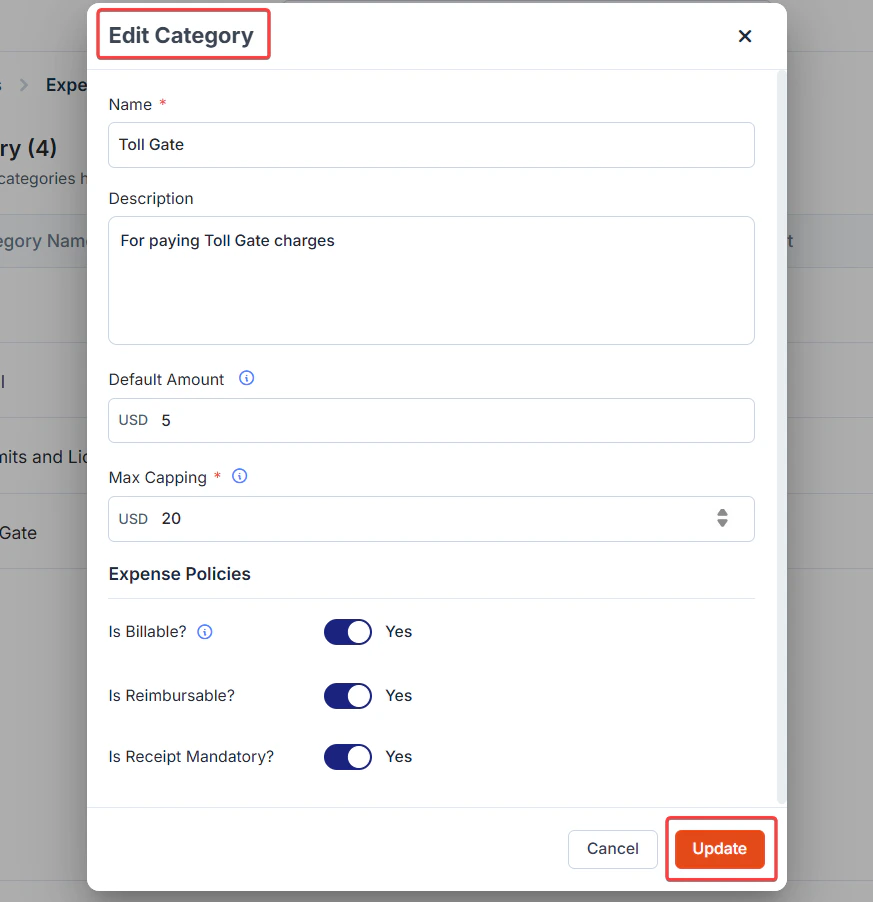 5. Click **Update** to save the changes.
### Deactivating an expense category
1. On the **Expense Category** listing page, click the **kebab** icon next to the specific expense category.
2. Select the **Disable** option.
5. Click **Update** to save the changes.
### Deactivating an expense category
1. On the **Expense Category** listing page, click the **kebab** icon next to the specific expense category.
2. Select the **Disable** option.
 3. A confirmation dialog box appears.
4. Click **Disable** to deactivate the expense category.
3. A confirmation dialog box appears.
4. Click **Disable** to deactivate the expense category.
 ### Deleting an expense category
1. On the **Expense Category** listing page, click the **kebab** icon next to the specific expense category.
2. Select the **Delete** option.
### Deleting an expense category
1. On the **Expense Category** listing page, click the **kebab** icon next to the specific expense category.
2. Select the **Delete** option.
 **Note:** You must deactivate an expense category before deleting it. Active categories cannot be deleted.
3. A confirmation dialog box appears.
4. Click **Delete** to permanently remove the expense category.
**Note:** You must deactivate an expense category before deleting it. Active categories cannot be deleted.
3. A confirmation dialog box appears.
4. Click **Delete** to permanently remove the expense category.
 ## **Report on expenses**
Zuper provides two expense reports to help you view costs from different perspectives:
### Job Expense Report
Go to **Reports > Job > Job Expense Report**
Use this report when you want to view expenses in the context of a job’s schedule. Expenses are grouped based on the **job schedule date**, making it useful for:
* Reviewing costs for jobs planned on a specific day or week
* Matching expenses with technician schedules
* Operational reporting tied to job timelines
## **Report on expenses**
Zuper provides two expense reports to help you view costs from different perspectives:
### Job Expense Report
Go to **Reports > Job > Job Expense Report**
Use this report when you want to view expenses in the context of a job’s schedule. Expenses are grouped based on the **job schedule date**, making it useful for:
* Reviewing costs for jobs planned on a specific day or week
* Matching expenses with technician schedules
* Operational reporting tied to job timelines
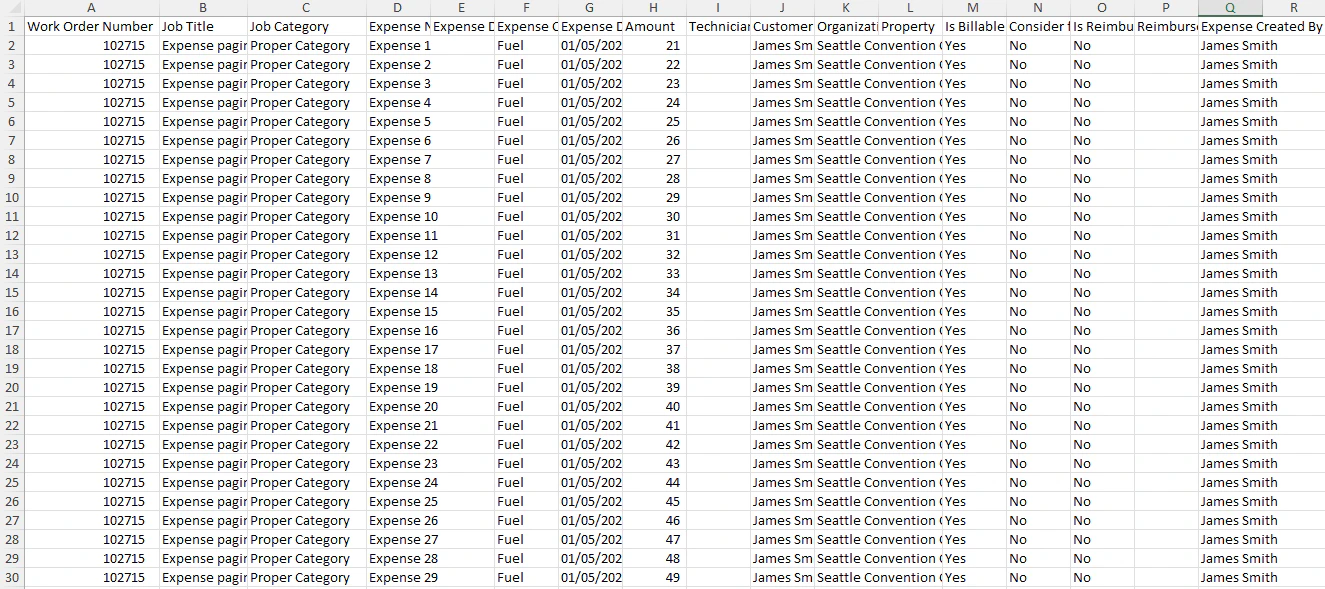
 ### Expense Master Report
Go to **Reports > Expense Master**
Use this report when you want to track expenses based on when they were actually incurred. This report uses the **expense date**, making it useful for:
* Finance and accounting reconciliation
* Tracking monthly or period-based spending
* Auditing expenses independent of job schedules
### Expense Master Report
Go to **Reports > Expense Master**
Use this report when you want to track expenses based on when they were actually incurred. This report uses the **expense date**, making it useful for:
* Finance and accounting reconciliation
* Tracking monthly or period-based spending
* Auditing expenses independent of job schedules