> ## Documentation Index
> Fetch the complete documentation index at: https://zuperinc-section23.mintlify.site/llms.txt
> Use this file to discover all available pages before exploring further.
# Before After Image Effect
Use Before & After in a job’s Gallery to combine two photos into a single comparison image. You can edit the layout and labels, align the photos, and then download the result or view it again in the Gallery.
* Proof of work and accountability: A before/after comparison makes it easy to demonstrate what changed on-site, helping validate completion and reduce disputes.
* Better customer communication: Customers can quickly understand the outcome without having to read long notes, which improves trust and satisfaction.
*Navigation: Jobs → open a Job → Gallery → select 2 images → Before & After*
Job -> Gallery (**Gallery tab** highlighted in the bottom action bar)
## **Create a Before & After**
* From the left navigation menu, select the job to open the job details page.
 * Click the **Gallery** in the left tab. Select exactly two images (use the checkbox on each image tile). A bottom action bar appears showing the selected count.
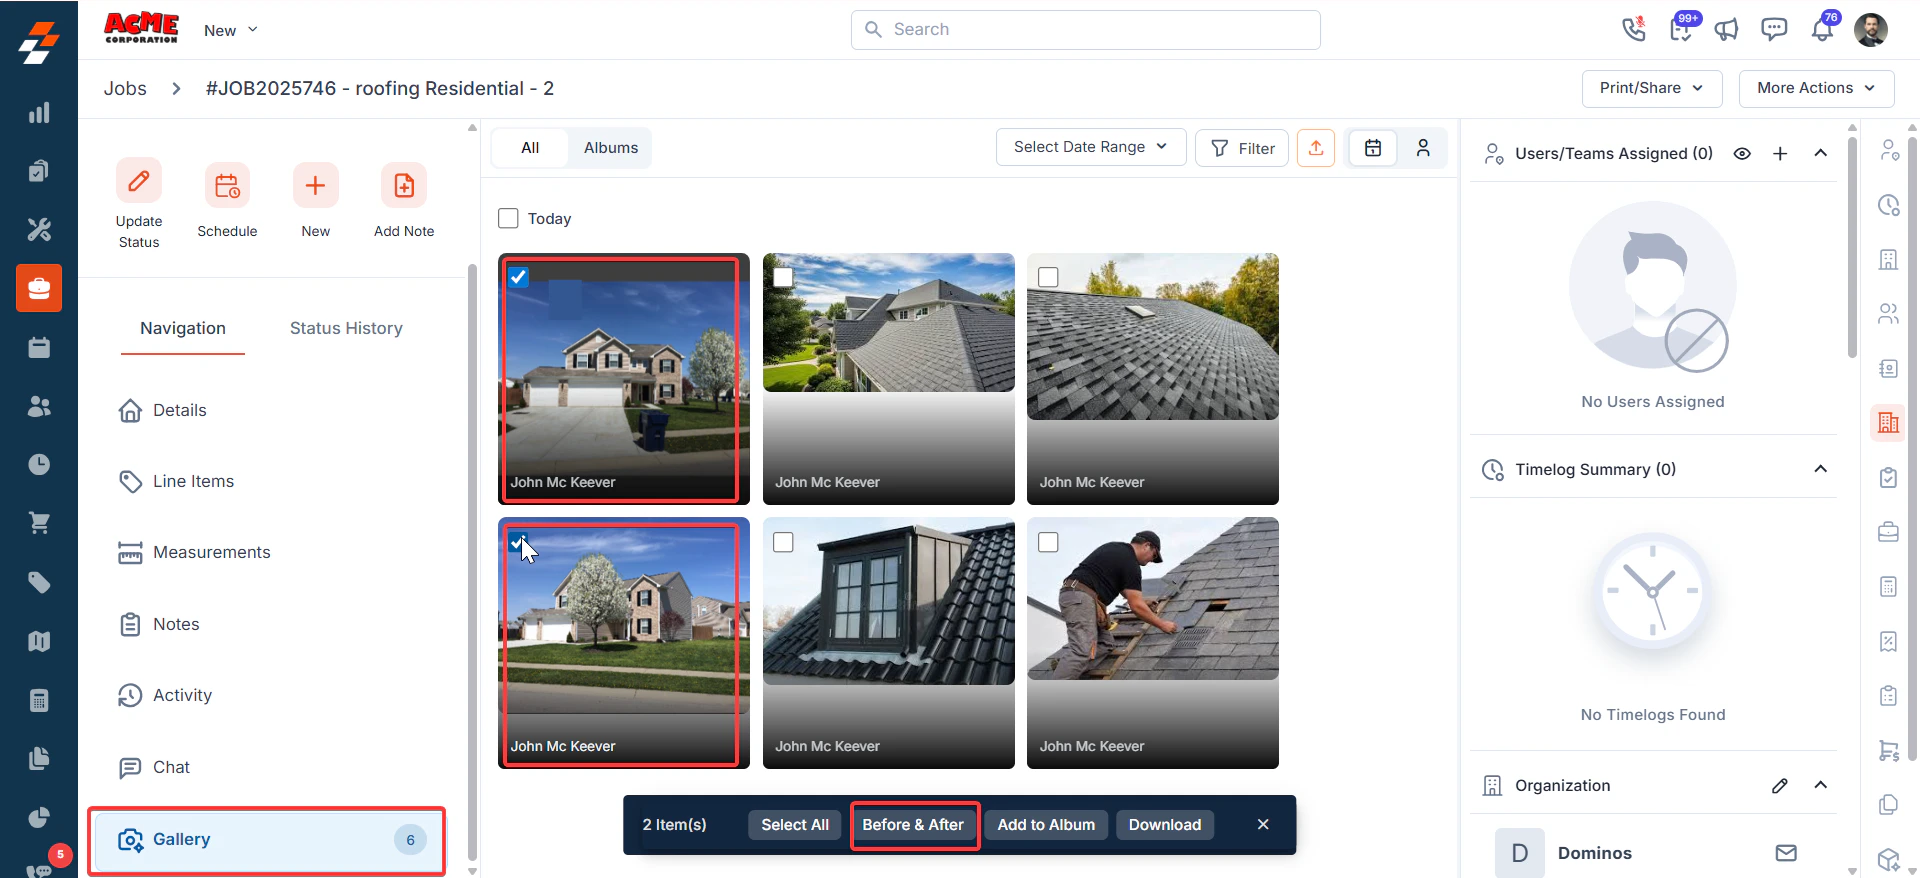 * Click Before & After on the bottom action bar to open Before & After Studio.
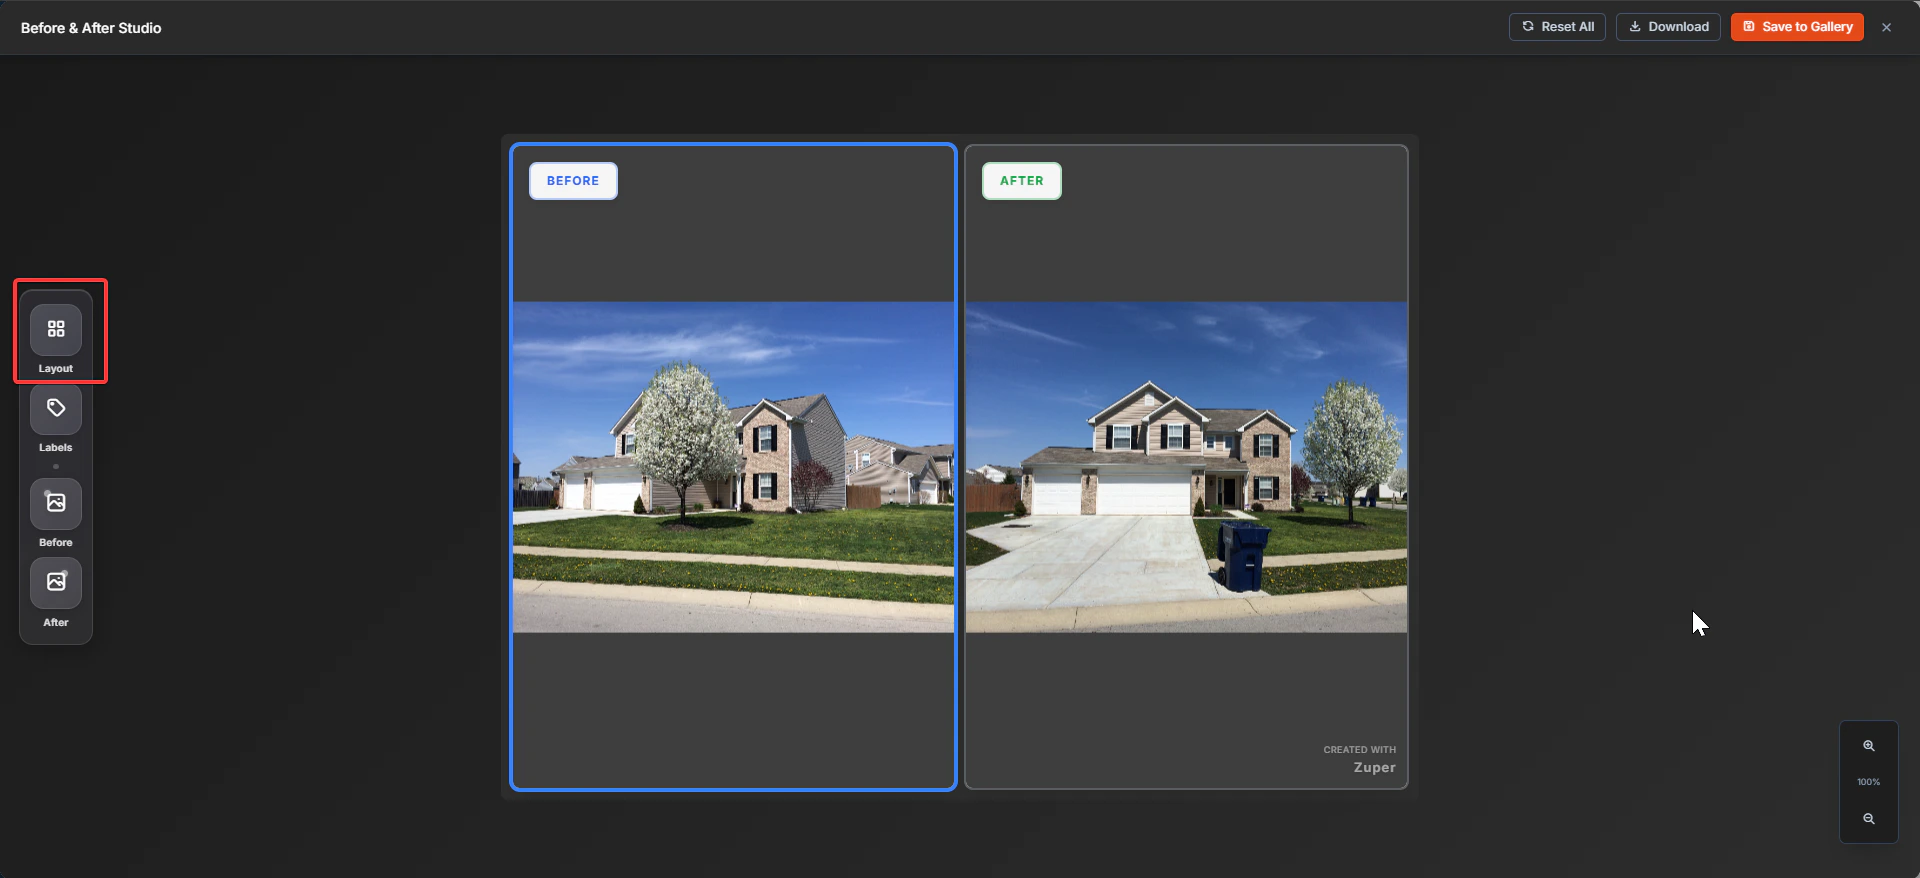 ## **Edit in Before & After Studio**
In Before & After Studio, you’ll see the two frames: BEFORE and AFTER. Use the left toolbar to customize the output.
**Change layout**
* Click Layout.
Choose:
* Side by Side View, or
* Top & Bottom
## **Edit in Before & After Studio**
In Before & After Studio, you’ll see the two frames: BEFORE and AFTER. Use the left toolbar to customize the output.
**Change layout**
* Click Layout.
Choose:
* Side by Side View, or
* Top & Bottom
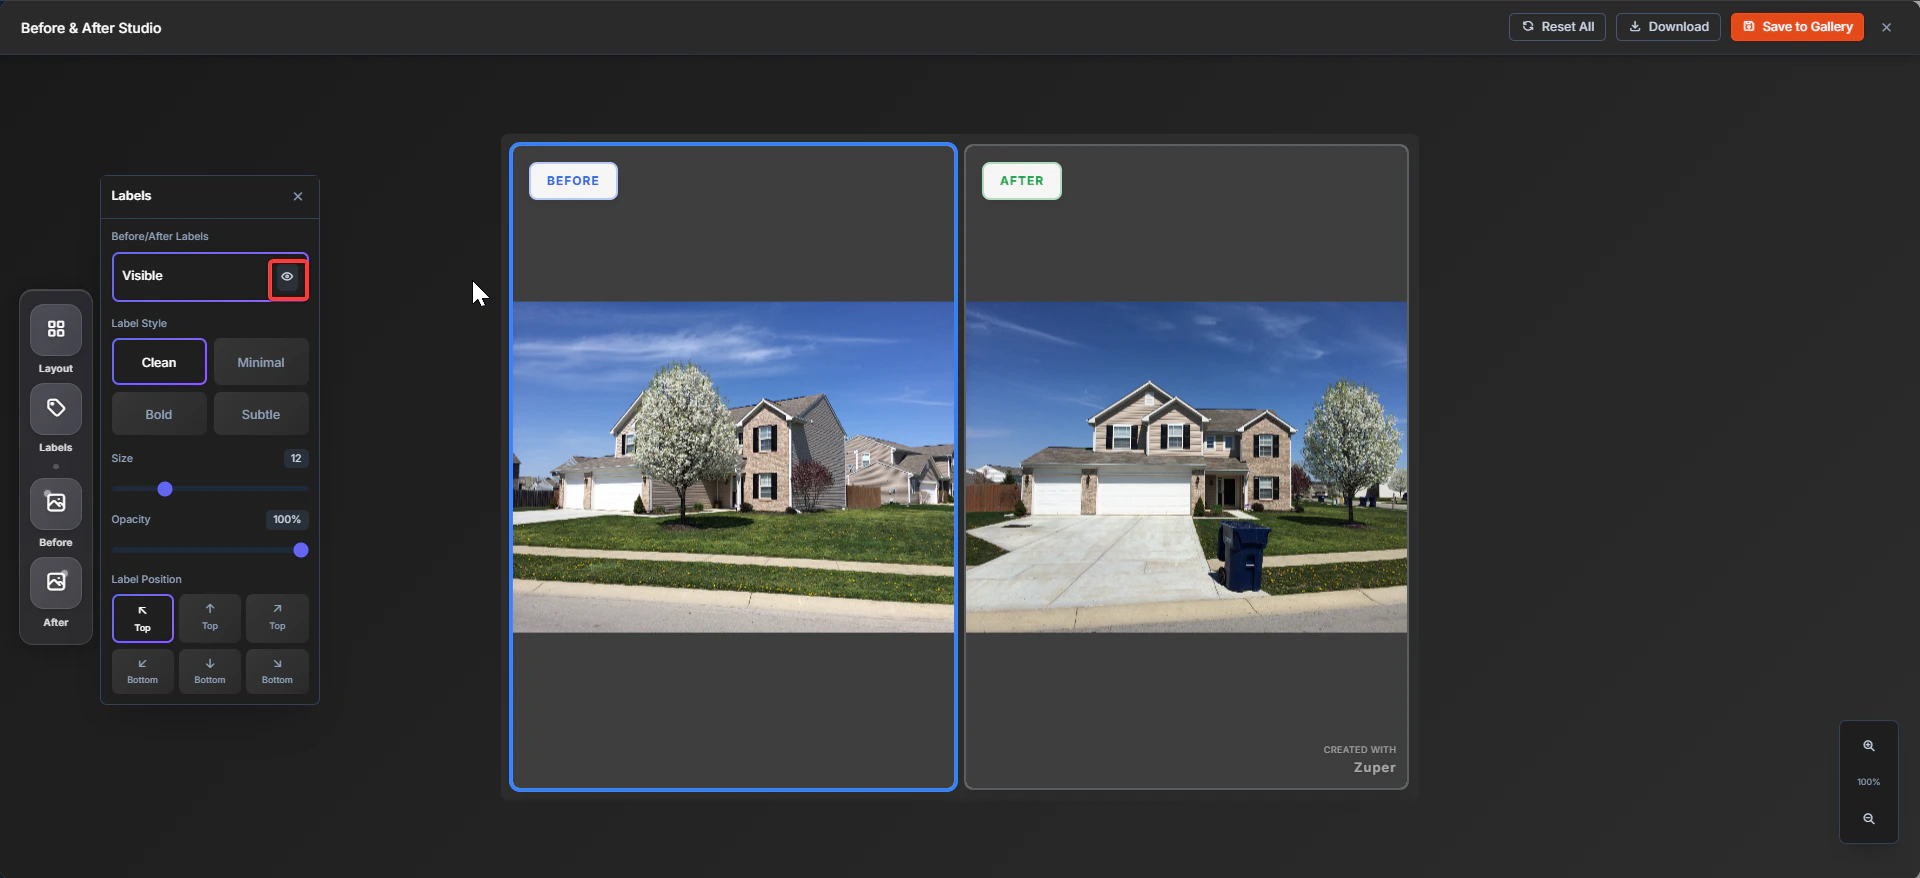
 ## **Customize labels**
* Click Labels.
Update any of the following:
* Visible – You can view the labels or hide the labels.
* Label Style (Clean / Minimal / Bold / Subtle).
* Size.
* Opacity.
* Label Position (top/bottom placements).
## **Customize labels**
* Click Labels.
Update any of the following:
* Visible – You can view the labels or hide the labels.
* Label Style (Clean / Minimal / Bold / Subtle).
* Size.
* Opacity.
* Label Position (top/bottom placements).
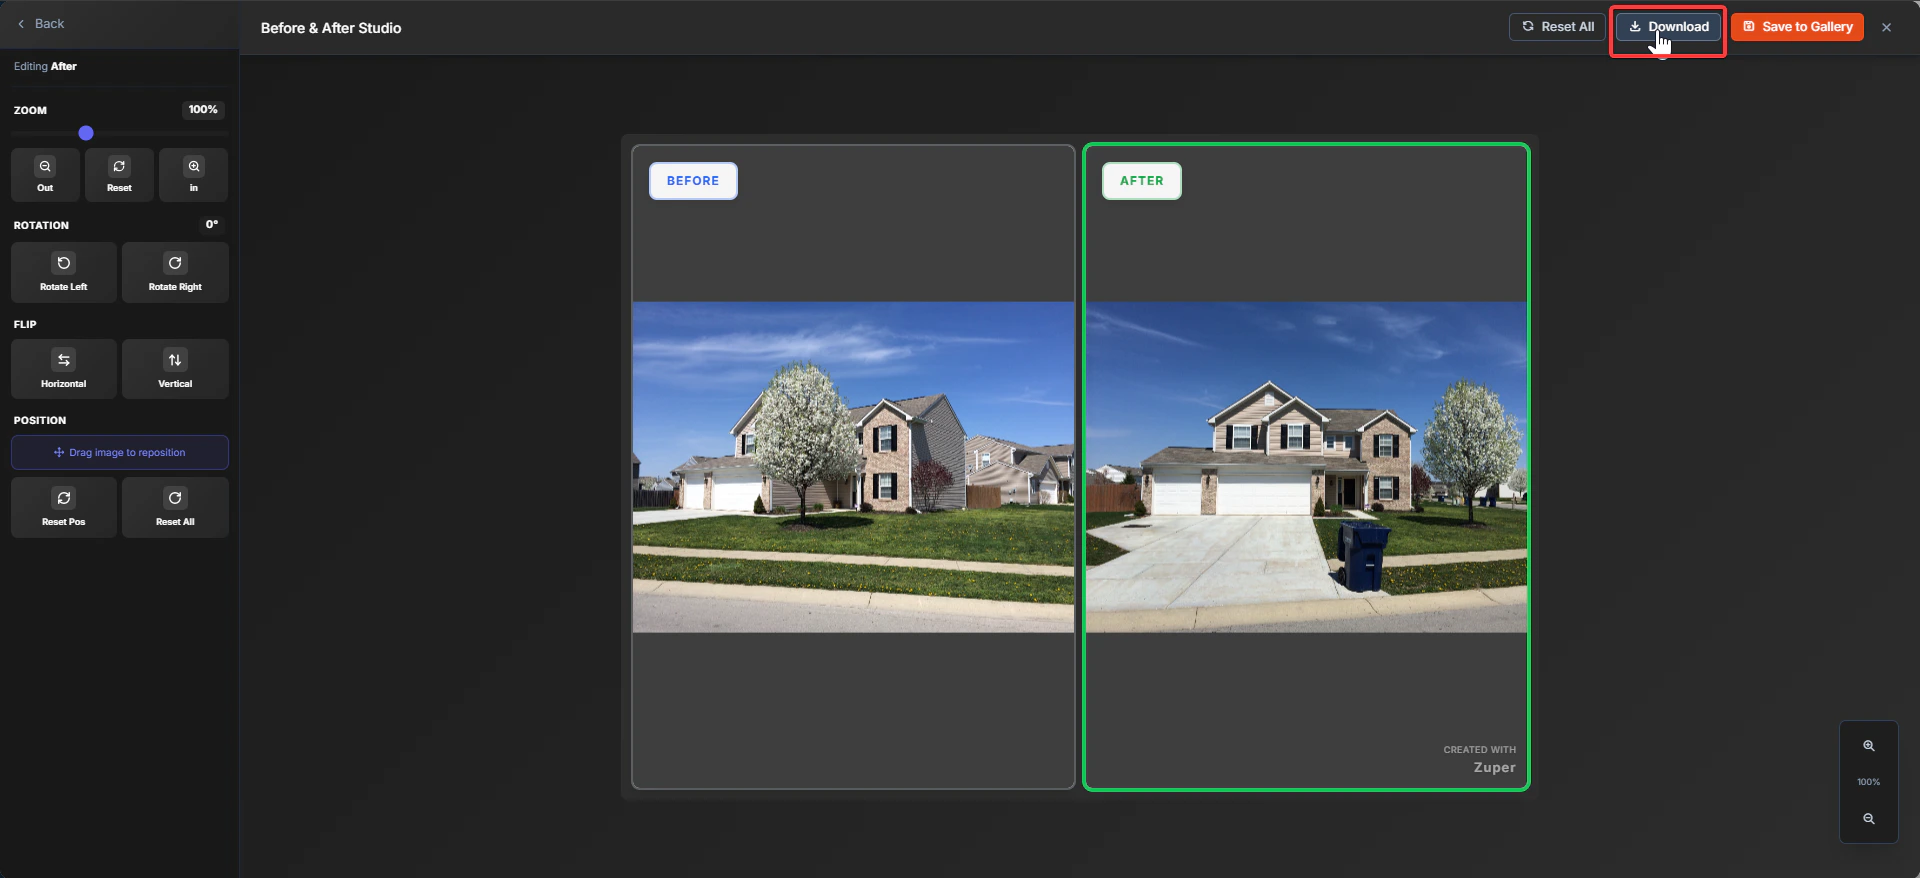
 ## **Adjust the Before/After images**
Click Before or After on the left toolbar to choose which frame to edit.
Use the editing controls to align your photos:
* Zoom (slider + zoom in/out/reset).
* Rotation (rotate left/right).
* Flip (horizontal/vertical).
* Position (drag the image to reposition).
* Reset Pos (resets only position).
* Reset All (resets edits for that side).
## **Save, download, or reset**
**Reset everything**
* Click Reset All (top-right) to clear the studio changes.
## **Adjust the Before/After images**
Click Before or After on the left toolbar to choose which frame to edit.
Use the editing controls to align your photos:
* Zoom (slider + zoom in/out/reset).
* Rotation (rotate left/right).
* Flip (horizontal/vertical).
* Position (drag the image to reposition).
* Reset Pos (resets only position).
* Reset All (resets edits for that side).
## **Save, download, or reset**
**Reset everything**
* Click Reset All (top-right) to clear the studio changes.
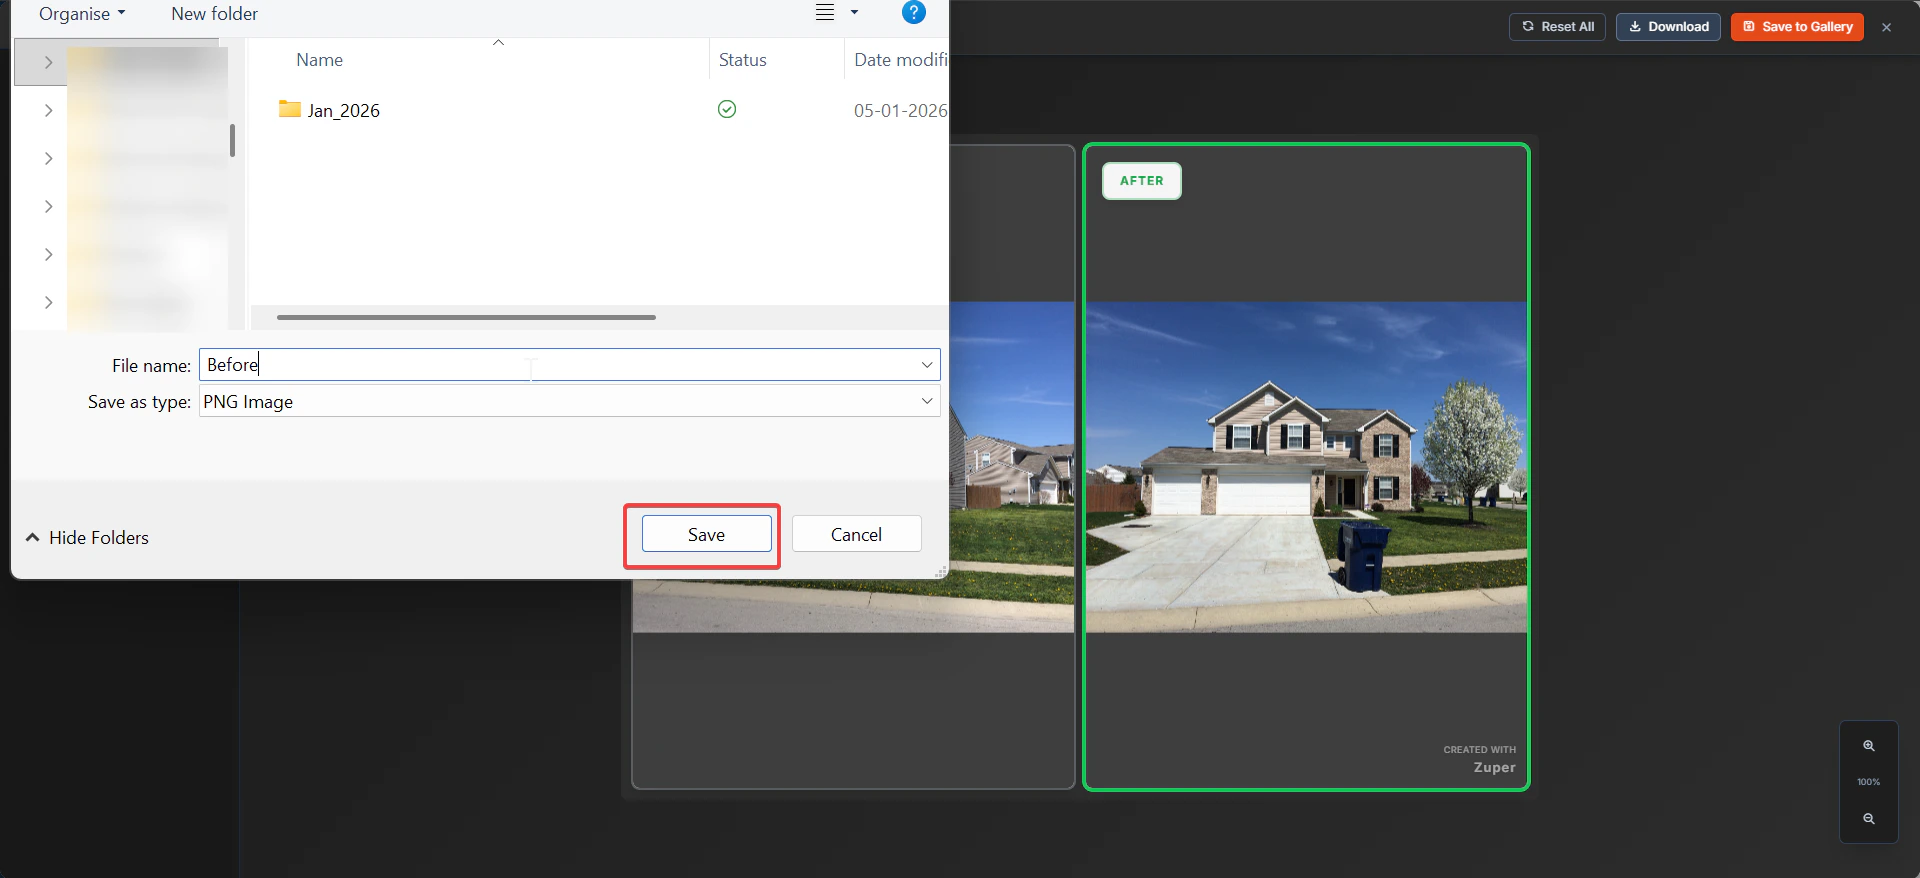
 ## **Download the Before & After image**
* Click Download (top-right).
* In the file save dialog, choose a location and click Save.
## **Download the Before & After image**
* Click Download (top-right).
* In the file save dialog, choose a location and click Save.
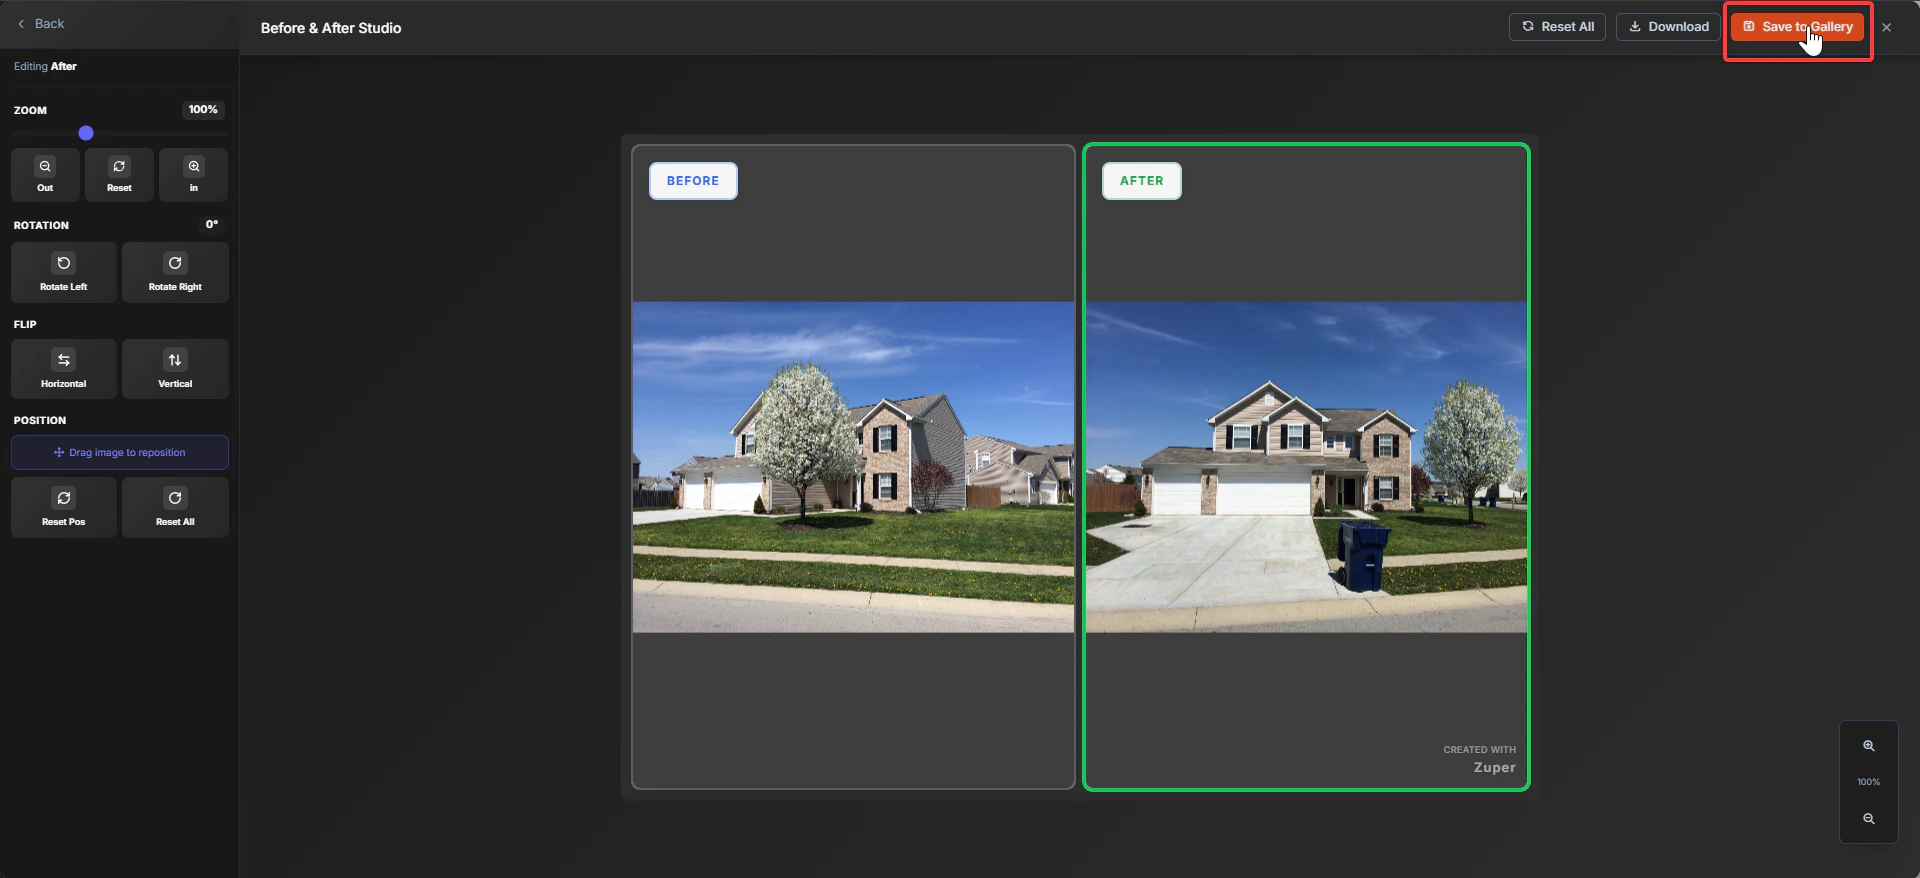
 ## **Save to Gallery**
* Click Save to Gallery (top-right).
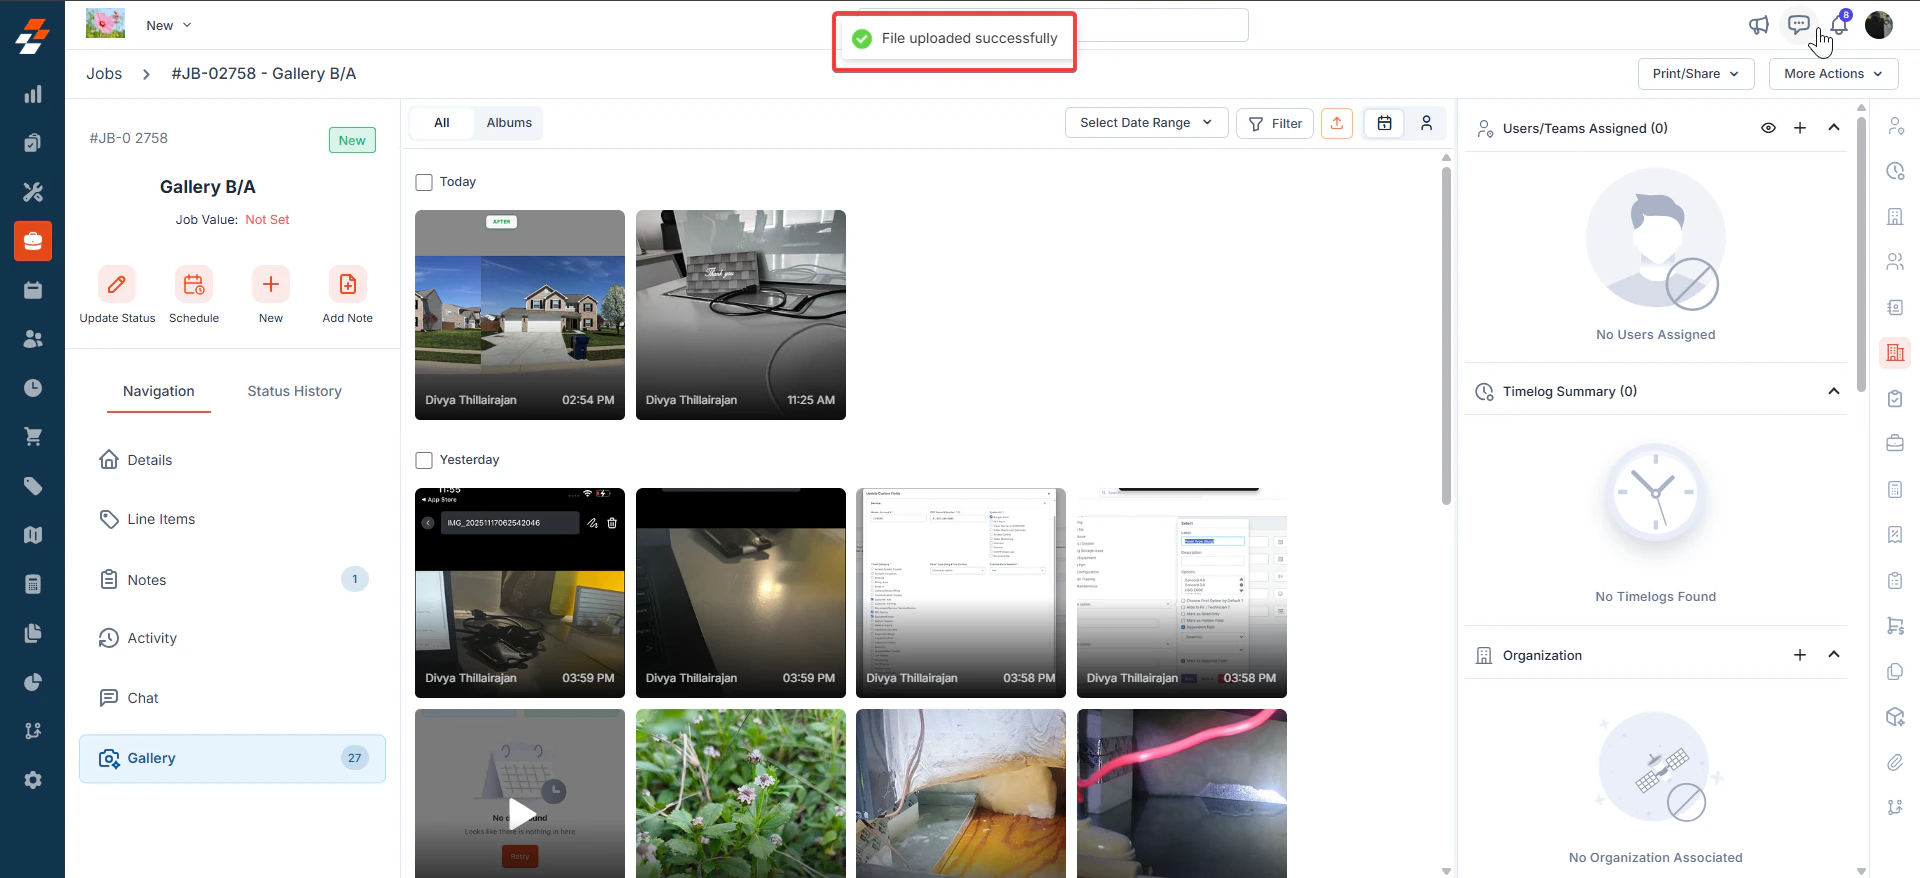
* After saving, you’ll see a confirmation message: “**File uploaded successfully**”.
* The generated Before & After image appears in the job’s Gallery as a new image.
## **Save to Gallery**
* Click Save to Gallery (top-right).
* After saving, you’ll see a confirmation message: “**File uploaded successfully**”.
* The generated Before & After image appears in the job’s Gallery as a new image.
 **Exit without saving**
* Click Back (top-left). If there are unsaved changes, a dialog box prompts you to confirm:
* Cancel to continue editing
* Discard Changes to exit without saving.
**Exit without saving**
* Click Back (top-left). If there are unsaved changes, a dialog box prompts you to confirm:
* Cancel to continue editing
* Discard Changes to exit without saving.
 ## **Troubleshooting**
1. **I don’t see the “Before & After” button**
You should “**Enable Job Gallery**” from the Job settings. Confirm you selected exactly two images in the Gallery. The action appears on the bottom bar only after it is selected.
2. **The Before and after photos don’t line up**
Use Position (drag to reposition) and Zoom first, then fine-tune with Rotation if needed.
## **Frequently Asked Questions (FAQs)**
1. What is a Before & After image in Zuper Gallery?
A Before & After is a single comparison image created from two photos in a job’s Gallery, presented in a selectable layout (for example, side-by-side). You need to open the job and use the option.
Note: The before and after option is not available in Photo Feed.
2. Where do I find the "**Before & After"** option?
Open Jobs → select a job → Gallery, then select two images. The Before & After button appears in the bottom action bar.
3. Why can’t I see the “**Before & After**” button?
This usually happens when:
* You selected fewer than 2 images, or
* You selected more than 2 images
Select exactly two images to enable Before & After.
4. Can I choose which photo is “**Before**” and which is “**After**”?
* Yes. In Before & After Studio, you can set and edit each side using the Before and After tools in the left toolbar. You can also swap both images during editing.
5. What layouts are available?
In Before & After Studio → Layout, you can choose:
* Side by Side View
* Top & Bottom
6. Can I hide or change the “**Before**” and “**After**” labels?
Yes. In Before & After Studio → Labels, you can:
* Toggle label Visible on/off
* Change Label Style
* Adjust Size, Opacity, and Position
7. How do I align the two photos so they match?
In Before or After tools (left toolbar), use:
* Zoom (zoom in/out)
* Position (drag to reposition)
* Rotation (rotate left/right)
Tip: Start with Position + Zoom, then fine-tune with Rotation.
8. What does “**Reset All**” do?
Reset All clears the edits you’ve made in the studio and returns the view to the default state.
9. What happens when I click “**Save to Gallery**”?
Zuper saves the generated Before & After image back into the job’s Gallery. You’ll see a confirmation message: “**File uploaded successfully**”.
***Note***: The newly created **before and after** images will be created as separate images, whereas the original images will be intact.
10. What happens when I click “**Download**”?
Zuper downloads the generated Before & After image to your device. Your browser/desktop will prompt you to choose a location and click Save.
11. What file type is downloaded?
Based on the download save dialog, the file is saved as a PNG image.
12. Can I leave the studio without saving?
Yes. Click Back. If you’ve made changes, Zuper will prompt you about unsaved changes:
Cancel to keep editing
Discard Changes to exit without saving
13. Will creating a Before & After delete or change my original photos?
No, your original photos remain in the Gallery. The Before & After result is generated as a new output you can save/download.
14. Who can create or save Before & After images?
Access can depend on your organization’s permissions and role settings. If you don’t see Gallery actions or can’t save, contact your Zuper admin.
15. Can I edit a saved Before & After image later?
If you need a different layout/label/alignment, the typical approach is to reselect the original two images and create a new Before & After output, then save/download again.
## **Troubleshooting**
1. **I don’t see the “Before & After” button**
You should “**Enable Job Gallery**” from the Job settings. Confirm you selected exactly two images in the Gallery. The action appears on the bottom bar only after it is selected.
2. **The Before and after photos don’t line up**
Use Position (drag to reposition) and Zoom first, then fine-tune with Rotation if needed.
## **Frequently Asked Questions (FAQs)**
1. What is a Before & After image in Zuper Gallery?
A Before & After is a single comparison image created from two photos in a job’s Gallery, presented in a selectable layout (for example, side-by-side). You need to open the job and use the option.
Note: The before and after option is not available in Photo Feed.
2. Where do I find the "**Before & After"** option?
Open Jobs → select a job → Gallery, then select two images. The Before & After button appears in the bottom action bar.
3. Why can’t I see the “**Before & After**” button?
This usually happens when:
* You selected fewer than 2 images, or
* You selected more than 2 images
Select exactly two images to enable Before & After.
4. Can I choose which photo is “**Before**” and which is “**After**”?
* Yes. In Before & After Studio, you can set and edit each side using the Before and After tools in the left toolbar. You can also swap both images during editing.
5. What layouts are available?
In Before & After Studio → Layout, you can choose:
* Side by Side View
* Top & Bottom
6. Can I hide or change the “**Before**” and “**After**” labels?
Yes. In Before & After Studio → Labels, you can:
* Toggle label Visible on/off
* Change Label Style
* Adjust Size, Opacity, and Position
7. How do I align the two photos so they match?
In Before or After tools (left toolbar), use:
* Zoom (zoom in/out)
* Position (drag to reposition)
* Rotation (rotate left/right)
Tip: Start with Position + Zoom, then fine-tune with Rotation.
8. What does “**Reset All**” do?
Reset All clears the edits you’ve made in the studio and returns the view to the default state.
9. What happens when I click “**Save to Gallery**”?
Zuper saves the generated Before & After image back into the job’s Gallery. You’ll see a confirmation message: “**File uploaded successfully**”.
***Note***: The newly created **before and after** images will be created as separate images, whereas the original images will be intact.
10. What happens when I click “**Download**”?
Zuper downloads the generated Before & After image to your device. Your browser/desktop will prompt you to choose a location and click Save.
11. What file type is downloaded?
Based on the download save dialog, the file is saved as a PNG image.
12. Can I leave the studio without saving?
Yes. Click Back. If you’ve made changes, Zuper will prompt you about unsaved changes:
Cancel to keep editing
Discard Changes to exit without saving
13. Will creating a Before & After delete or change my original photos?
No, your original photos remain in the Gallery. The Before & After result is generated as a new output you can save/download.
14. Who can create or save Before & After images?
Access can depend on your organization’s permissions and role settings. If you don’t see Gallery actions or can’t save, contact your Zuper admin.
15. Can I edit a saved Before & After image later?
If you need a different layout/label/alignment, the typical approach is to reselect the original two images and create a new Before & After output, then save/download again.