> ## Documentation Index
> Fetch the complete documentation index at: https://zuperinc-section23.mintlify.site/llms.txt
> Use this file to discover all available pages before exploring further.
# Quickstart guide for FE
> This guide provides field technicians with essential steps to navigate and use the Zuper Mobile App efficiently.
# Overview
The Zuper Mobile App is designed to help Field Executives efficiently manage their daily field operations. With a streamlined interface and quick access to essential job information, the app enables you to:
* View and manage assigned jobs
* Update job status in real-time
* Complete service tasks and checklists
* Communicate with customers and your internal team
* Add notes, upload photos/videos, and log activities
The mobile app ensures that every FE stays informed, organized, and productive throughout the workday.
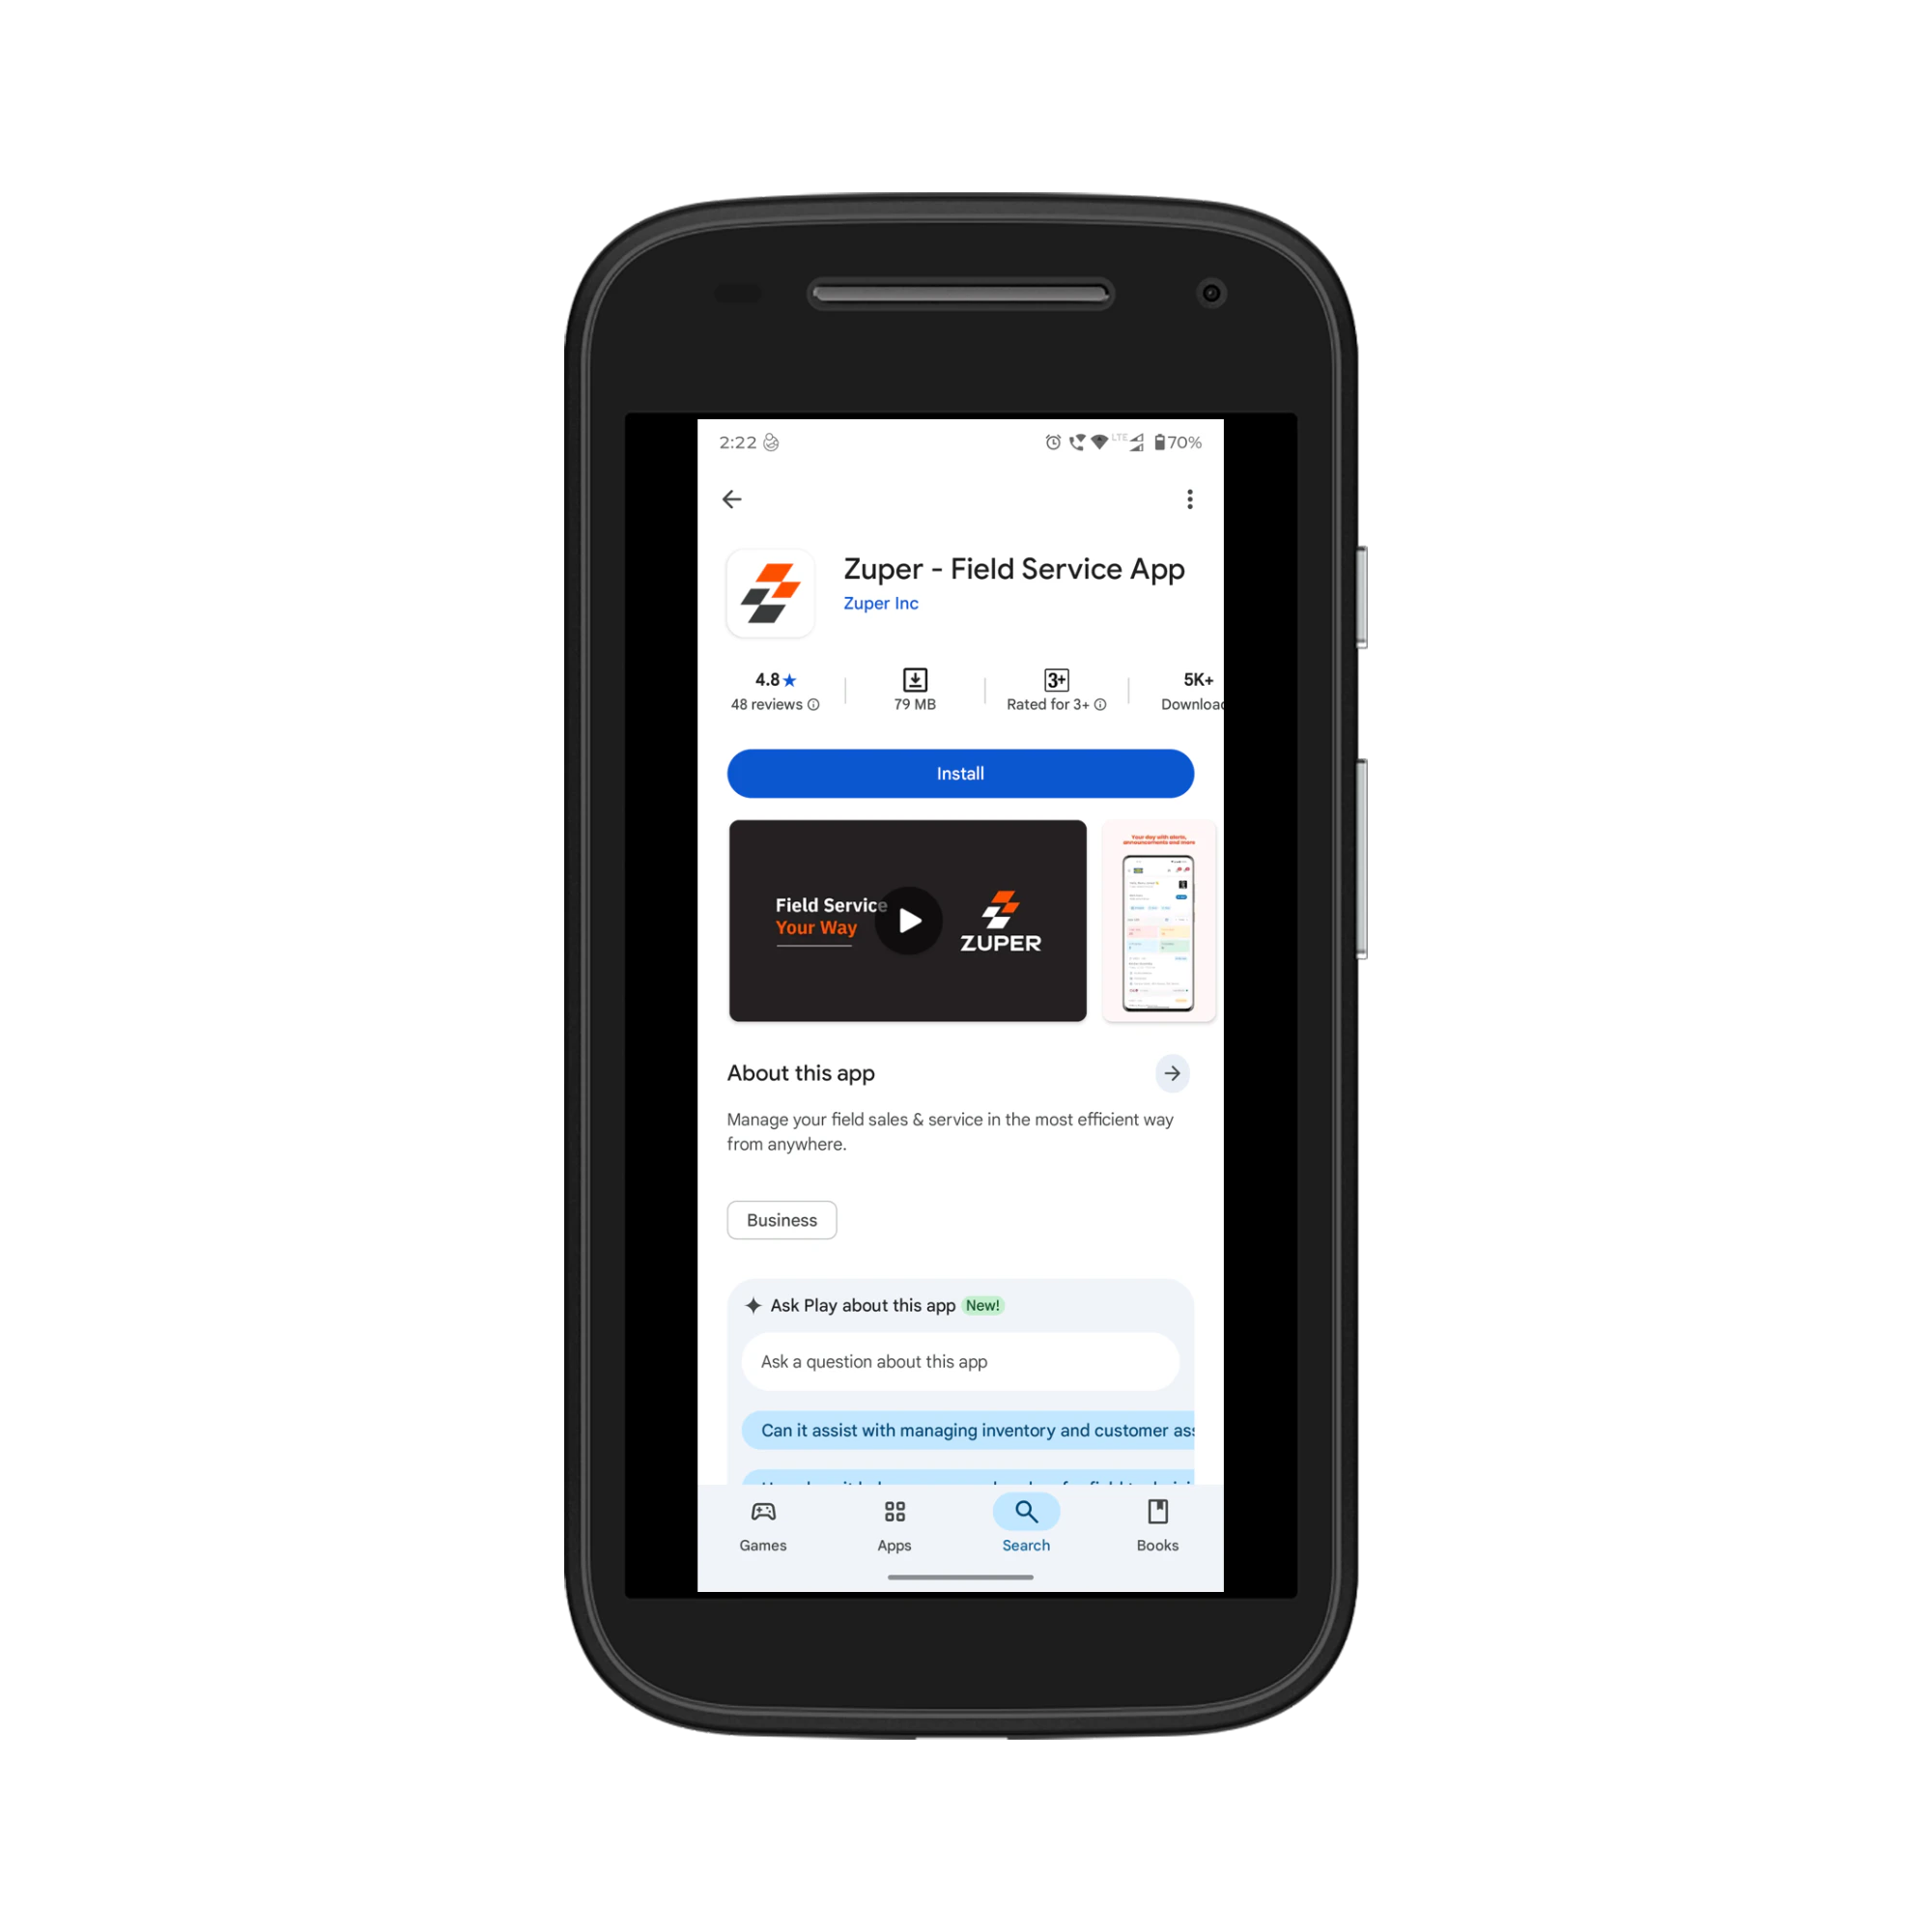
# Downloading and Installing the Zuper Field Service App
1. Open the **Google Play Store** (Android) or **App Store** (iOS) on your mobile device.
2. In the search bar, type **“Zuper- Field Service App.”**
3. From the search results, select the Zuper app.
4. Tap **Install** (Android) or **Get** (iOS).
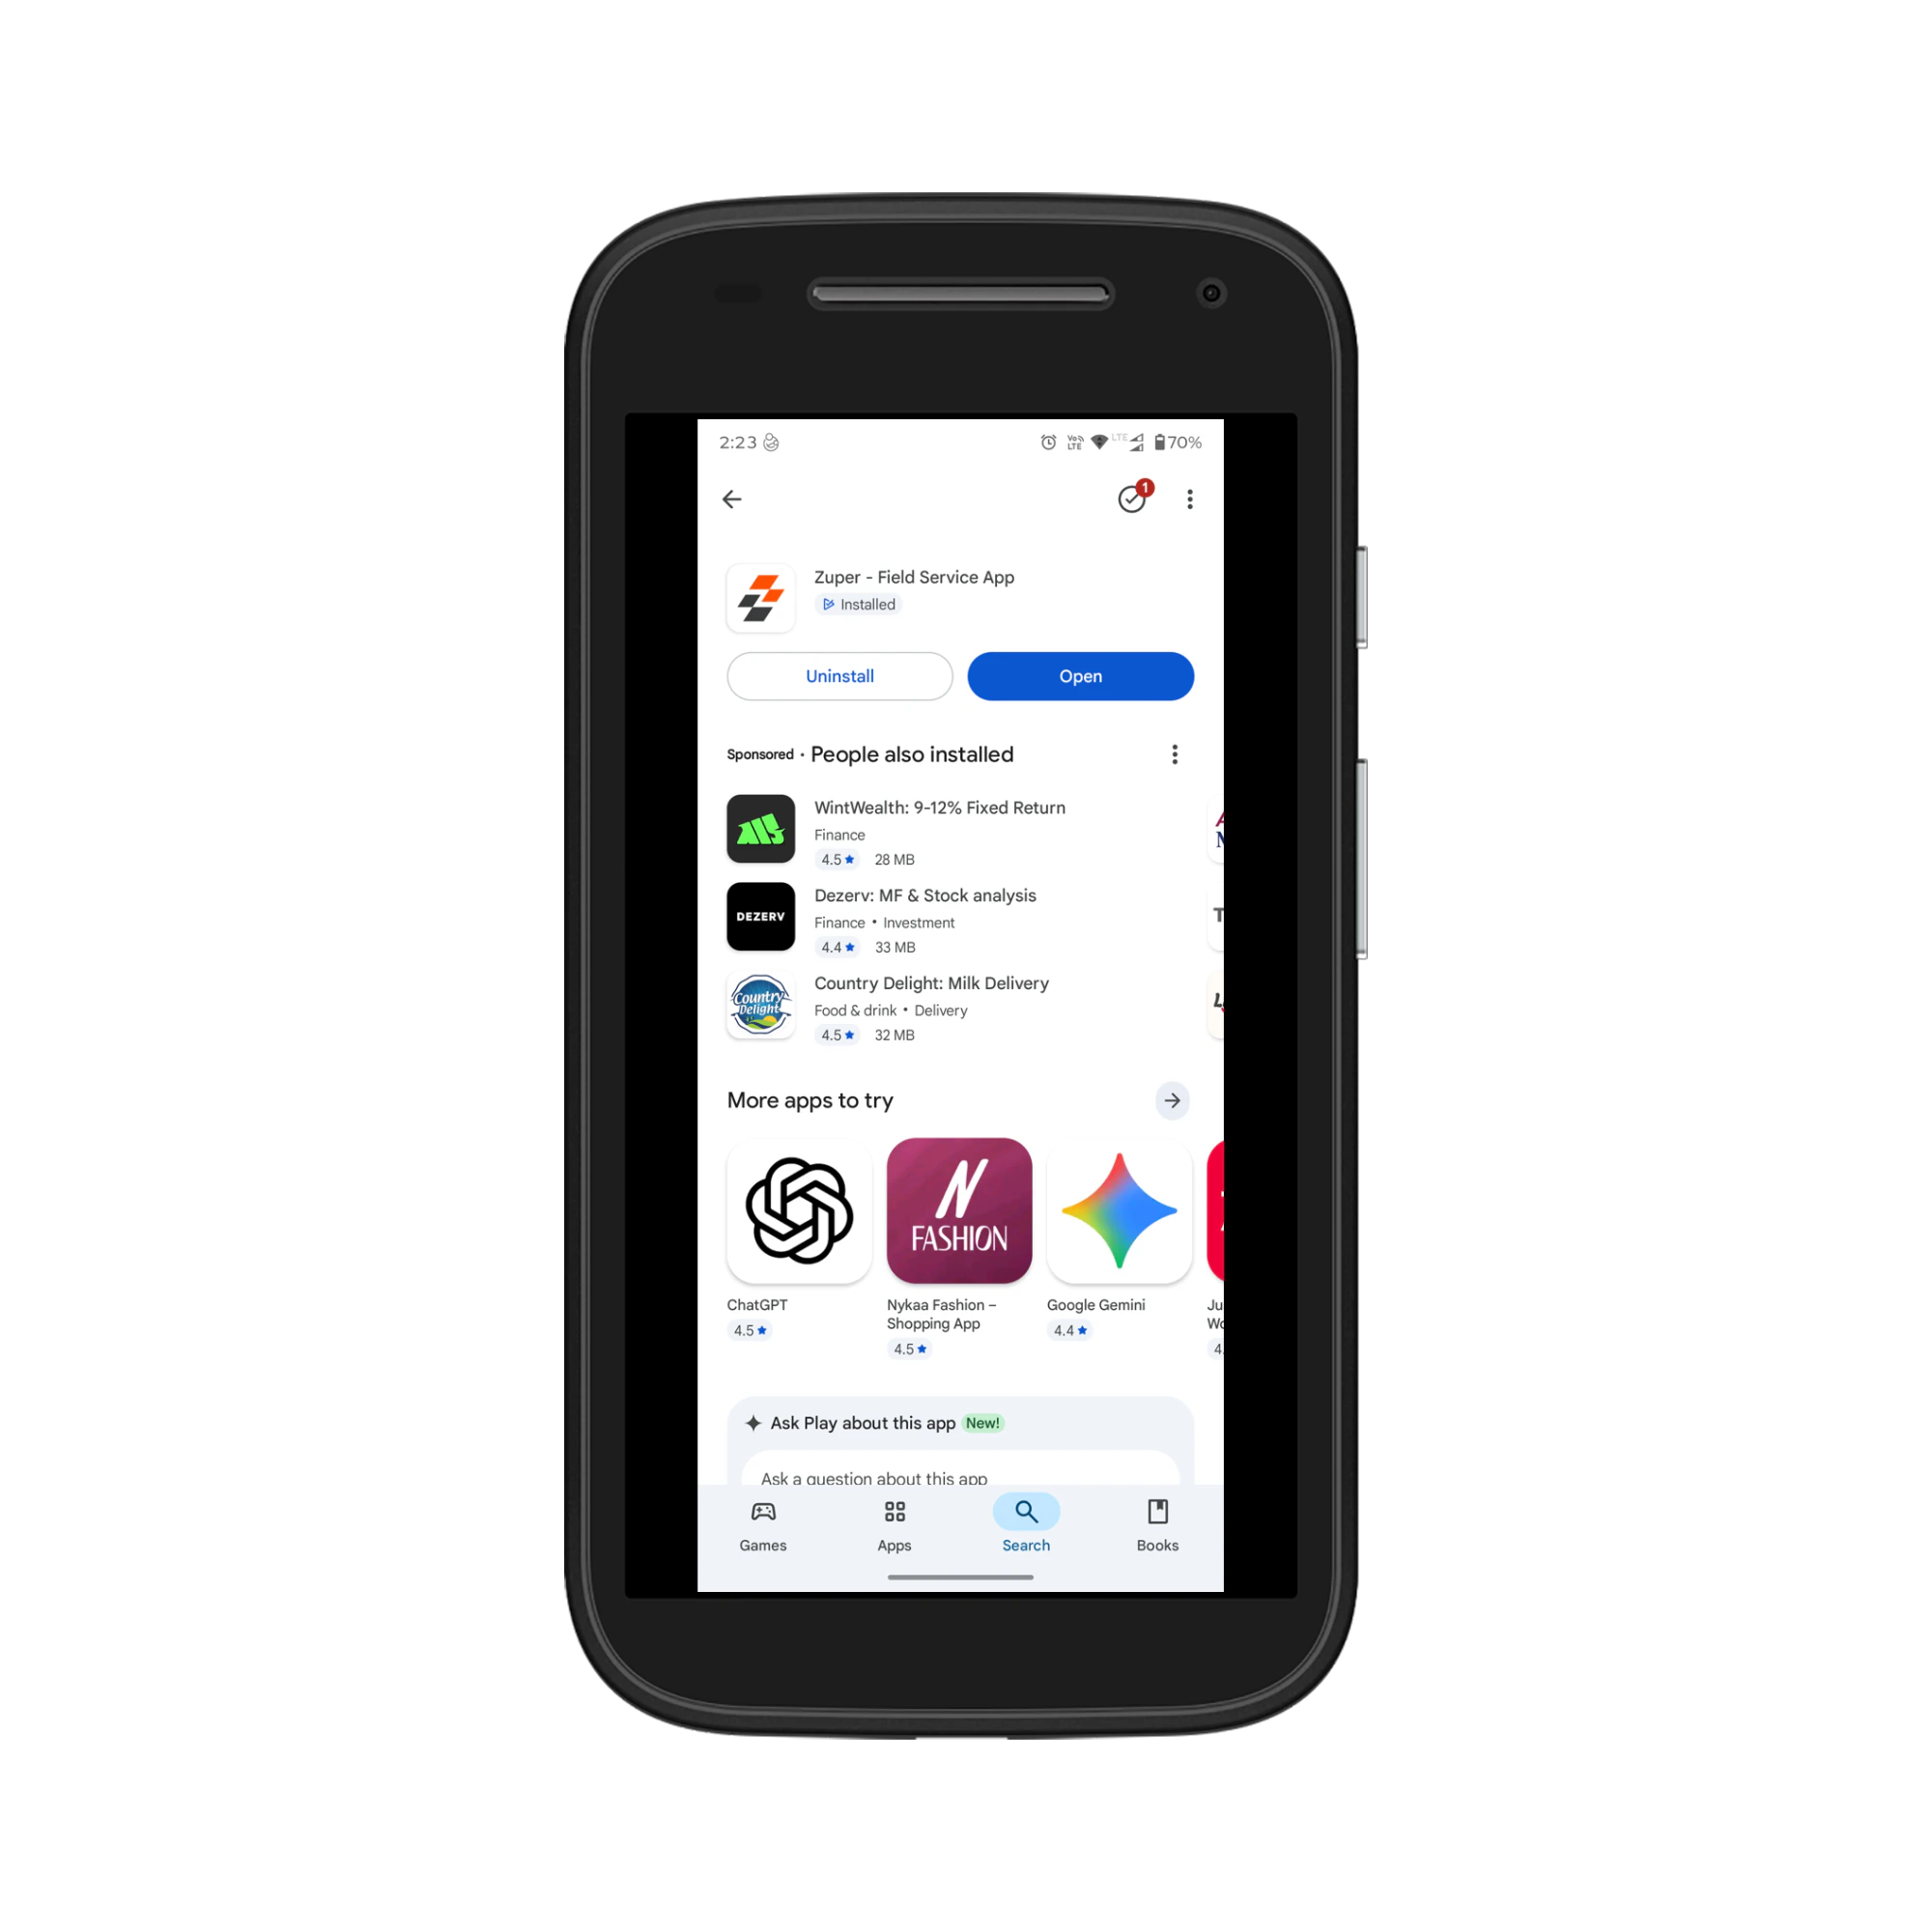
 5. Once installed, tap **Open** or click the **Zuper** app icon on your home screen to begin using the app.
 For more information on device requirements for a smooth performance, check out this [article](https://docs.zuper.co/Zuper_Mobile_Apps/Device_Requirements).
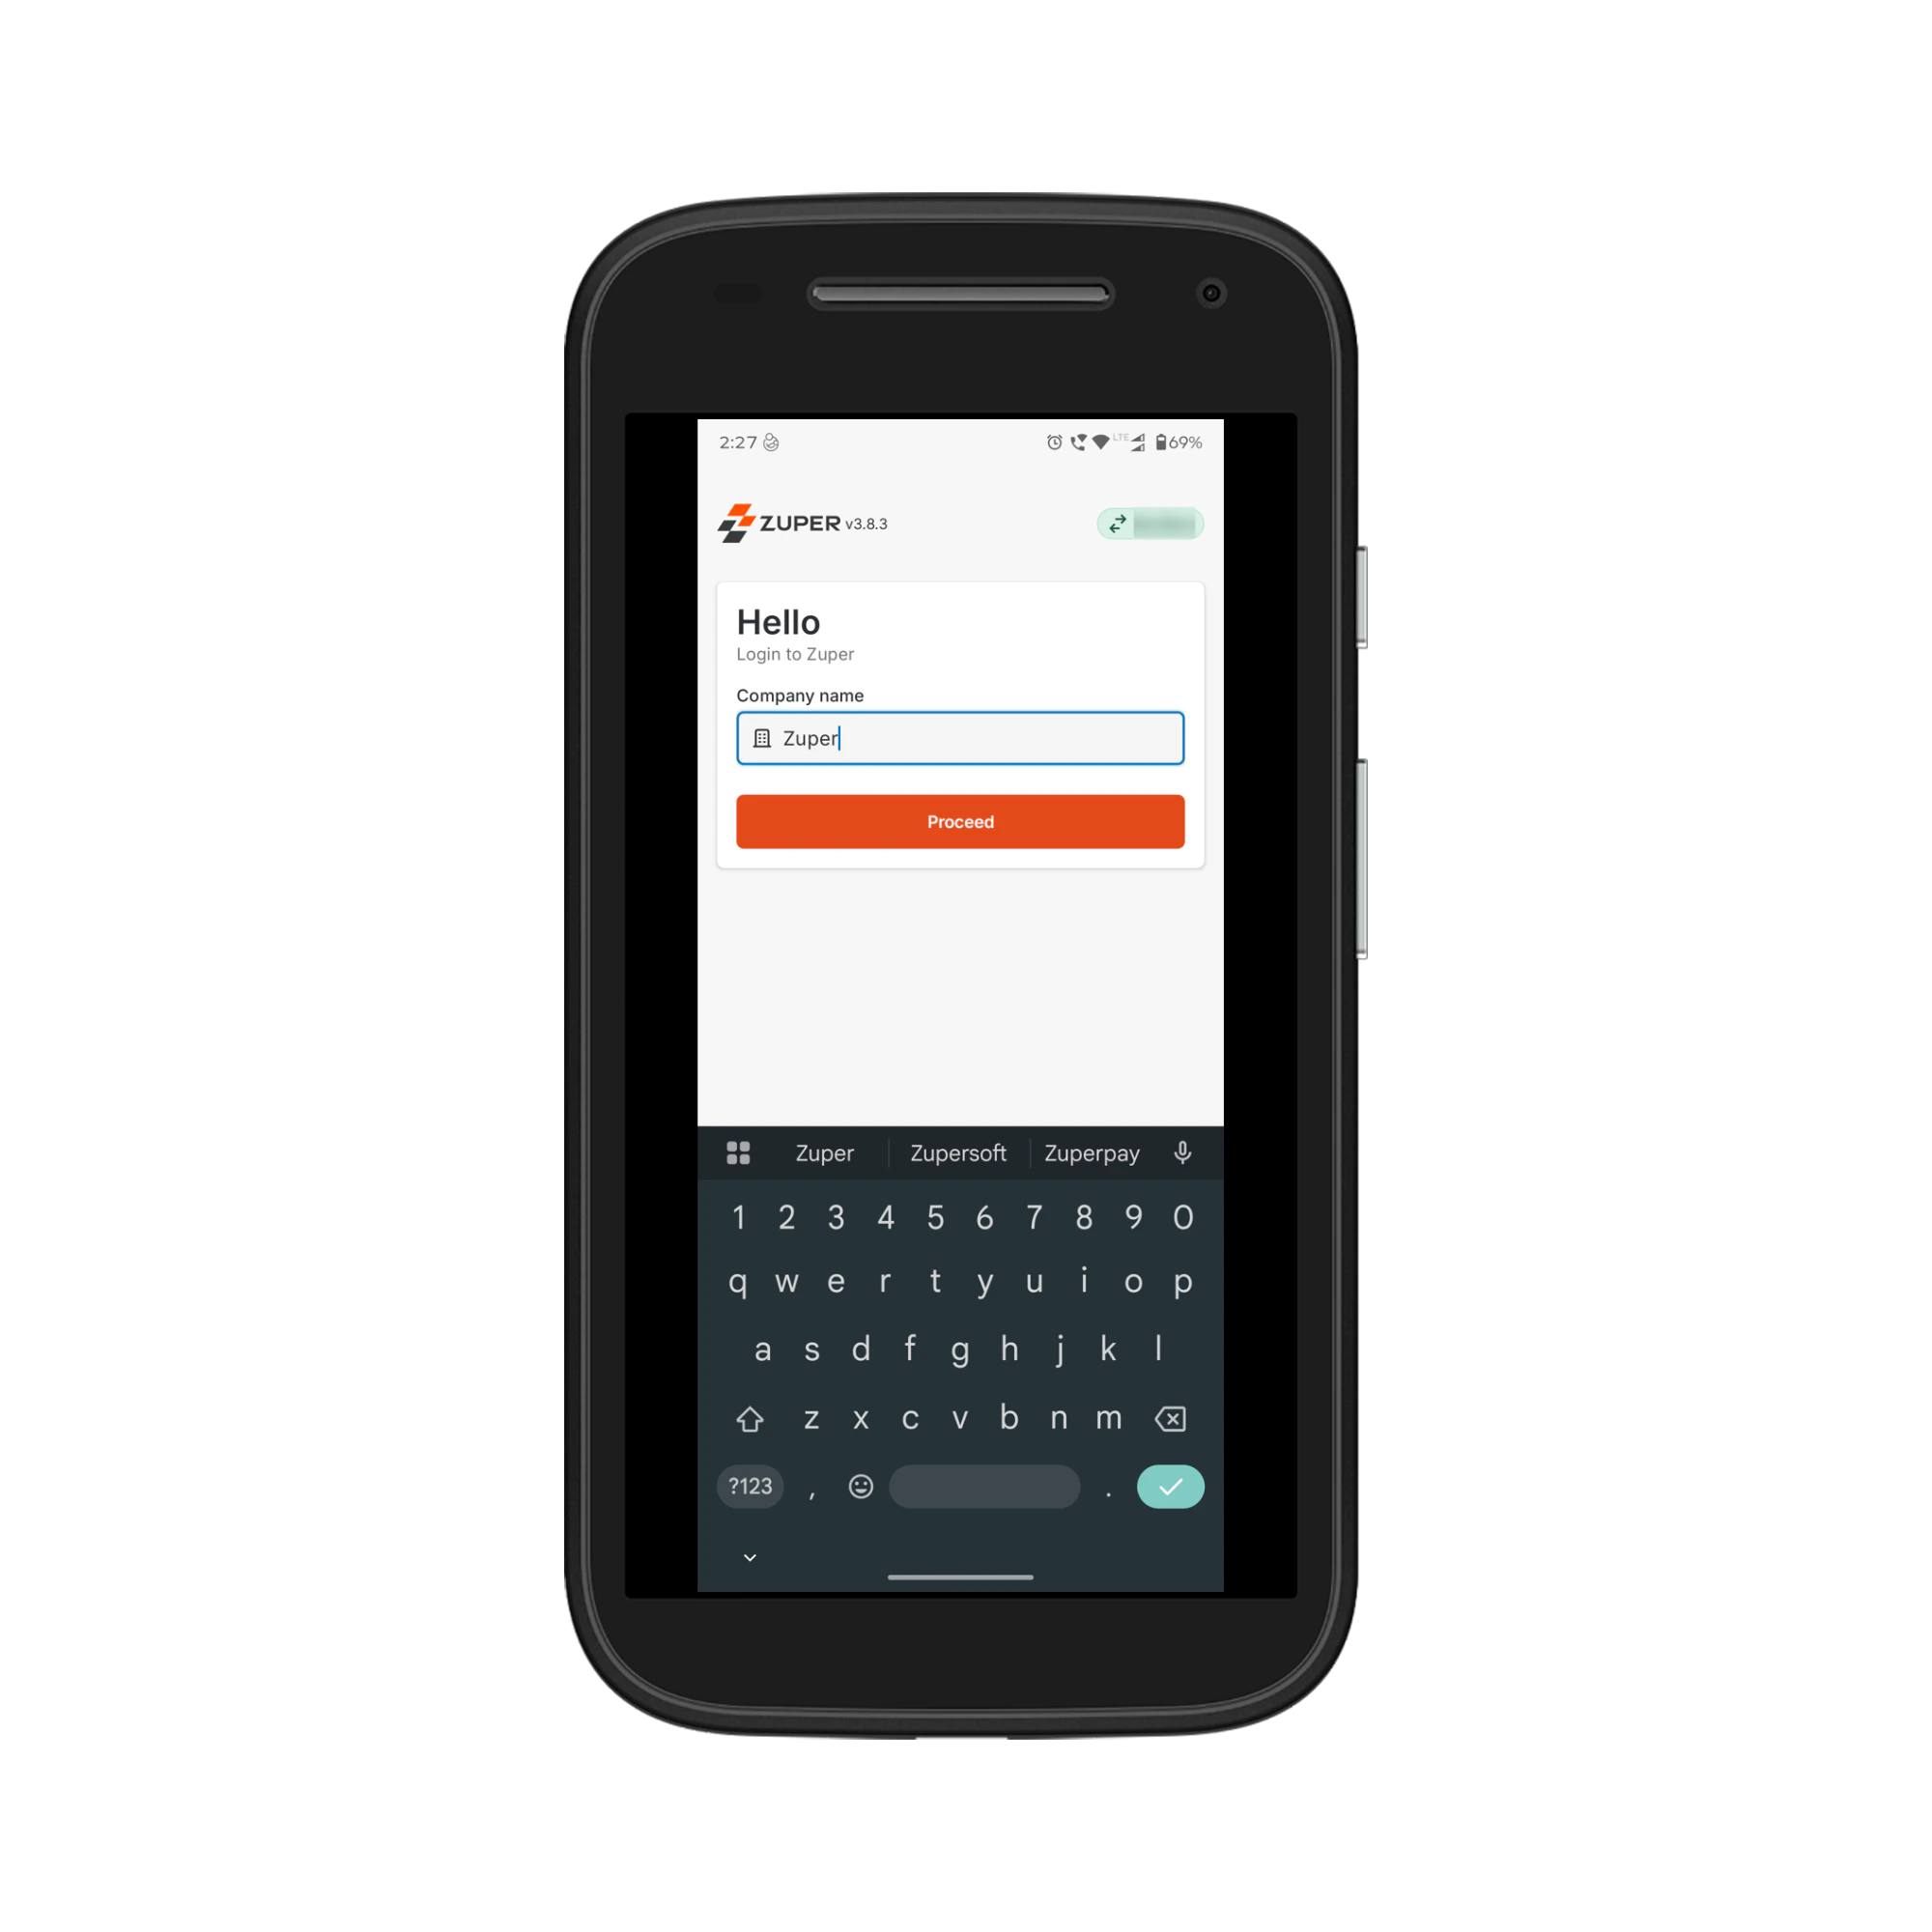
# Logging In to the Mobile App
1. Open the **Zuper Field Service App** on your mobile device.
Enter the **Company Name** and tap **Proceed** to continue.
For more information on device requirements for a smooth performance, check out this [article](https://docs.zuper.co/Zuper_Mobile_Apps/Device_Requirements).
# Logging In to the Mobile App
1. Open the **Zuper Field Service App** on your mobile device.
Enter the **Company Name** and tap **Proceed** to continue.
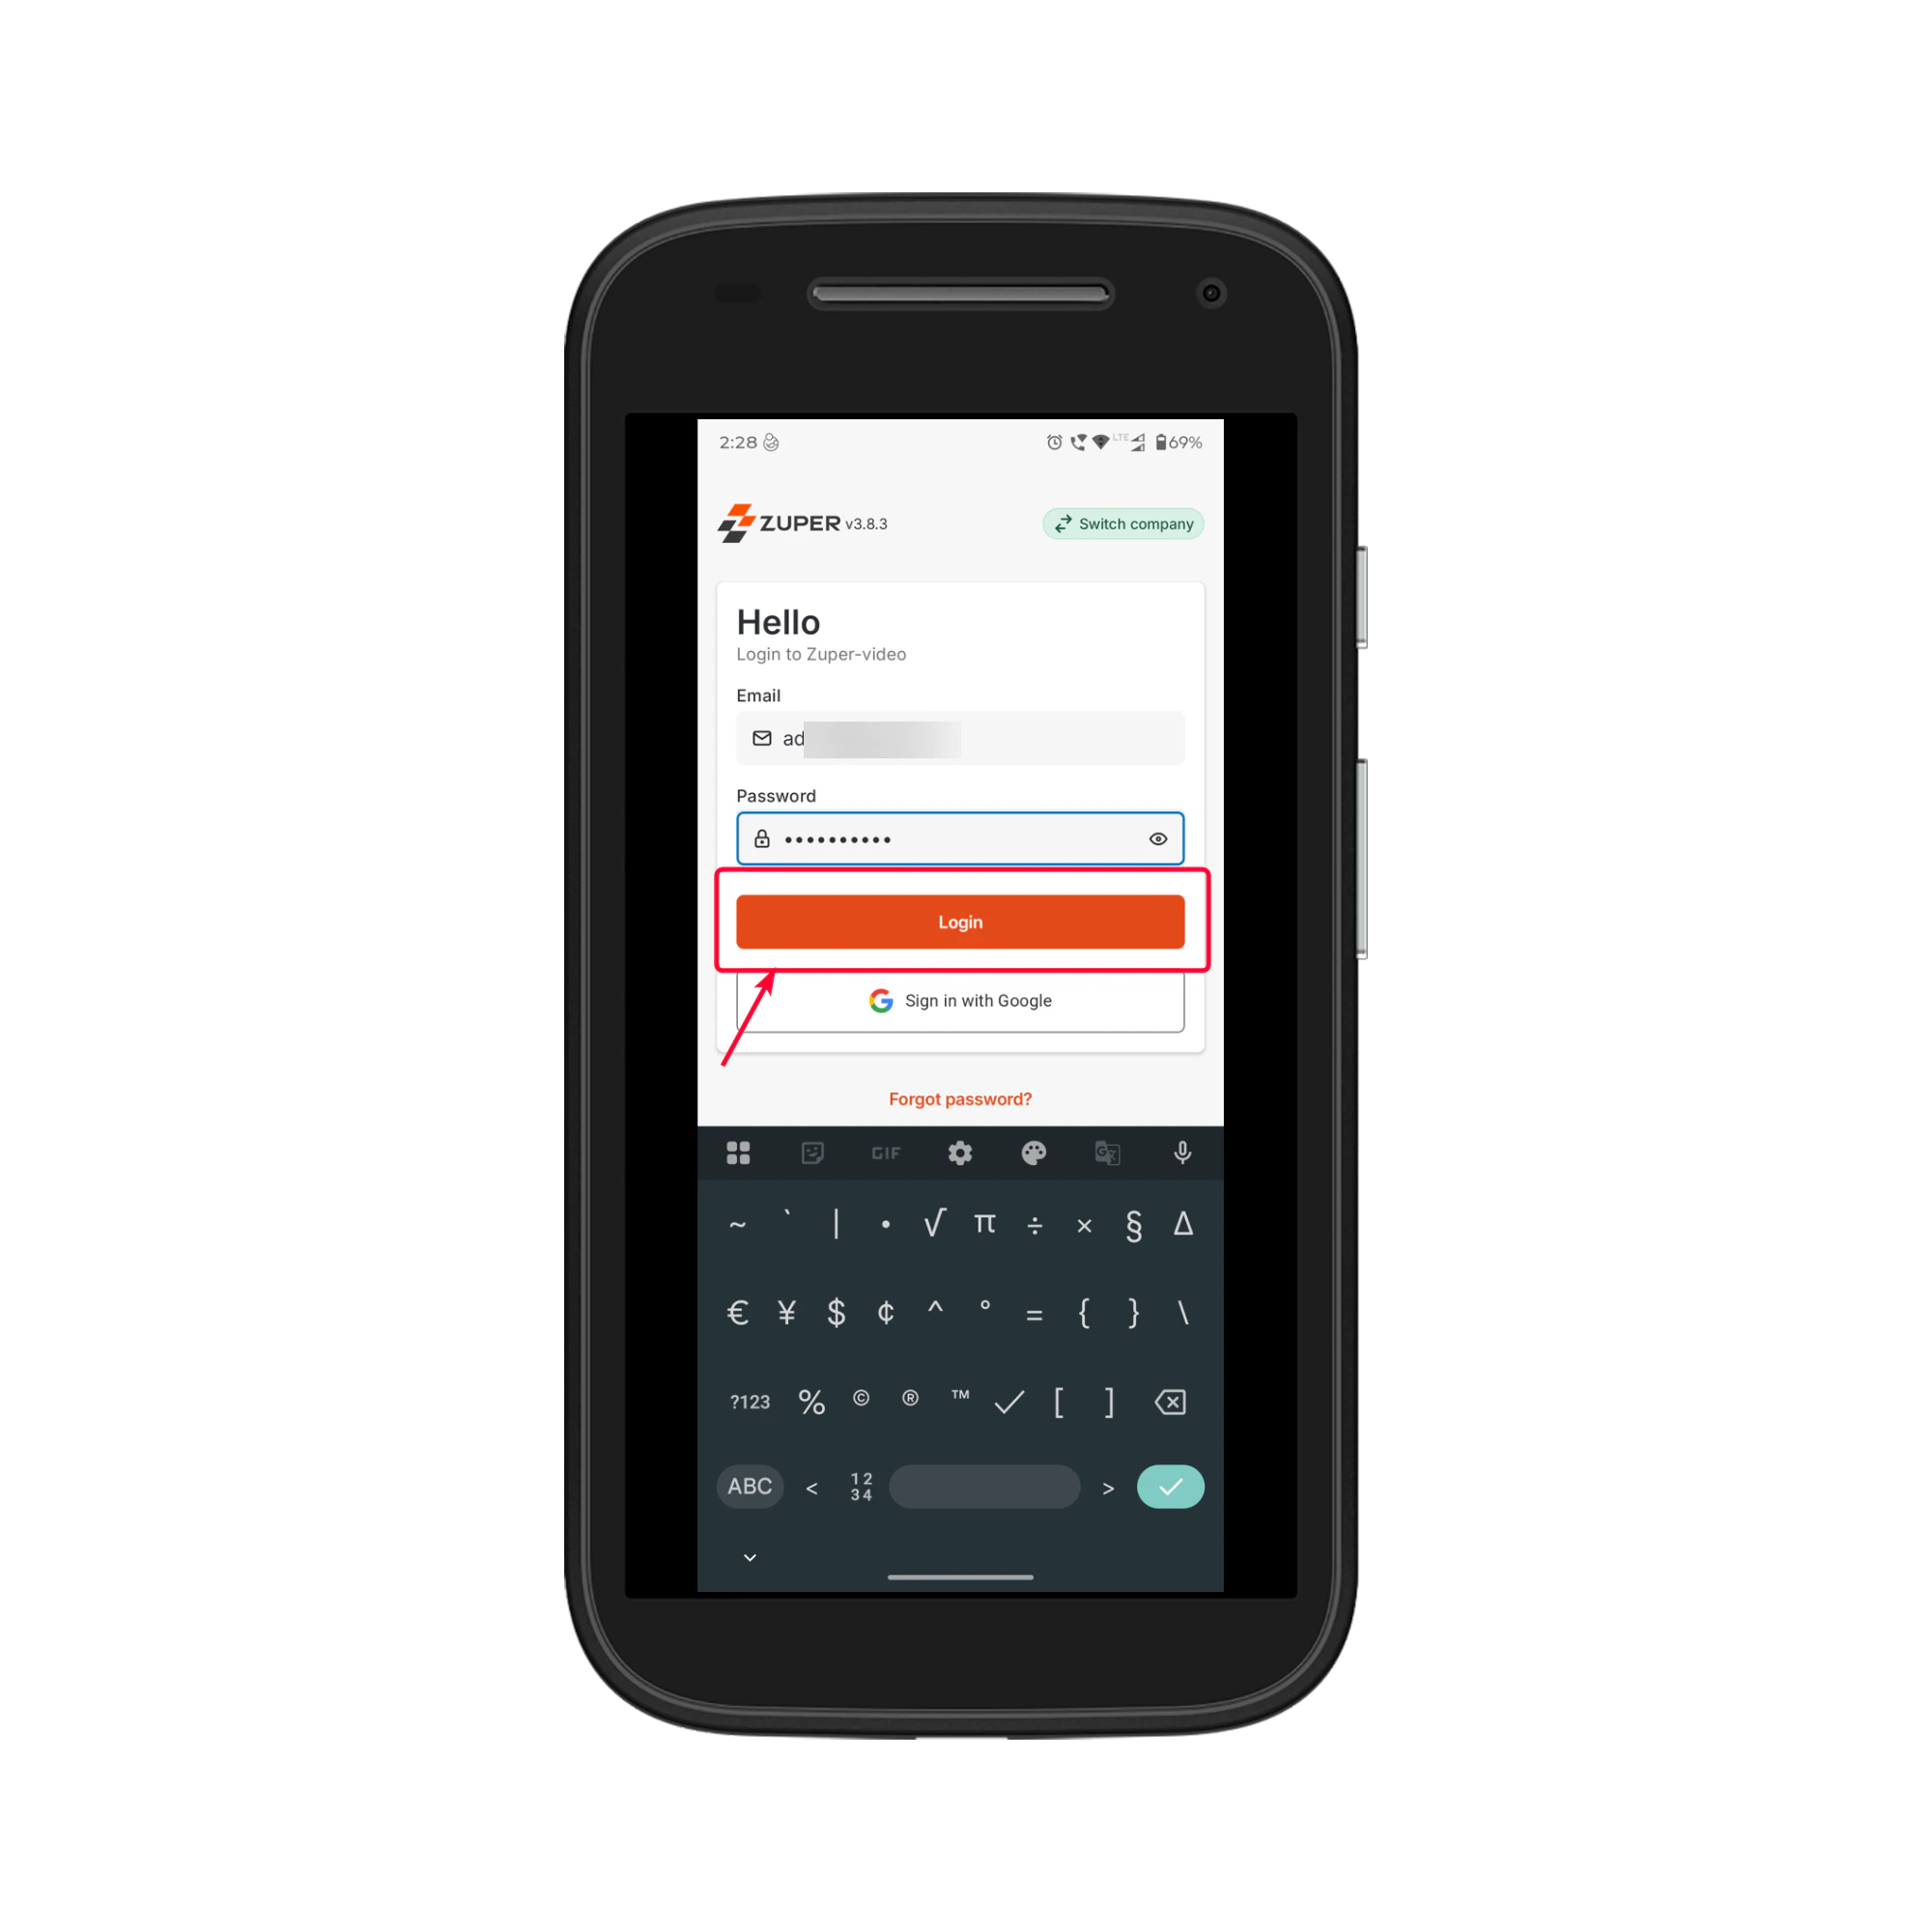
 3. Enter your **registered email** and **password** provided by your administrator.
4. Tap **Login**.
3. Enter your **registered email** and **password** provided by your administrator.
4. Tap **Login**.
 3. After successful login, you will be redirected to the **Dashboard**.
**Note:** You can also log in using **Sign in with Google** if your organization has enabled Google authentication. This allows you to access the app quickly without manually entering your password.
If you have forgotten your password:
1. On the **login screen**, tap **Forgot Password?**
2. Enter your **Company Name** and registered **email address**.
3. Tap **Send**. You will receive an email with **password reset instructions**.
4. Follow the instructions in the email to create a **new password**.
5. Return to the app and log in using your **new password**.
**Note:**
* If you don’t receive the email, check your **spam/junk folder**.
* For further assistance, contact your administrator.
# Navigating the Dashboard
After logging into the Zuper Mobile App, you will land on the **Dashboard**, which gives you a quick overview of your workday, schedule, and assigned jobs.
3. After successful login, you will be redirected to the **Dashboard**.
**Note:** You can also log in using **Sign in with Google** if your organization has enabled Google authentication. This allows you to access the app quickly without manually entering your password.
If you have forgotten your password:
1. On the **login screen**, tap **Forgot Password?**
2. Enter your **Company Name** and registered **email address**.
3. Tap **Send**. You will receive an email with **password reset instructions**.
4. Follow the instructions in the email to create a **new password**.
5. Return to the app and log in using your **new password**.
**Note:**
* If you don’t receive the email, check your **spam/junk folder**.
* For further assistance, contact your administrator.
# Navigating the Dashboard
After logging into the Zuper Mobile App, you will land on the **Dashboard**, which gives you a quick overview of your workday, schedule, and assigned jobs.
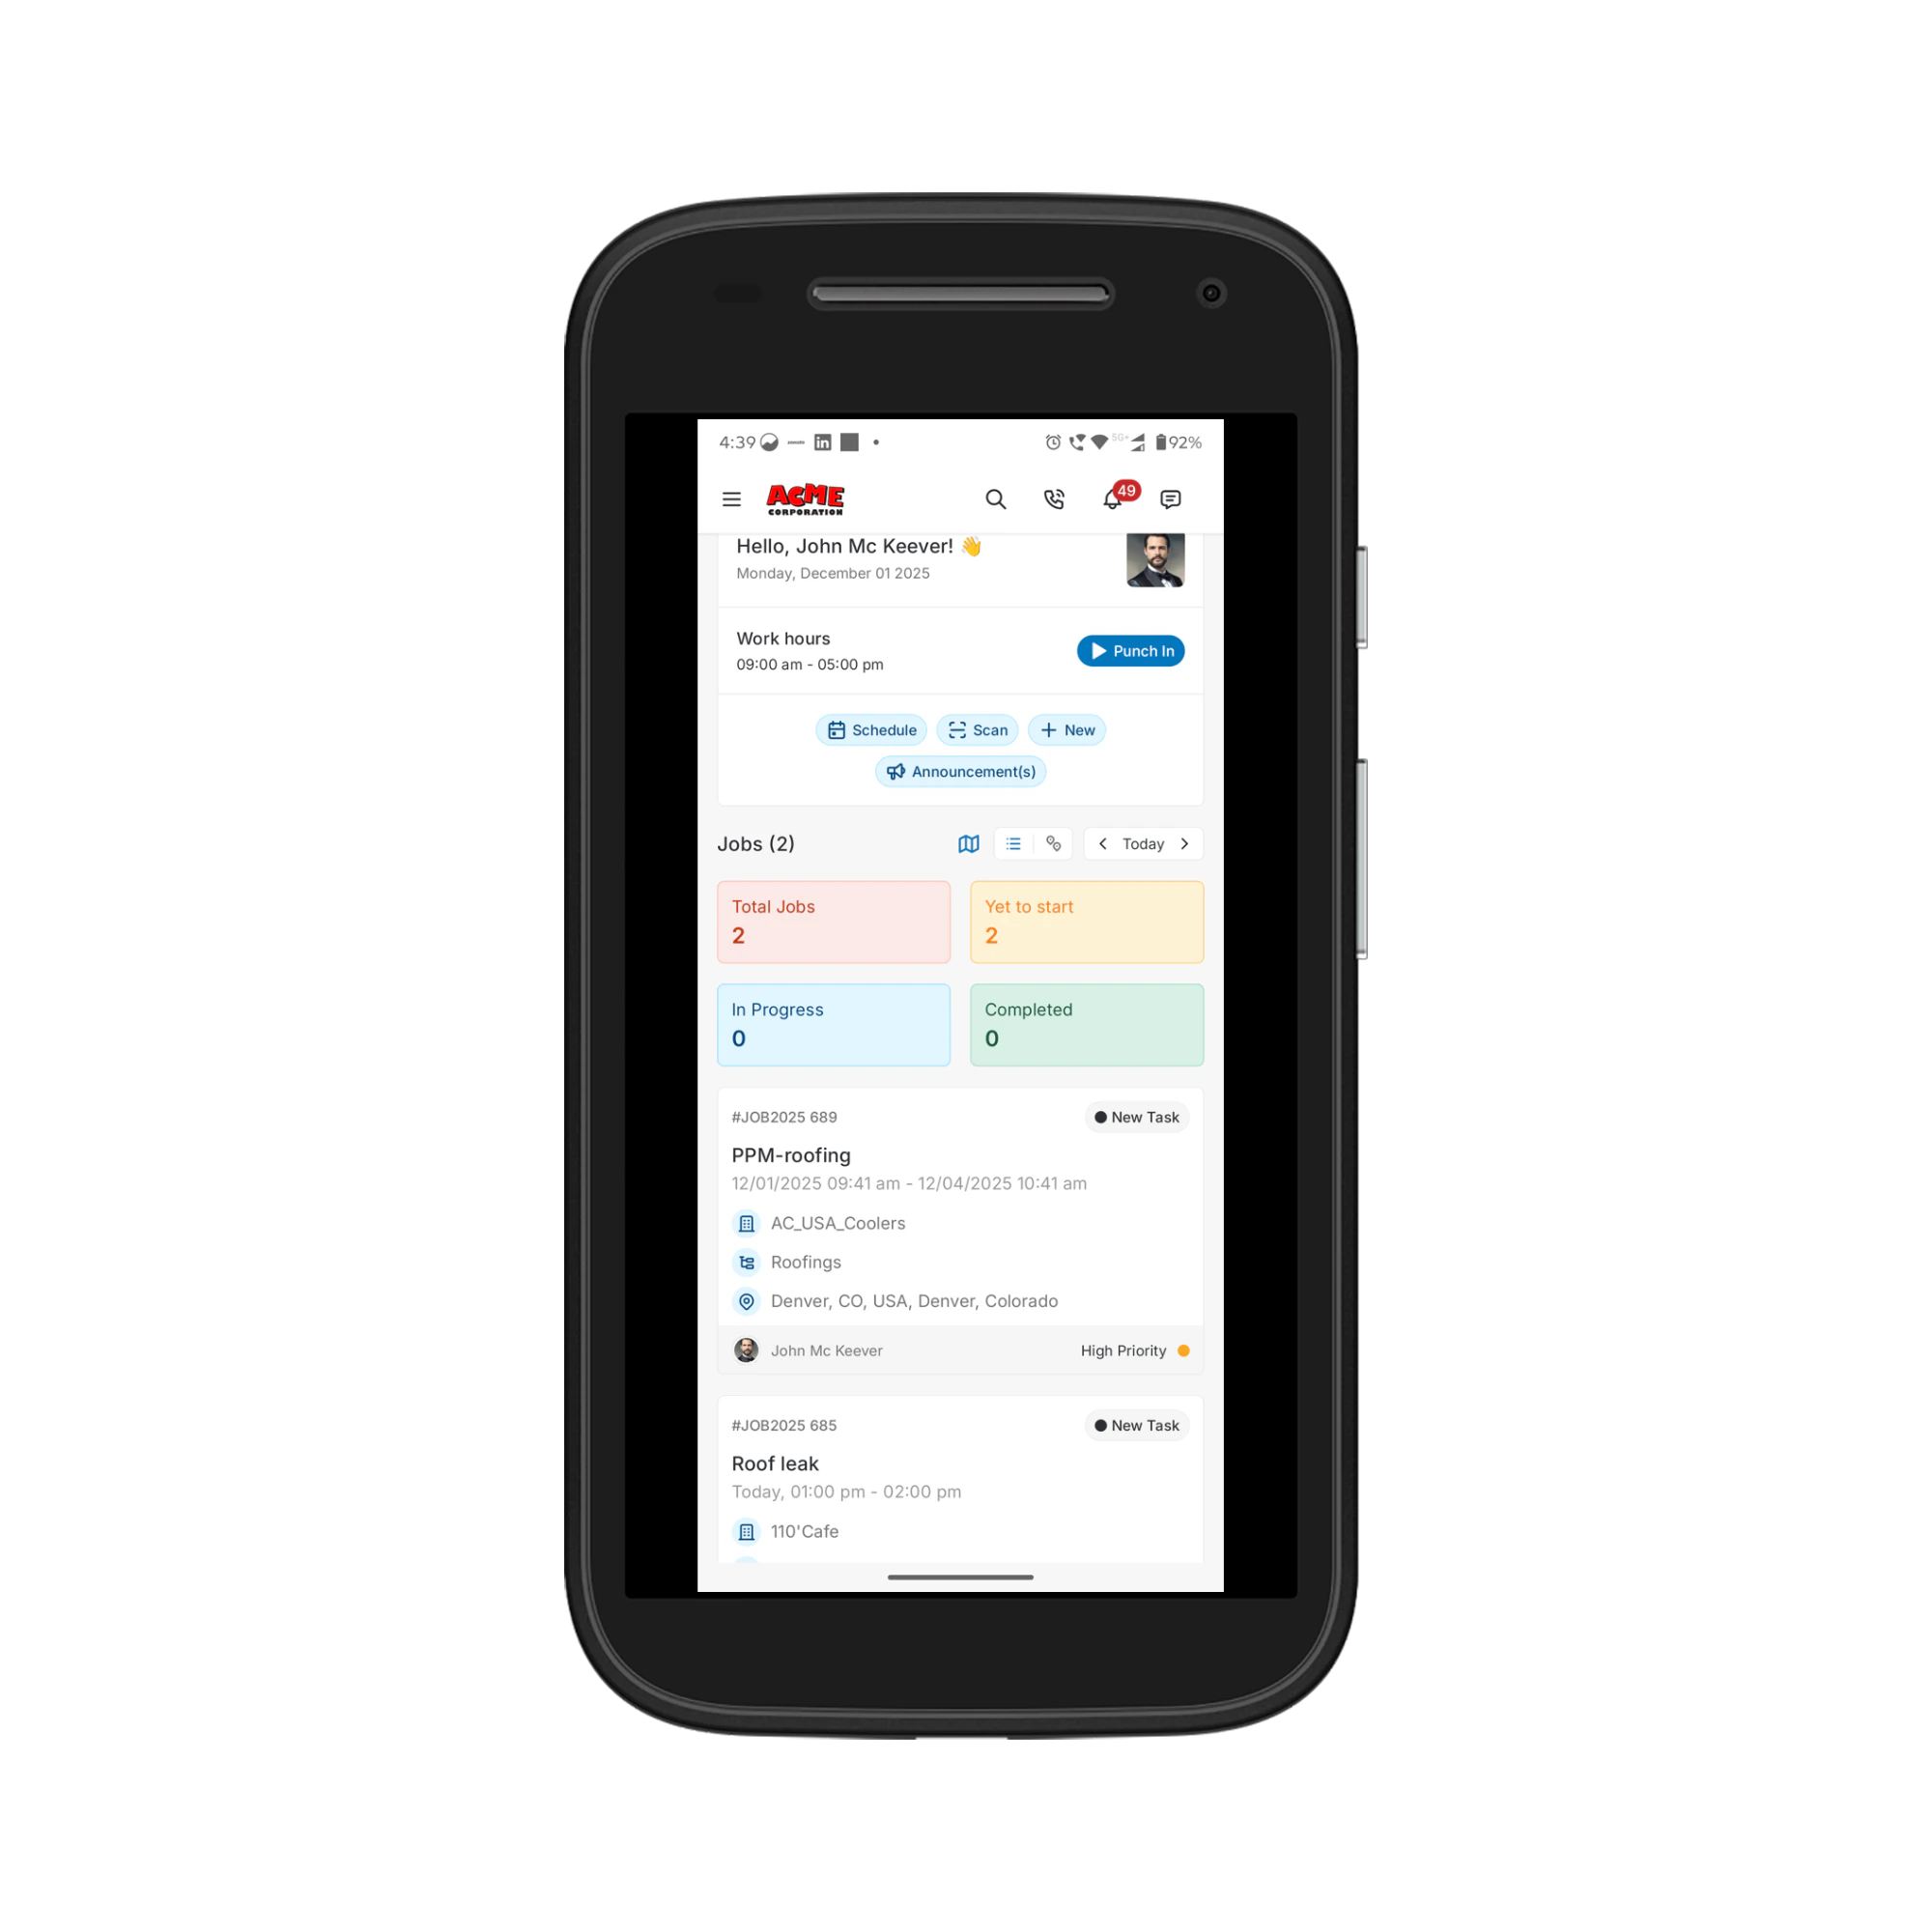 ### Greeting & Workday Summary
At the top of the dashboard, you will see a personalized section that includes:
* A greeting with your **name**
* The **current date**
* Your **scheduled work hours** for the day
* A **Punch In / Punch Out** button to record your attendance.
### Greeting & Workday Summary
At the top of the dashboard, you will see a personalized section that includes:
* A greeting with your **name**
* The **current date**
* Your **scheduled work hours** for the day
* A **Punch In / Punch Out** button to record your attendance.
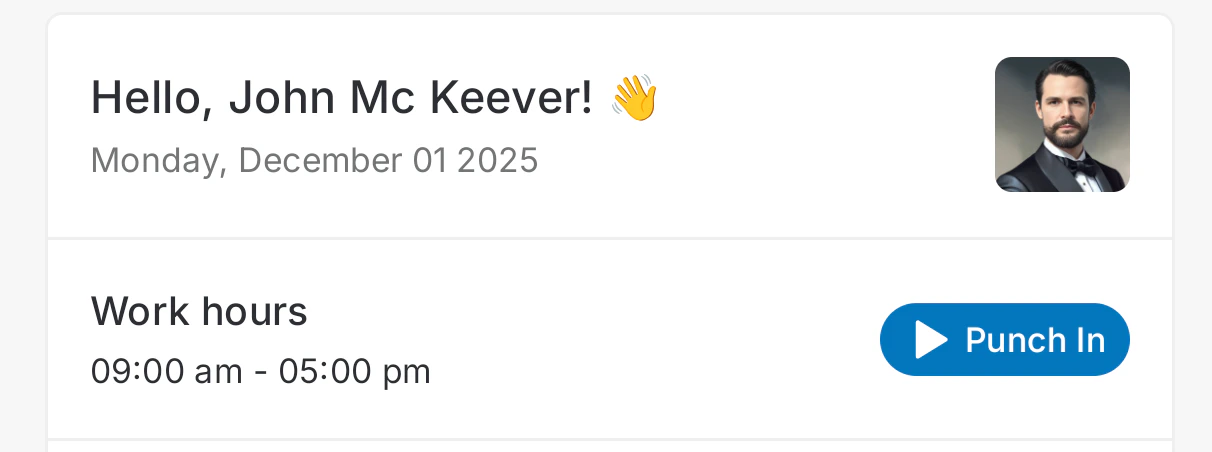 **Note:**\
To ensure accurate attendance tracking, make sure Zuper has the necessary **location access permissions** enabled on your device.
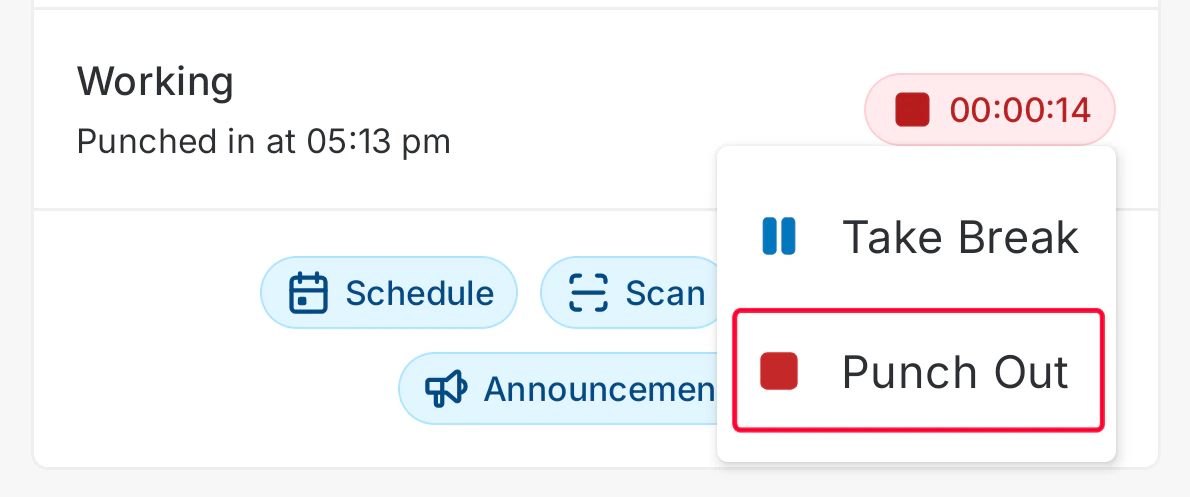
**Punching In/Out:**
* Tap **Punch In** at the start of your workday. Once punched in, the app begins tracking your work duration.
* At the end of your shift, tap **Punch Out** to complete your attendance log.
**Note:**\
To ensure accurate attendance tracking, make sure Zuper has the necessary **location access permissions** enabled on your device.
**Punching In/Out:**
* Tap **Punch In** at the start of your workday. Once punched in, the app begins tracking your work duration.
* At the end of your shift, tap **Punch Out** to complete your attendance log.
 ### Quick Action Buttons
Below the workday summary, you’ll see quick-access buttons that offer one-tap access to key features:
* **Schedule** – Opens the calendar view where you can view your **daily, weekly, or monthly** job schedule.
* **Scan** – Allows you to scan job-related QR codes, asset tags, or equipment barcodes after enabling **camera access permission** on your device.
* **New** – Enables you to create new records such as **Jobs, Contacts, Quotes, or Proposals**, depending on your assigned permissions.
* **Announcement(s)** – Displays important updates or notices shared by your administrator or organization.
### Quick Action Buttons
Below the workday summary, you’ll see quick-access buttons that offer one-tap access to key features:
* **Schedule** – Opens the calendar view where you can view your **daily, weekly, or monthly** job schedule.
* **Scan** – Allows you to scan job-related QR codes, asset tags, or equipment barcodes after enabling **camera access permission** on your device.
* **New** – Enables you to create new records such as **Jobs, Contacts, Quotes, or Proposals**, depending on your assigned permissions.
* **Announcement(s)** – Displays important updates or notices shared by your administrator or organization.
 These options allow you to perform essential actions directly from the dashboard.
### Jobs Summary Cards
A set of colored summary cards gives you a quick view of all your assigned jobs within the selected date range:
* **Total Jobs** – Total number of jobs assigned
* **Yet to Start** – Jobs that are new and not yet started
* **In Progress** – Jobs currently underway
* **Completed** – Jobs finished and closed
These options allow you to perform essential actions directly from the dashboard.
### Jobs Summary Cards
A set of colored summary cards gives you a quick view of all your assigned jobs within the selected date range:
* **Total Jobs** – Total number of jobs assigned
* **Yet to Start** – Jobs that are new and not yet started
* **In Progress** – Jobs currently underway
* **Completed** – Jobs finished and closed
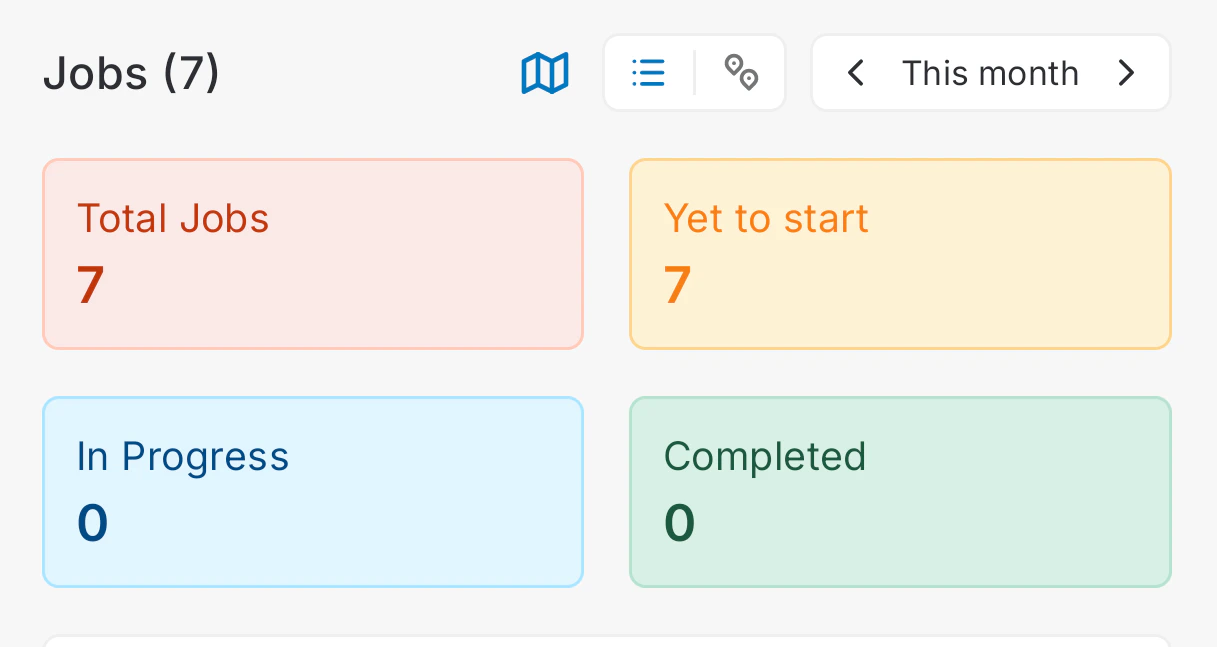 These indicators help you understand your workload briefly.
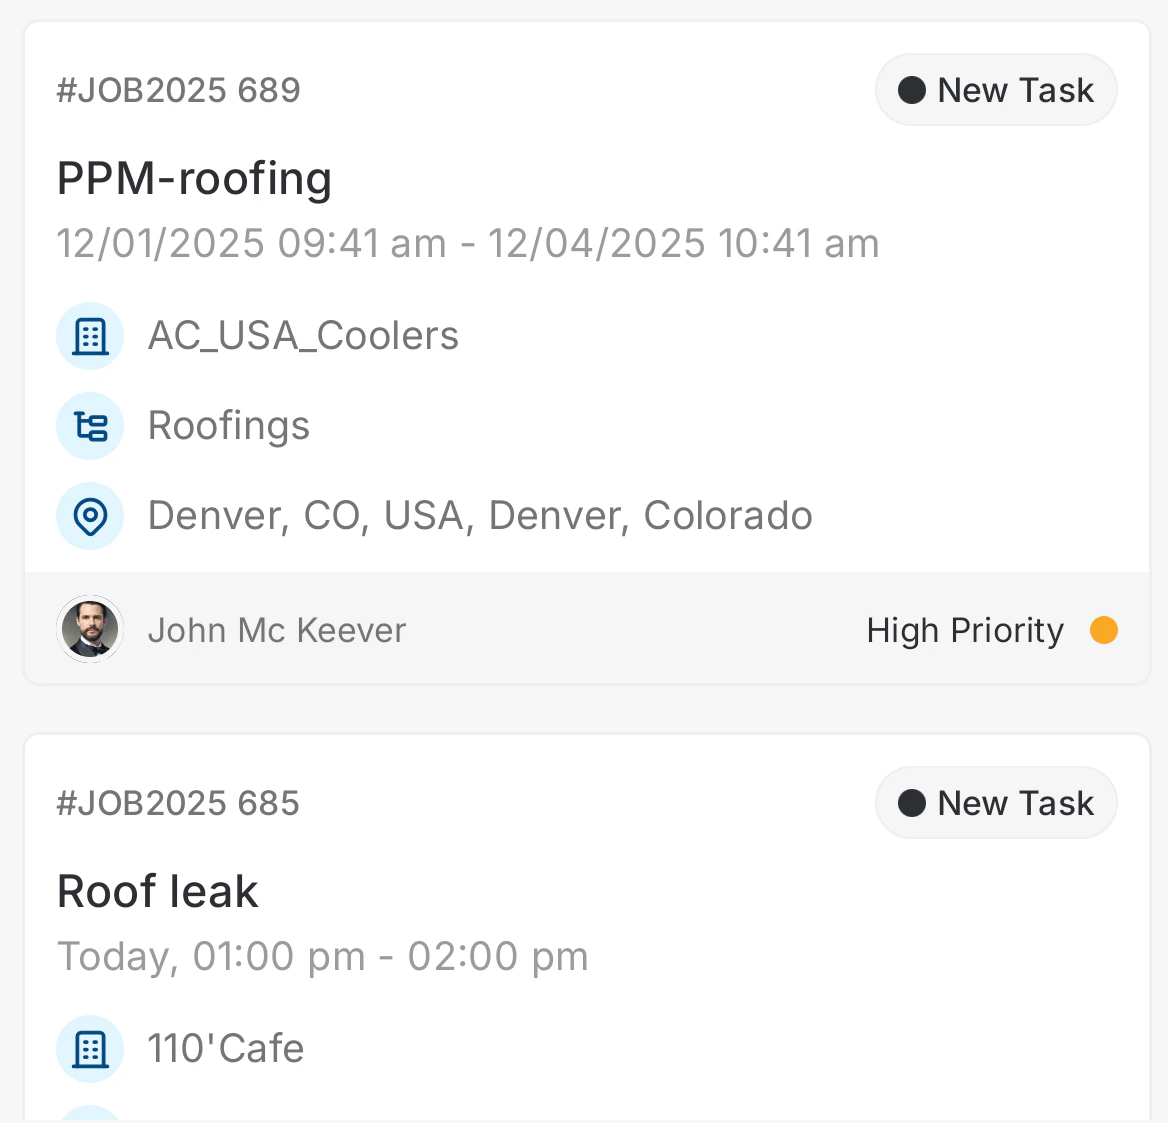
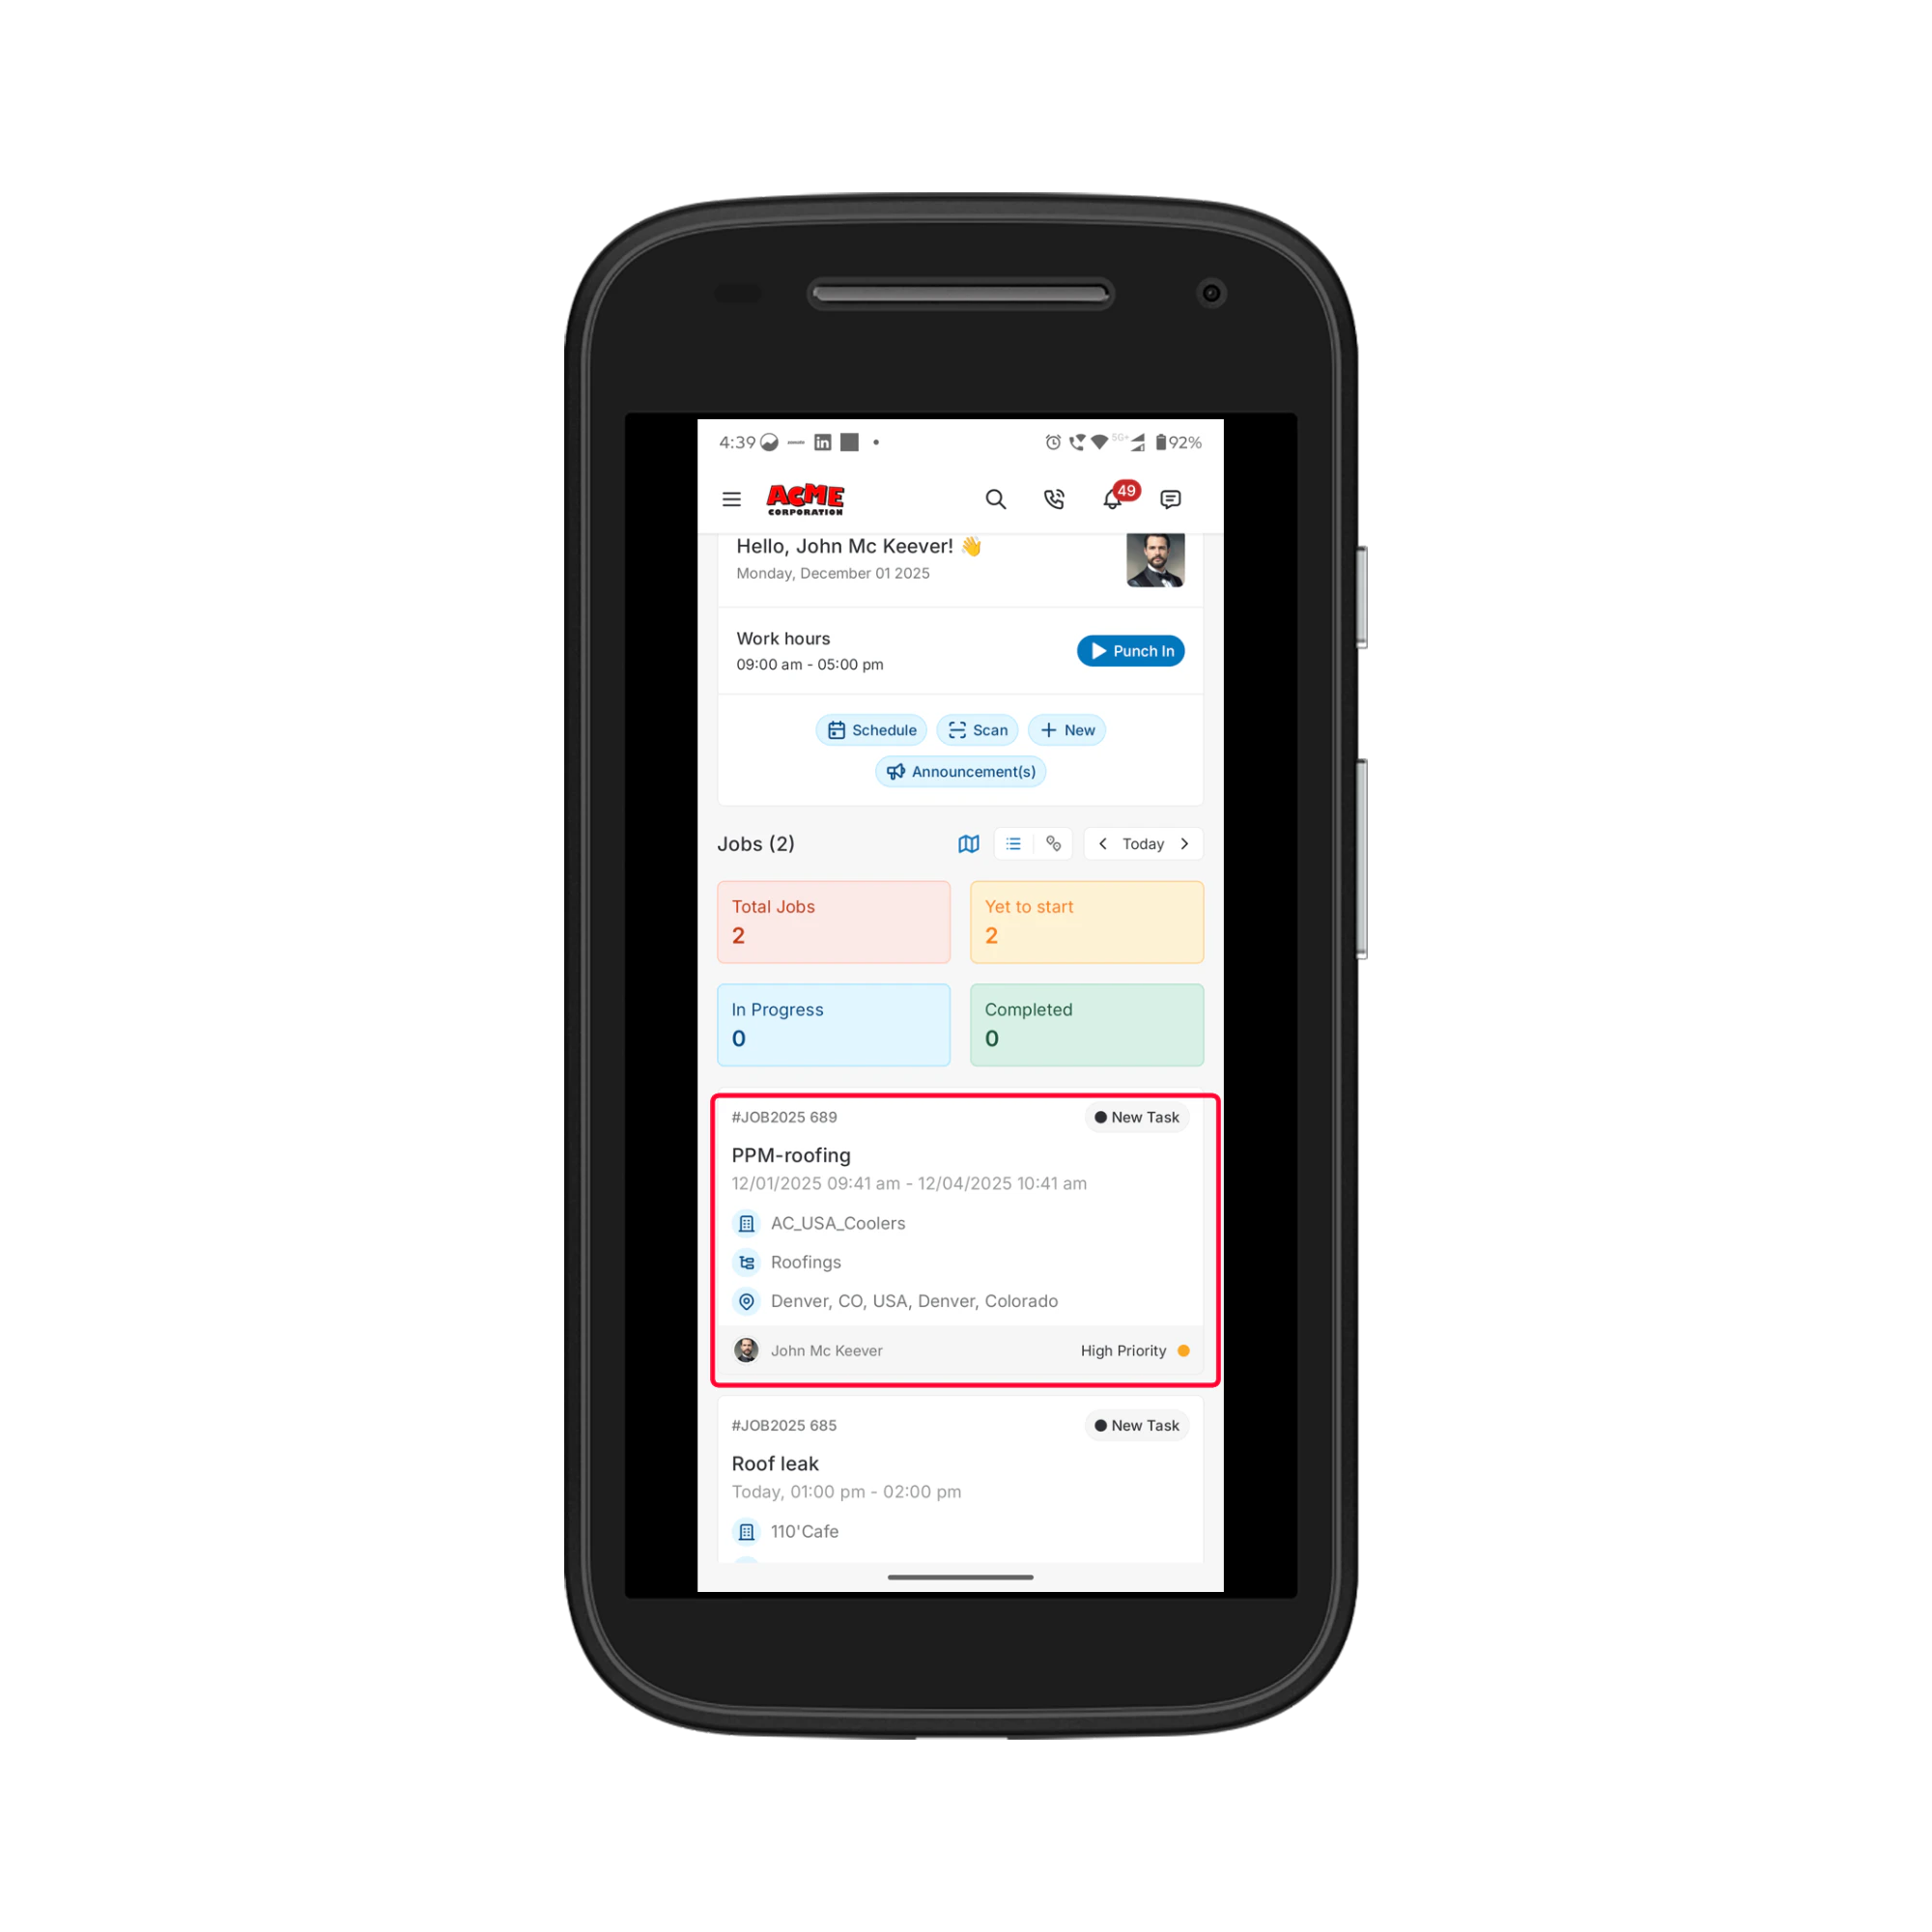
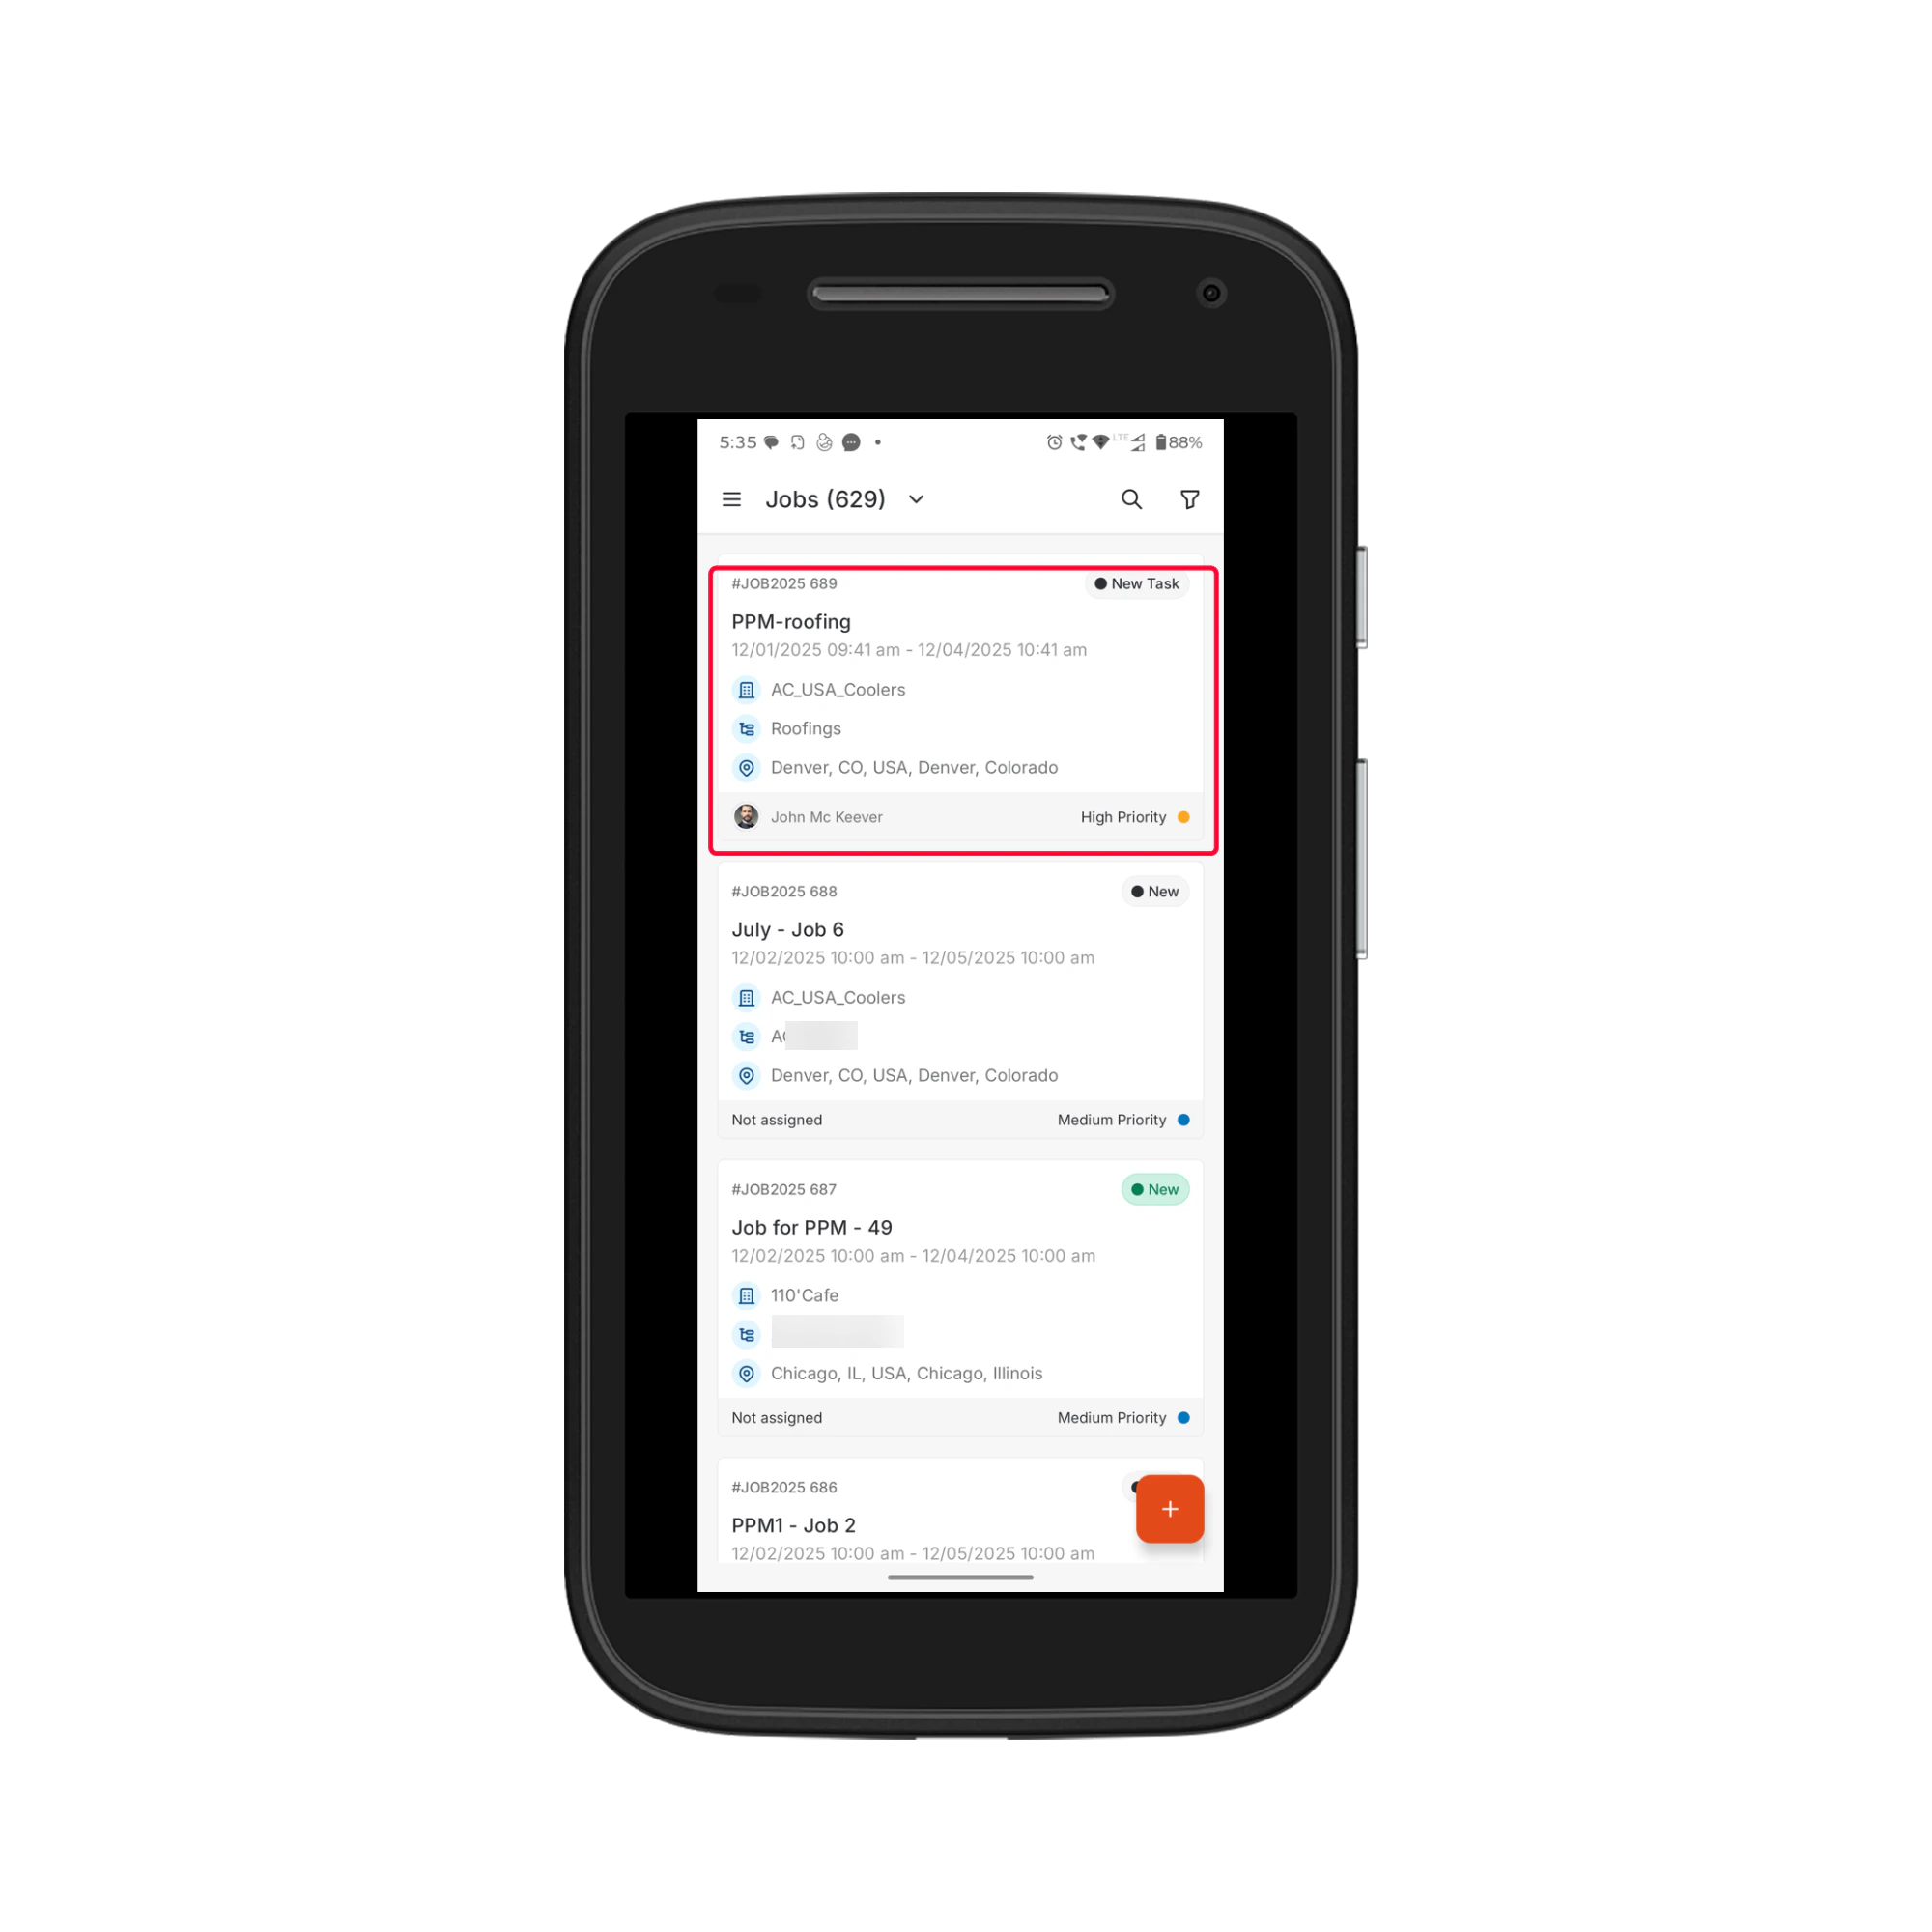
### Assigned Jobs
Below the summary cards, scroll down to view all jobs assigned for the selected date range. Each job card shows:
* Job number and status (e.g., *On the way*)
* Job title and scheduled date & time
* Contact or organization information
* Job category
* Job location
* Assigned user(s)
* Job priority
These indicators help you understand your workload briefly.
### Assigned Jobs
Below the summary cards, scroll down to view all jobs assigned for the selected date range. Each job card shows:
* Job number and status (e.g., *On the way*)
* Job title and scheduled date & time
* Contact or organization information
* Job category
* Job location
* Assigned user(s)
* Job priority
 Tap any job card to open the Job Details page and begin working on it.
### Additional Actions
At the top-right corner of the Dashboard, you will find quick-access icons that help you perform essential actions without navigating away from the main screen.
Tap any job card to open the Job Details page and begin working on it.
### Additional Actions
At the top-right corner of the Dashboard, you will find quick-access icons that help you perform essential actions without navigating away from the main screen.
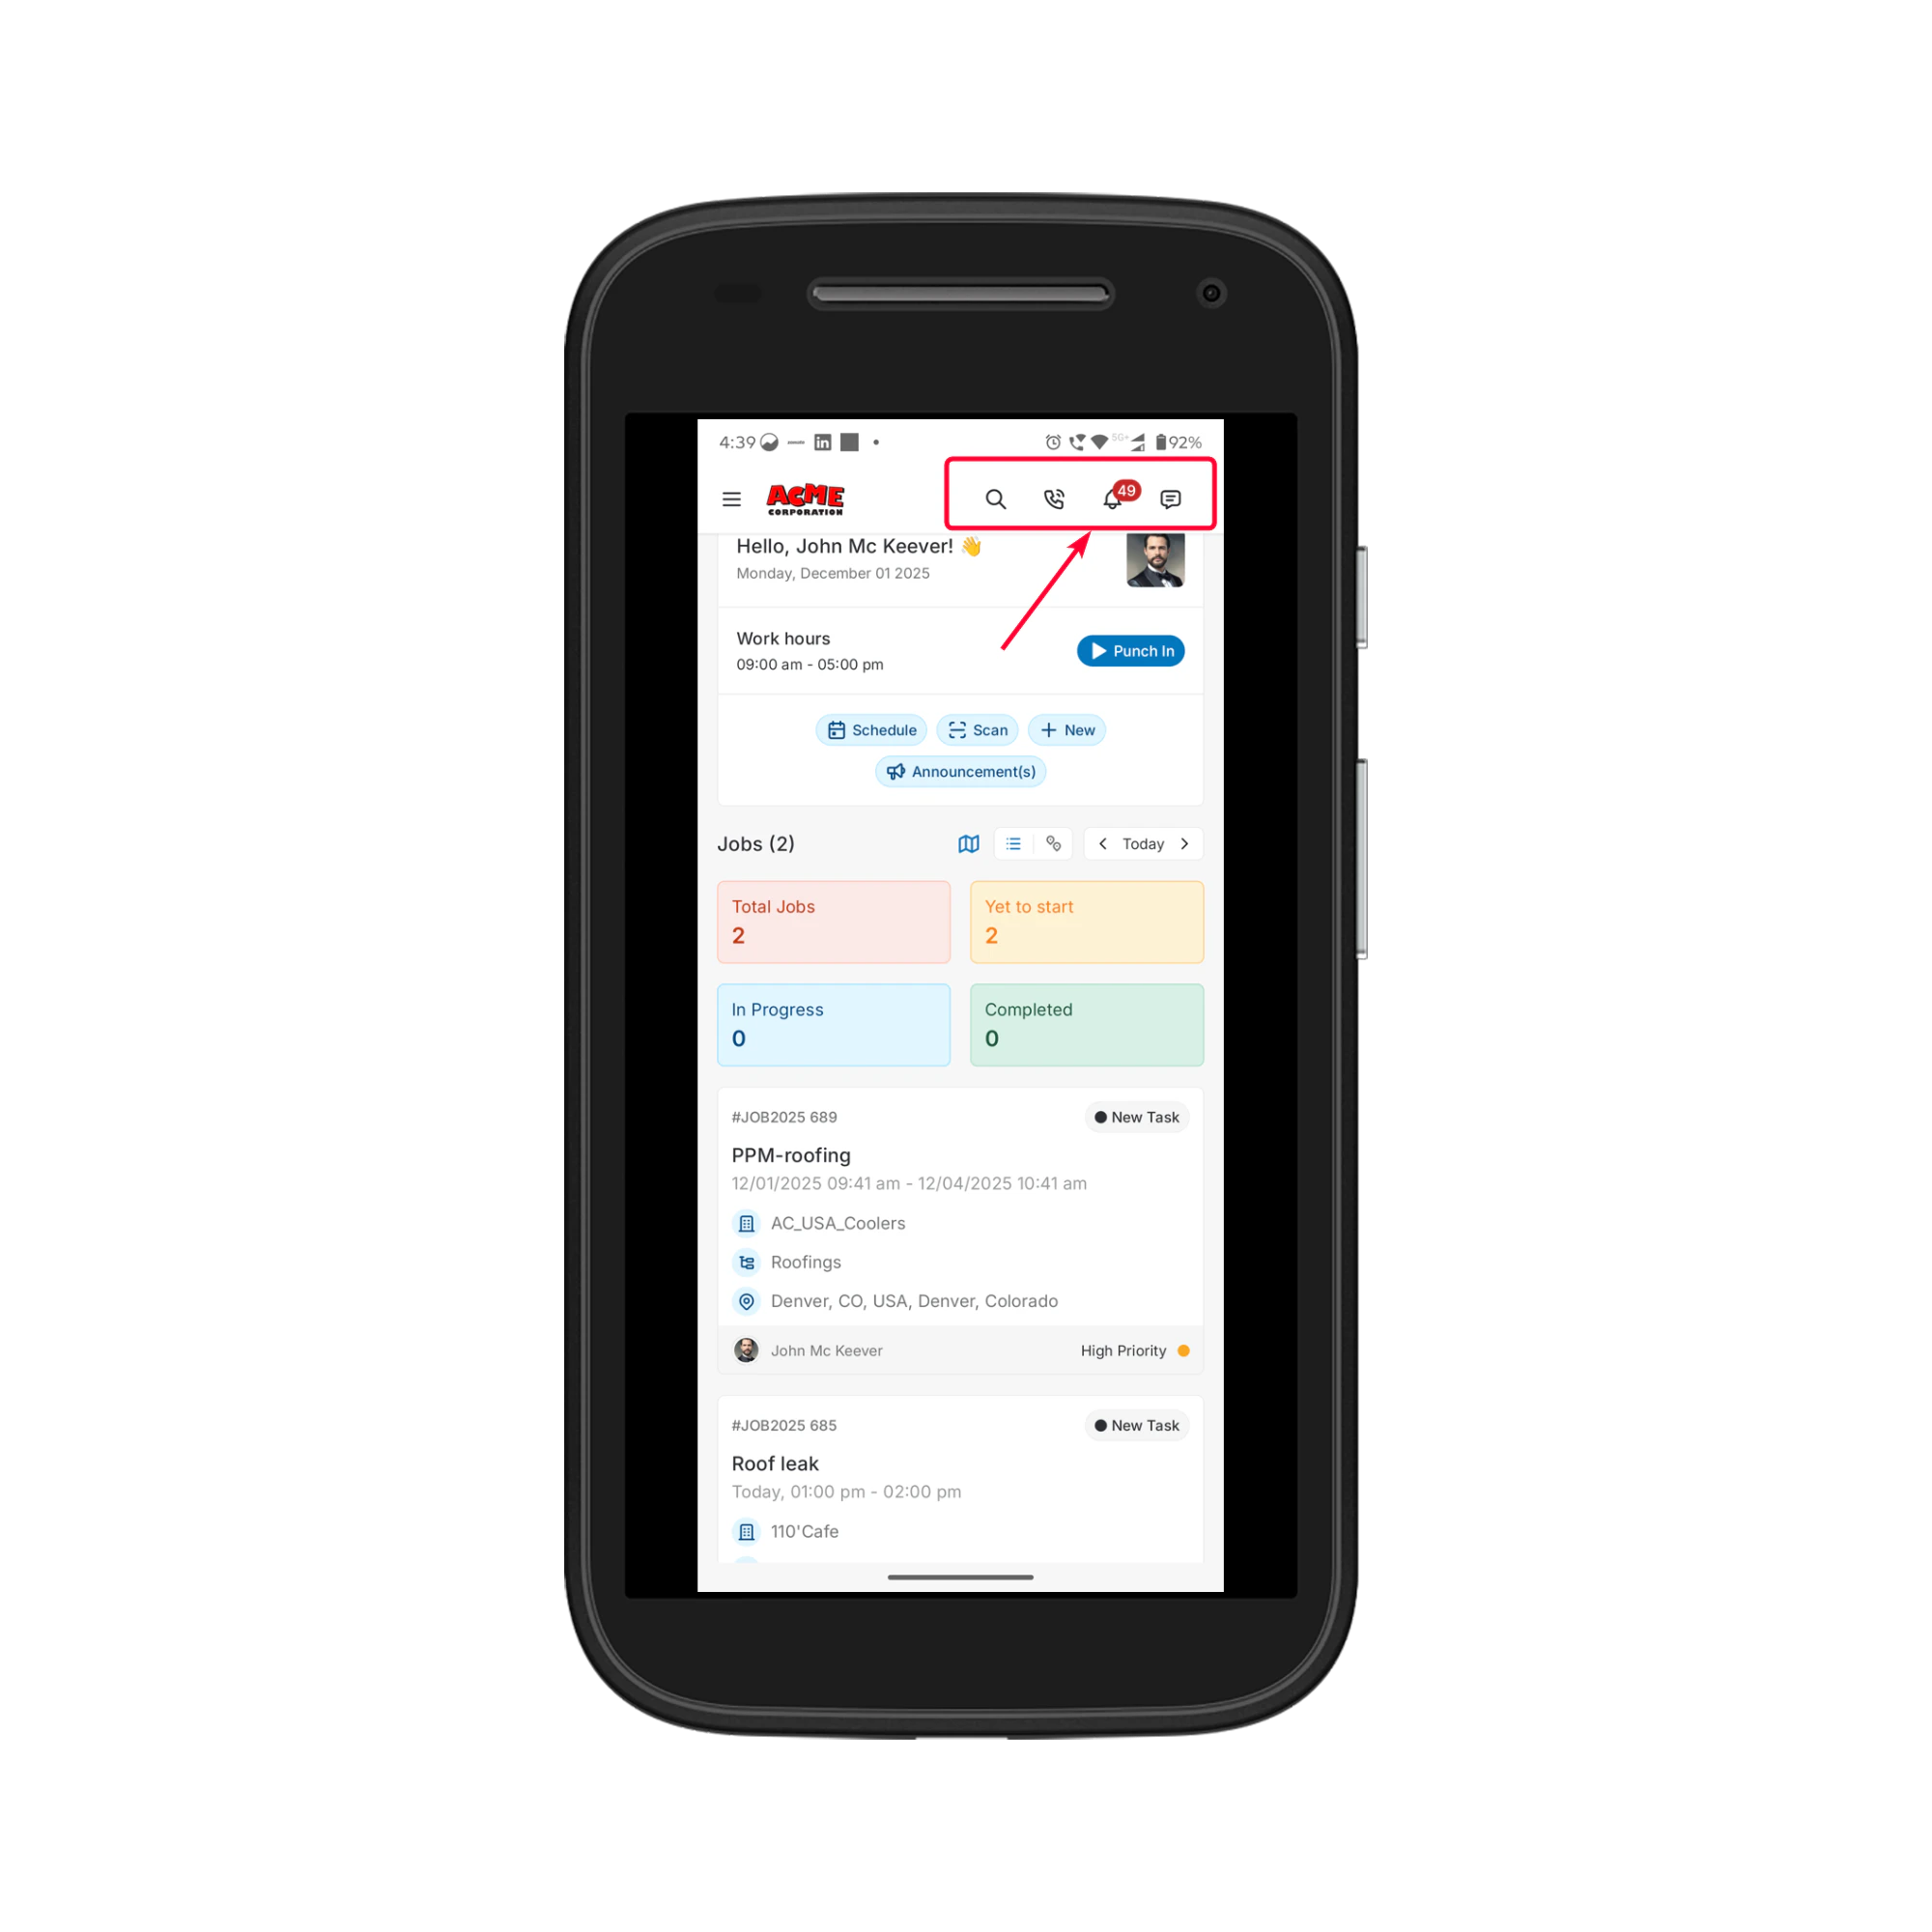 **Search**
Use the **Search** icon to quickly find jobs, projects, contacts, assets, or any relevant information available to you. Simply tap the icon and enter a keyword to view matching results.
**Call**
The **Call** icon allows you to access call logs, make outbound calls, and review recent communication (available if the [Zuper Connect feature is enabled by your organization](https://docs.zuper.co/Zuper_Connect/Setup-Zuper-Connect/User_permissions)). This ensures quick, direct communication with customers or team members.
**Notifications**
Tap the **Notifications** icon to view all system-generated alerts, such as job updates, status changes, assigned tasks, comments, approvals, and reminders. Notifications help you stay updated in real time.
**Chat**
The **Chat** icon opens the in-app messaging module where you can send and receive messages with your team, supervisors, or connected channels. This provides seamless communication without relying on external messaging apps.
# Job Management
### Viewing Assigned Jobs
You can access your assigned jobs directly from the Dashboard or through the Jobs module.
**From the Dashboard**
* Scroll down to the **Assigned Jobs** section.
* Browse through the list of jobs available for the selected date range.
* Tap any job card to open the **Job Details** page.
**Search**
Use the **Search** icon to quickly find jobs, projects, contacts, assets, or any relevant information available to you. Simply tap the icon and enter a keyword to view matching results.
**Call**
The **Call** icon allows you to access call logs, make outbound calls, and review recent communication (available if the [Zuper Connect feature is enabled by your organization](https://docs.zuper.co/Zuper_Connect/Setup-Zuper-Connect/User_permissions)). This ensures quick, direct communication with customers or team members.
**Notifications**
Tap the **Notifications** icon to view all system-generated alerts, such as job updates, status changes, assigned tasks, comments, approvals, and reminders. Notifications help you stay updated in real time.
**Chat**
The **Chat** icon opens the in-app messaging module where you can send and receive messages with your team, supervisors, or connected channels. This provides seamless communication without relying on external messaging apps.
# Job Management
### Viewing Assigned Jobs
You can access your assigned jobs directly from the Dashboard or through the Jobs module.
**From the Dashboard**
* Scroll down to the **Assigned Jobs** section.
* Browse through the list of jobs available for the selected date range.
* Tap any job card to open the **Job Details** page.
 **From the Sidebar (if enabled)**
* Tap the **Menu** icon (☰) on the top-left corner.
* Select **Jobs** from the sidebar.
**From the Sidebar (if enabled)**
* Tap the **Menu** icon (☰) on the top-left corner.
* Select **Jobs** from the sidebar.
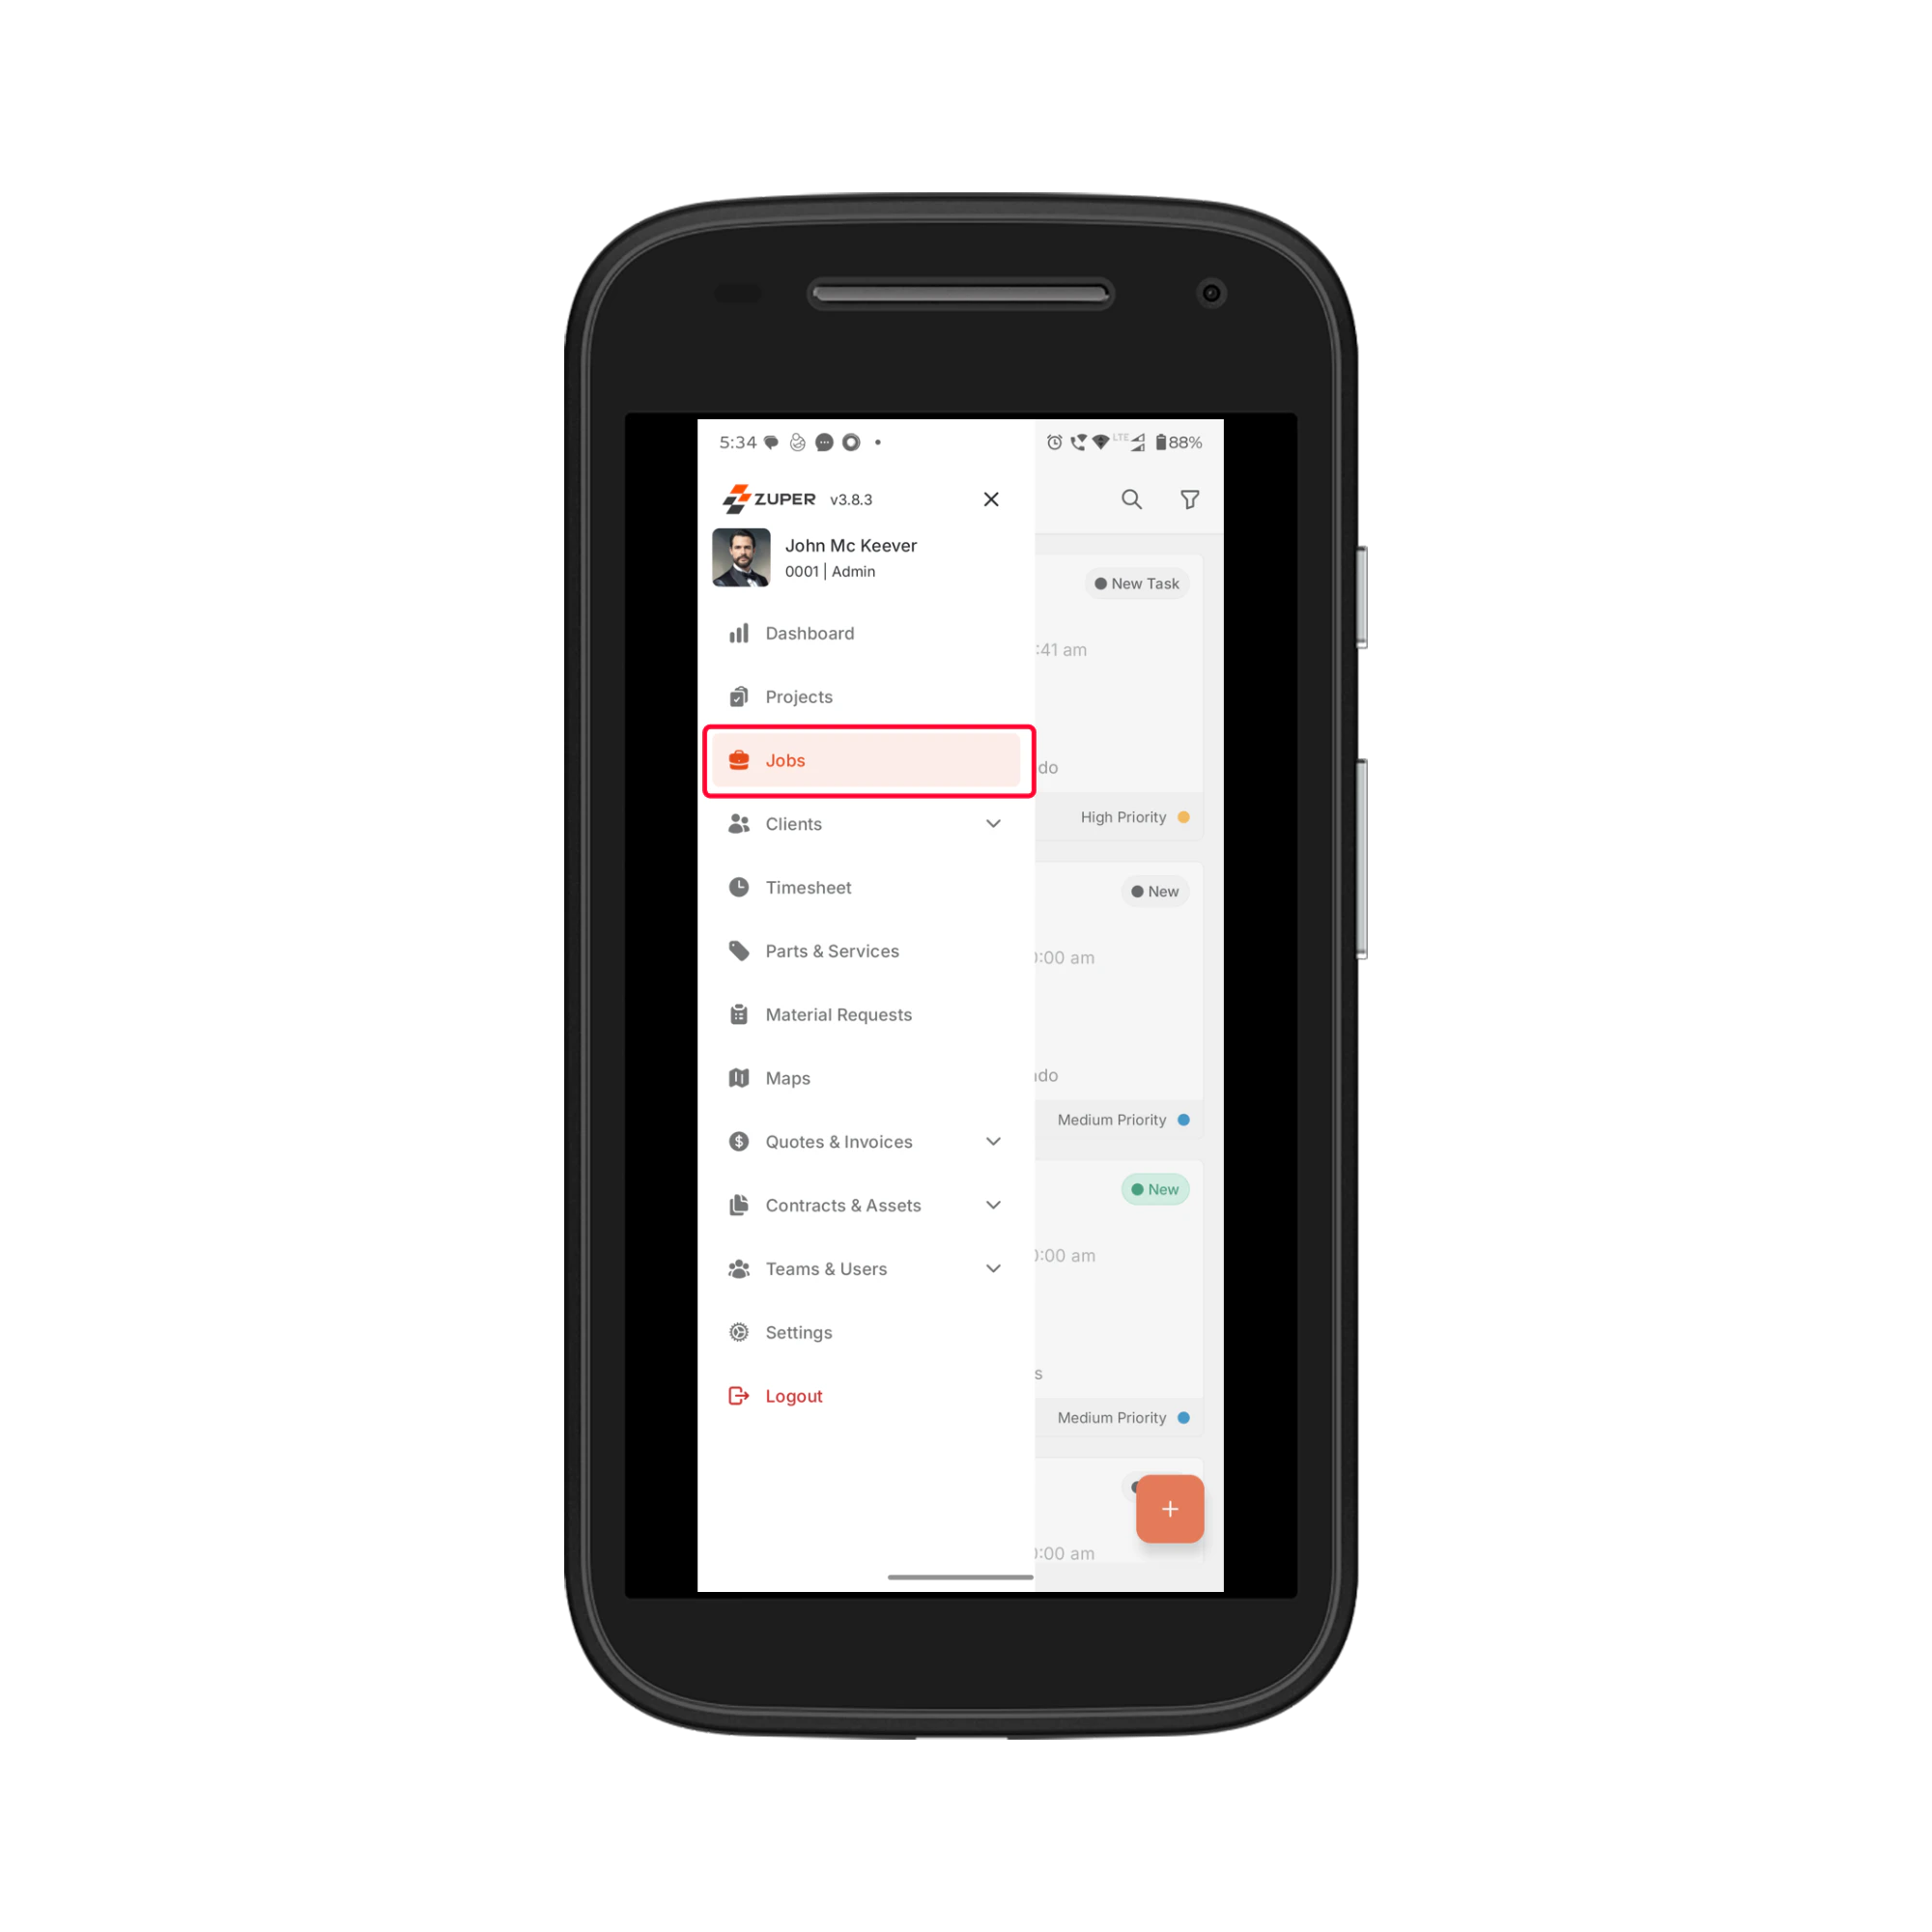 * Choose the job you want to view from the list.
 ### Viewing Job Details
Tap a job to land on the Job Details page. This page contains all the information needed to perform your job efficiently.
**Details Tab**
Here you can view the job's primary details, such as:
* Measurements- Job-specific dimensions or values captured to support accurate planning, estimation, or service execution.
* Service Address- The location where the service will be performed.
* Category- The classification or type of job selected.
* Priority- The Urgency level of the job.
* Schedule and Due Date- The job’s scheduled start time and expected completion date.
* Job Description- A brief summary of the work to be performed.
* Billing Address- The address used for invoicing and billing purposes.
* Primary and Secondary Contacts- Key people associated with the job for communication and coordination.
* Organization details- Information about the customer’s organization linked to the job.
* Property details- Information about the property where the job is being executed.
* PPM (Planned Preventive Maintenance), if linked
* Child Jobs- Sub-jobs created under the parent job.
* Assigned Team Members
* Attachments
Swipe across tabs to view additional information:
**Tasks Tab**
* View all **Service Tasks** assigned to the job.
### Viewing Job Details
Tap a job to land on the Job Details page. This page contains all the information needed to perform your job efficiently.
**Details Tab**
Here you can view the job's primary details, such as:
* Measurements- Job-specific dimensions or values captured to support accurate planning, estimation, or service execution.
* Service Address- The location where the service will be performed.
* Category- The classification or type of job selected.
* Priority- The Urgency level of the job.
* Schedule and Due Date- The job’s scheduled start time and expected completion date.
* Job Description- A brief summary of the work to be performed.
* Billing Address- The address used for invoicing and billing purposes.
* Primary and Secondary Contacts- Key people associated with the job for communication and coordination.
* Organization details- Information about the customer’s organization linked to the job.
* Property details- Information about the property where the job is being executed.
* PPM (Planned Preventive Maintenance), if linked
* Child Jobs- Sub-jobs created under the parent job.
* Assigned Team Members
* Attachments
Swipe across tabs to view additional information:
**Tasks Tab**
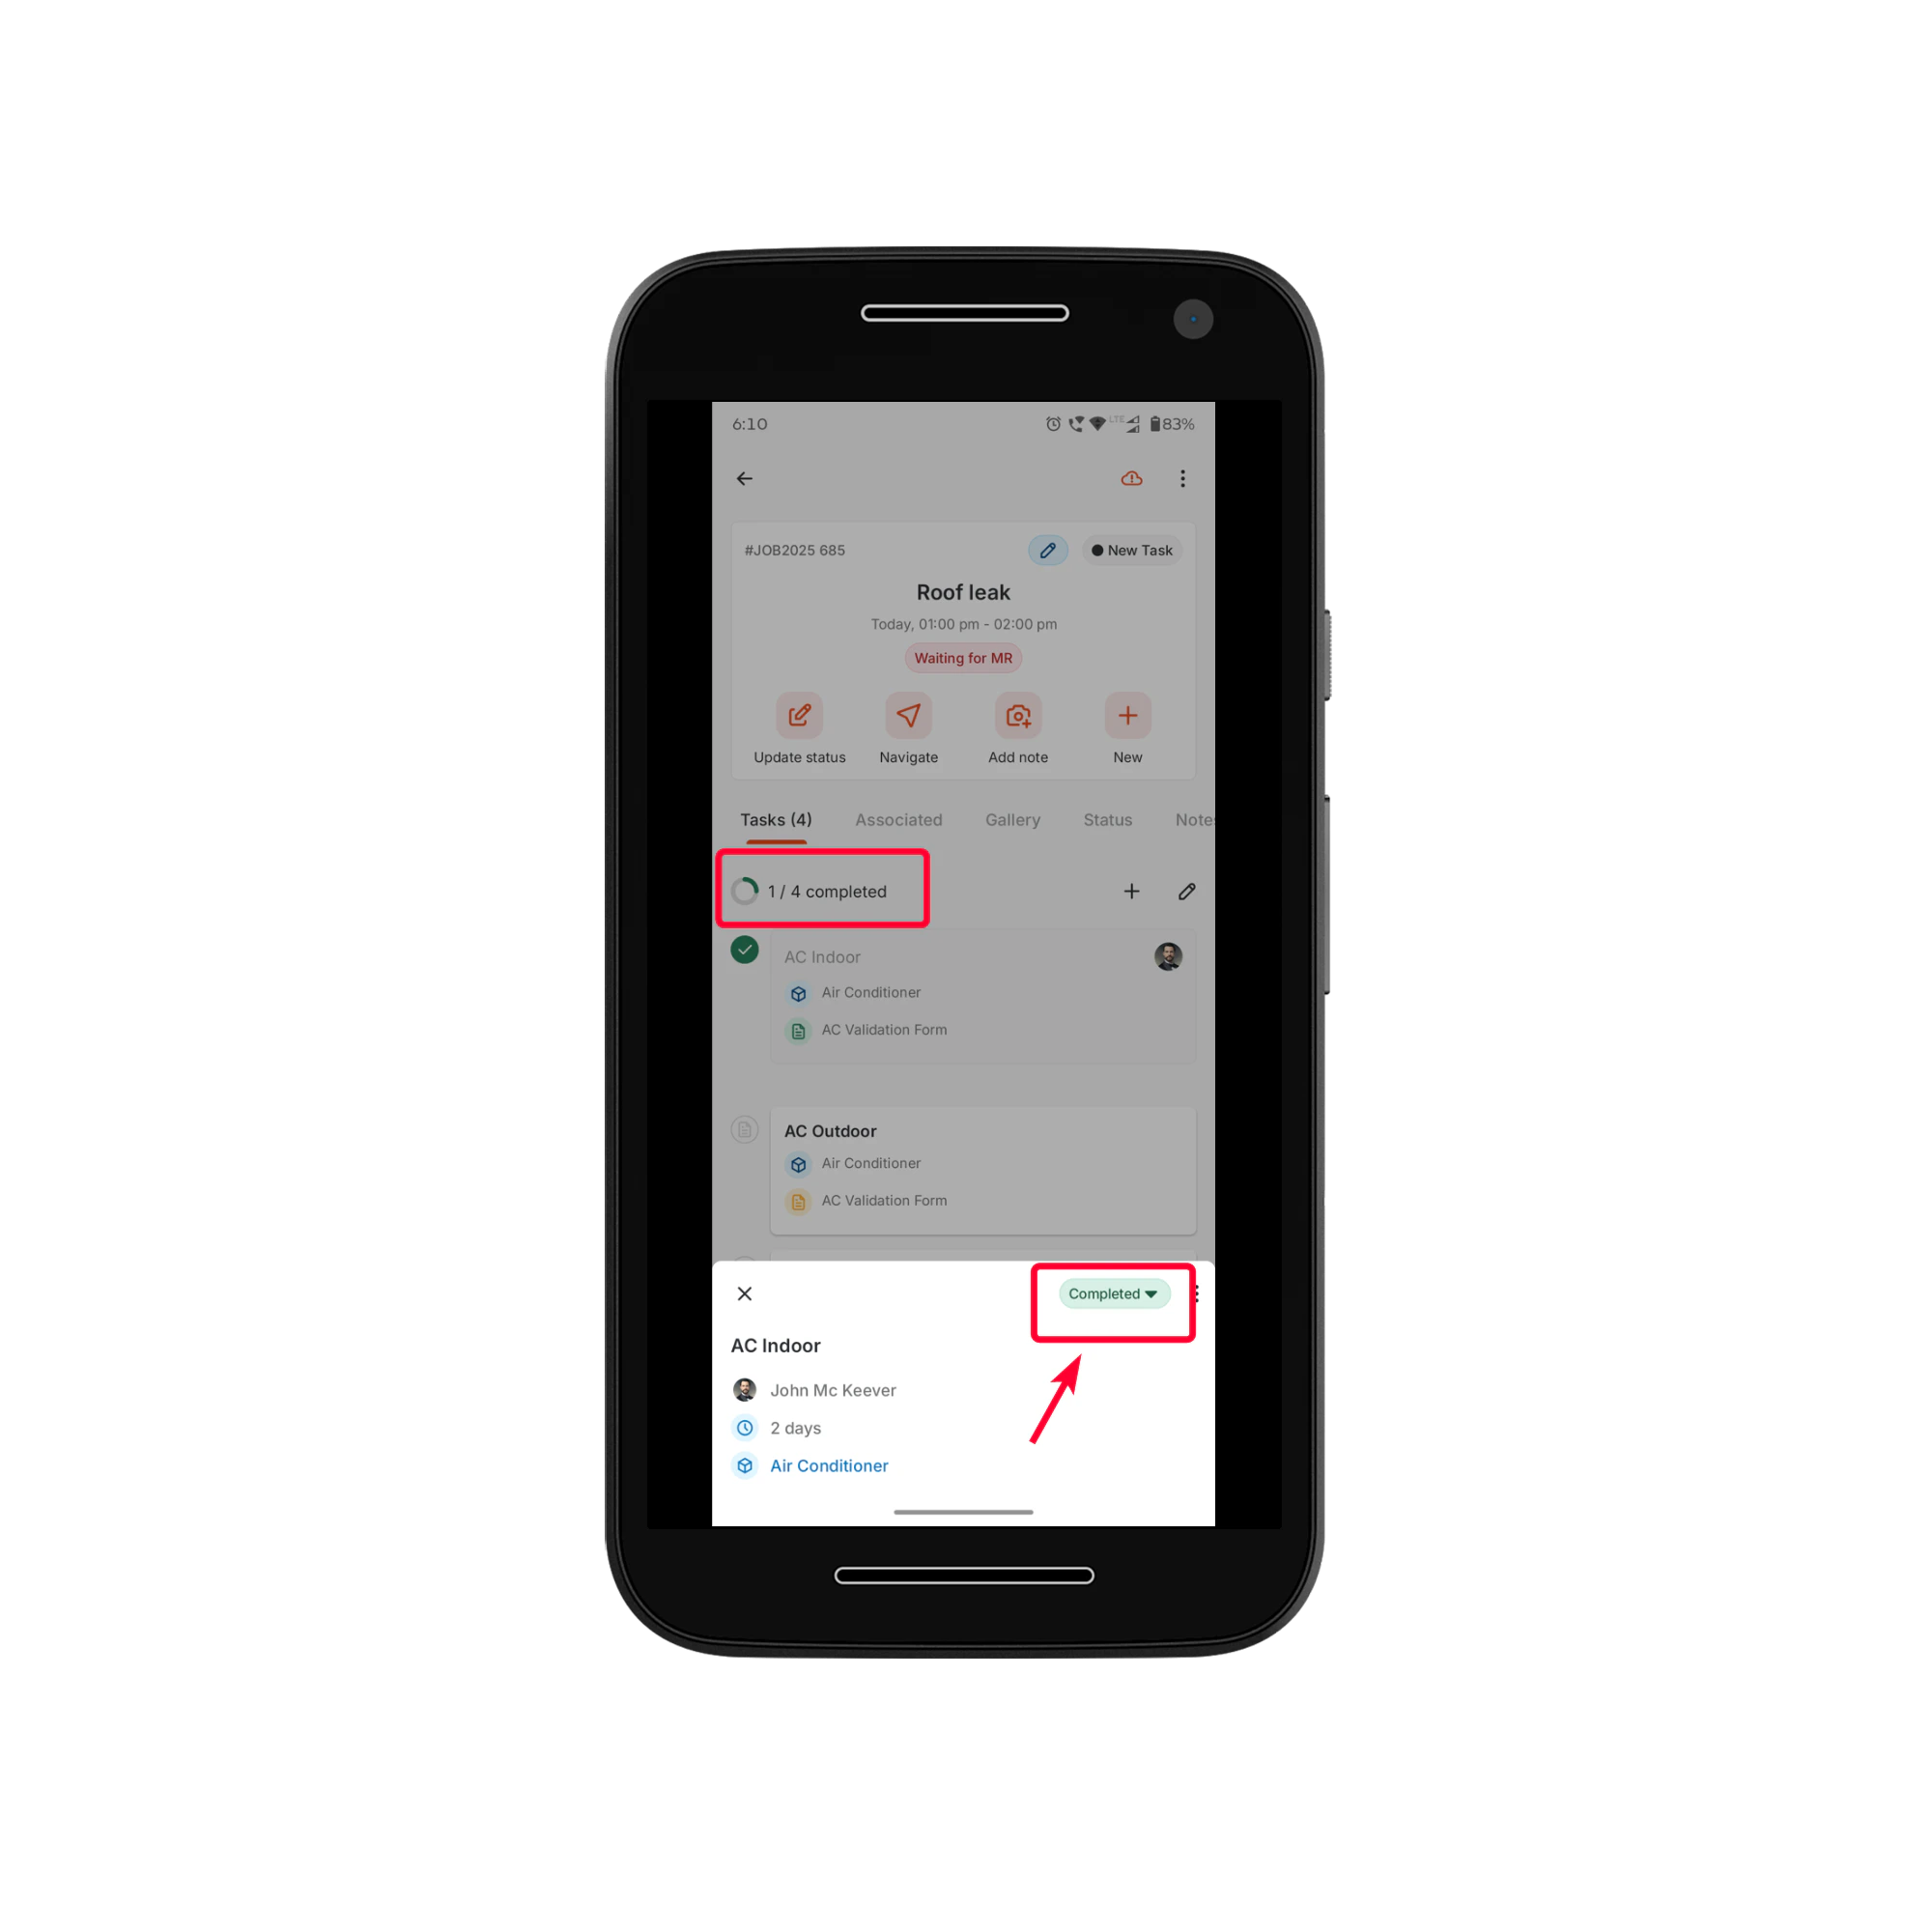
* View all **Service Tasks** assigned to the job.
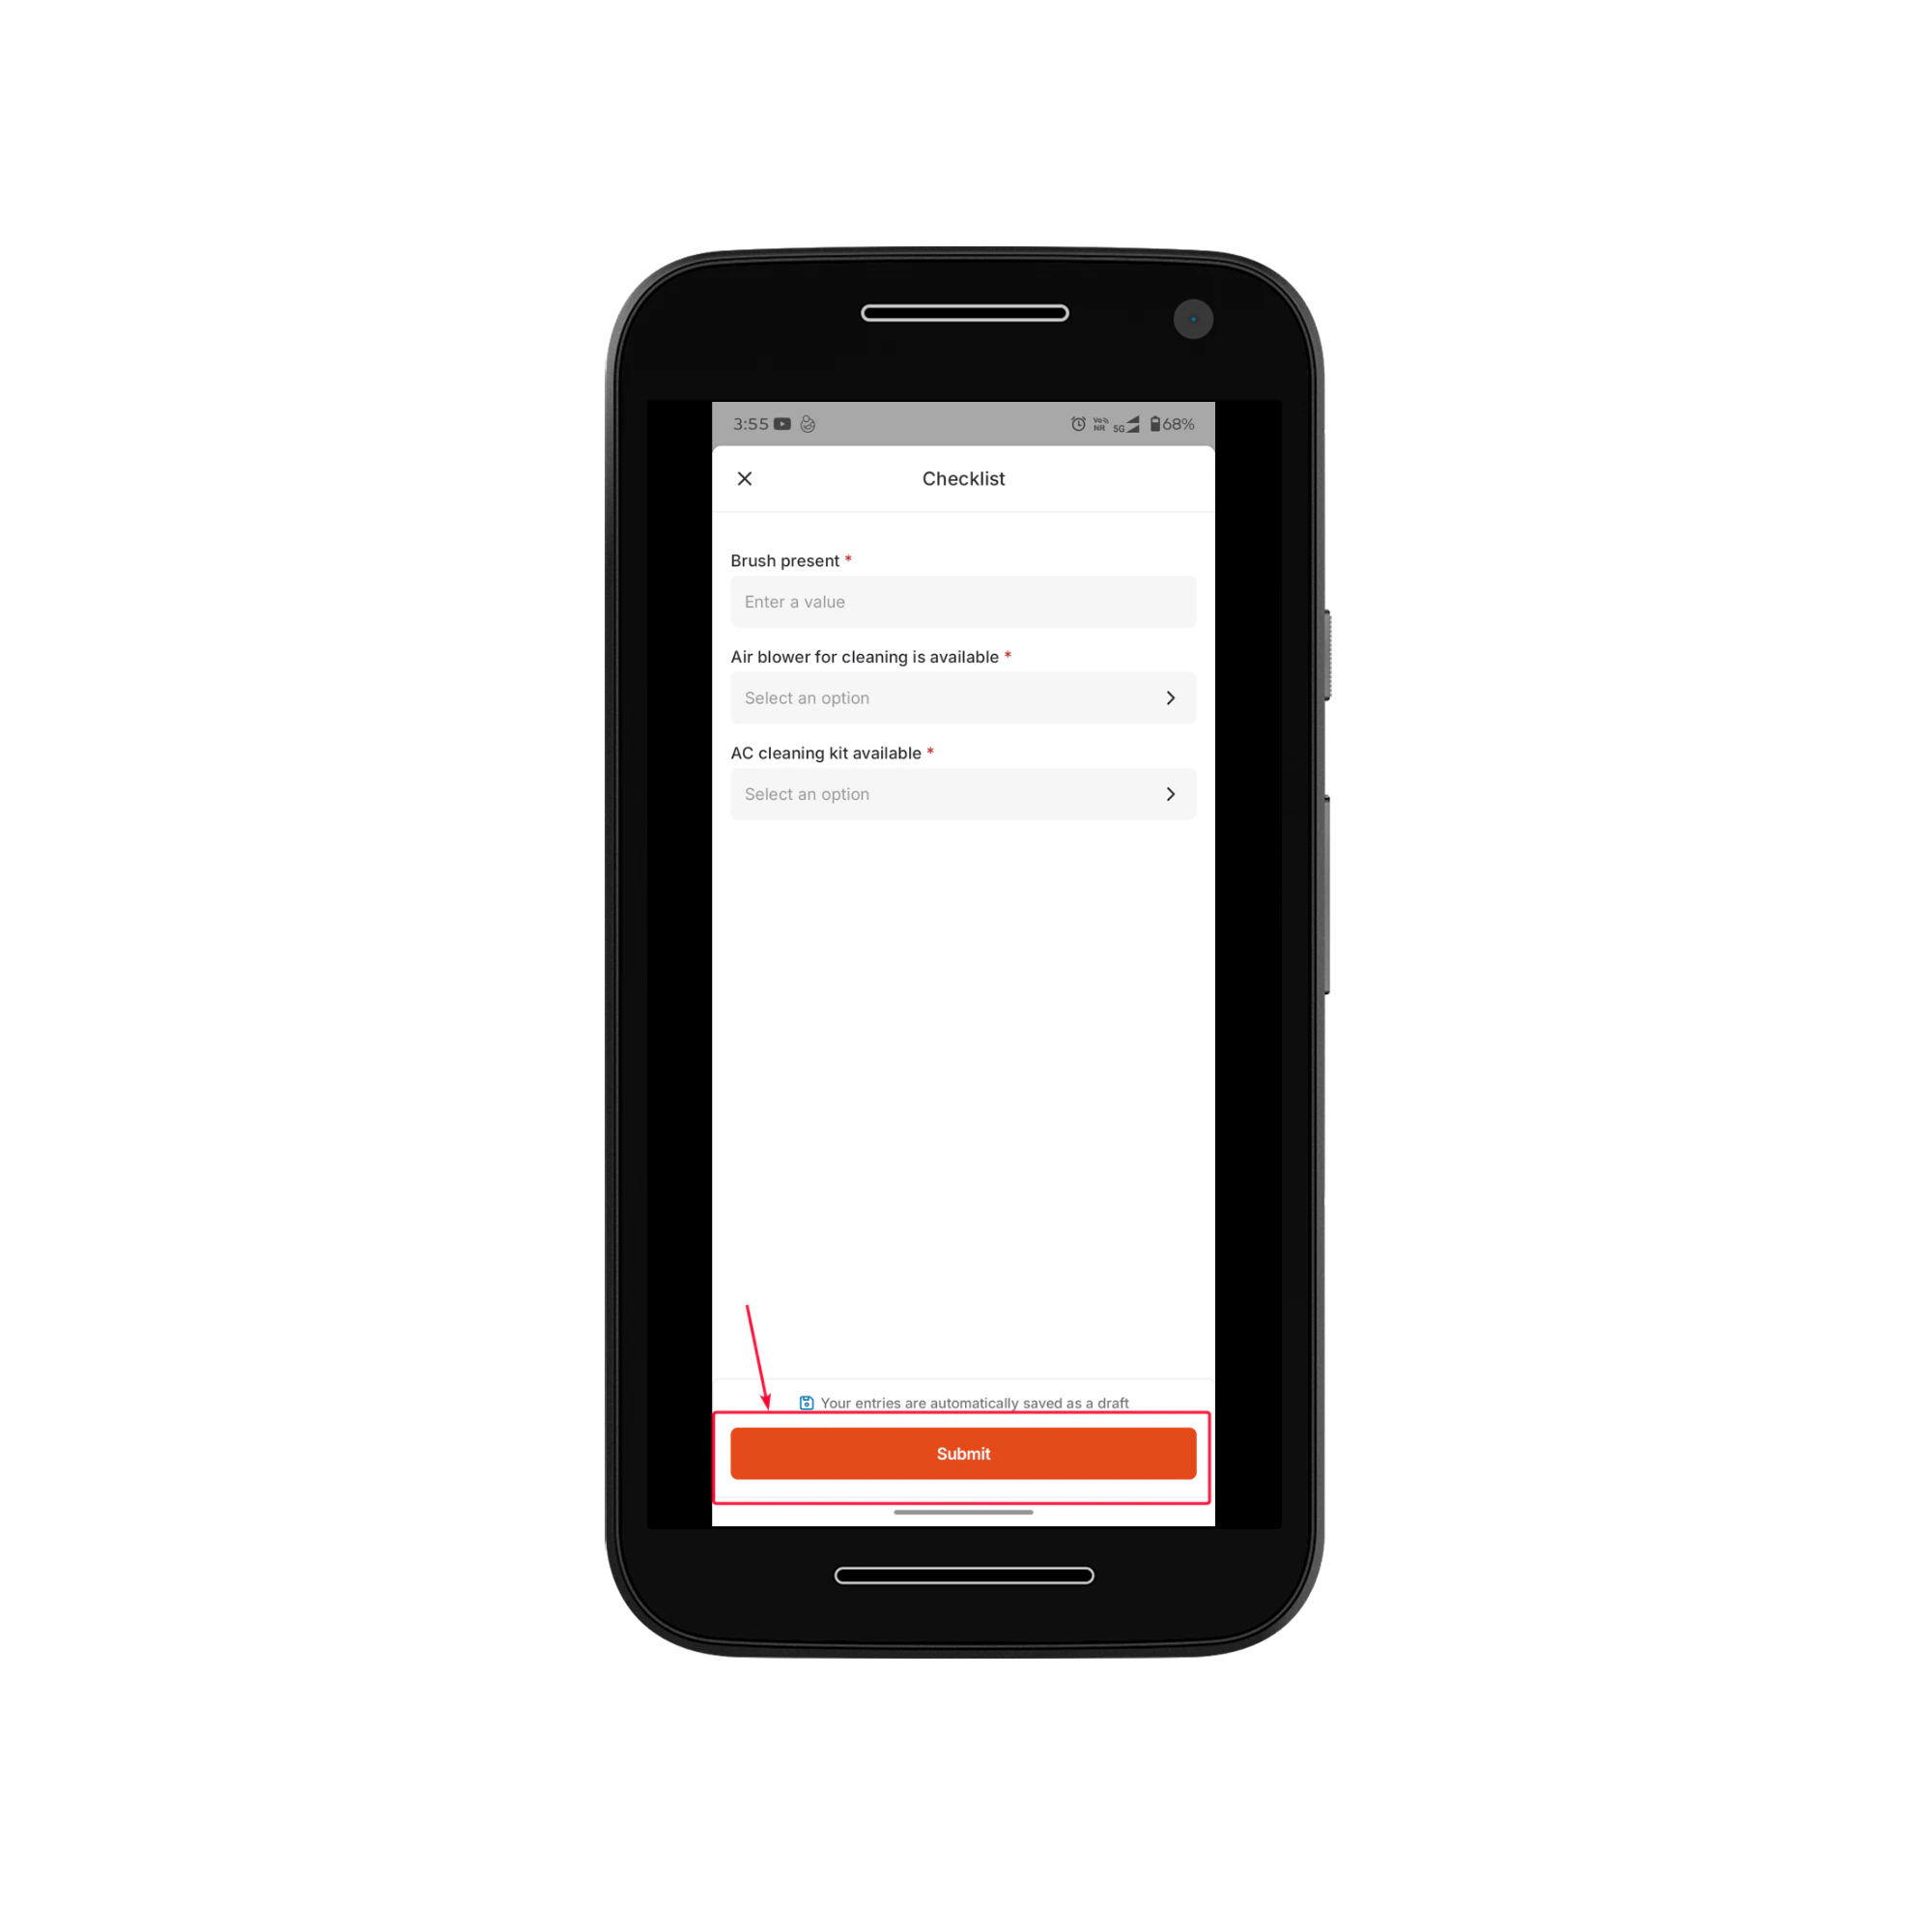
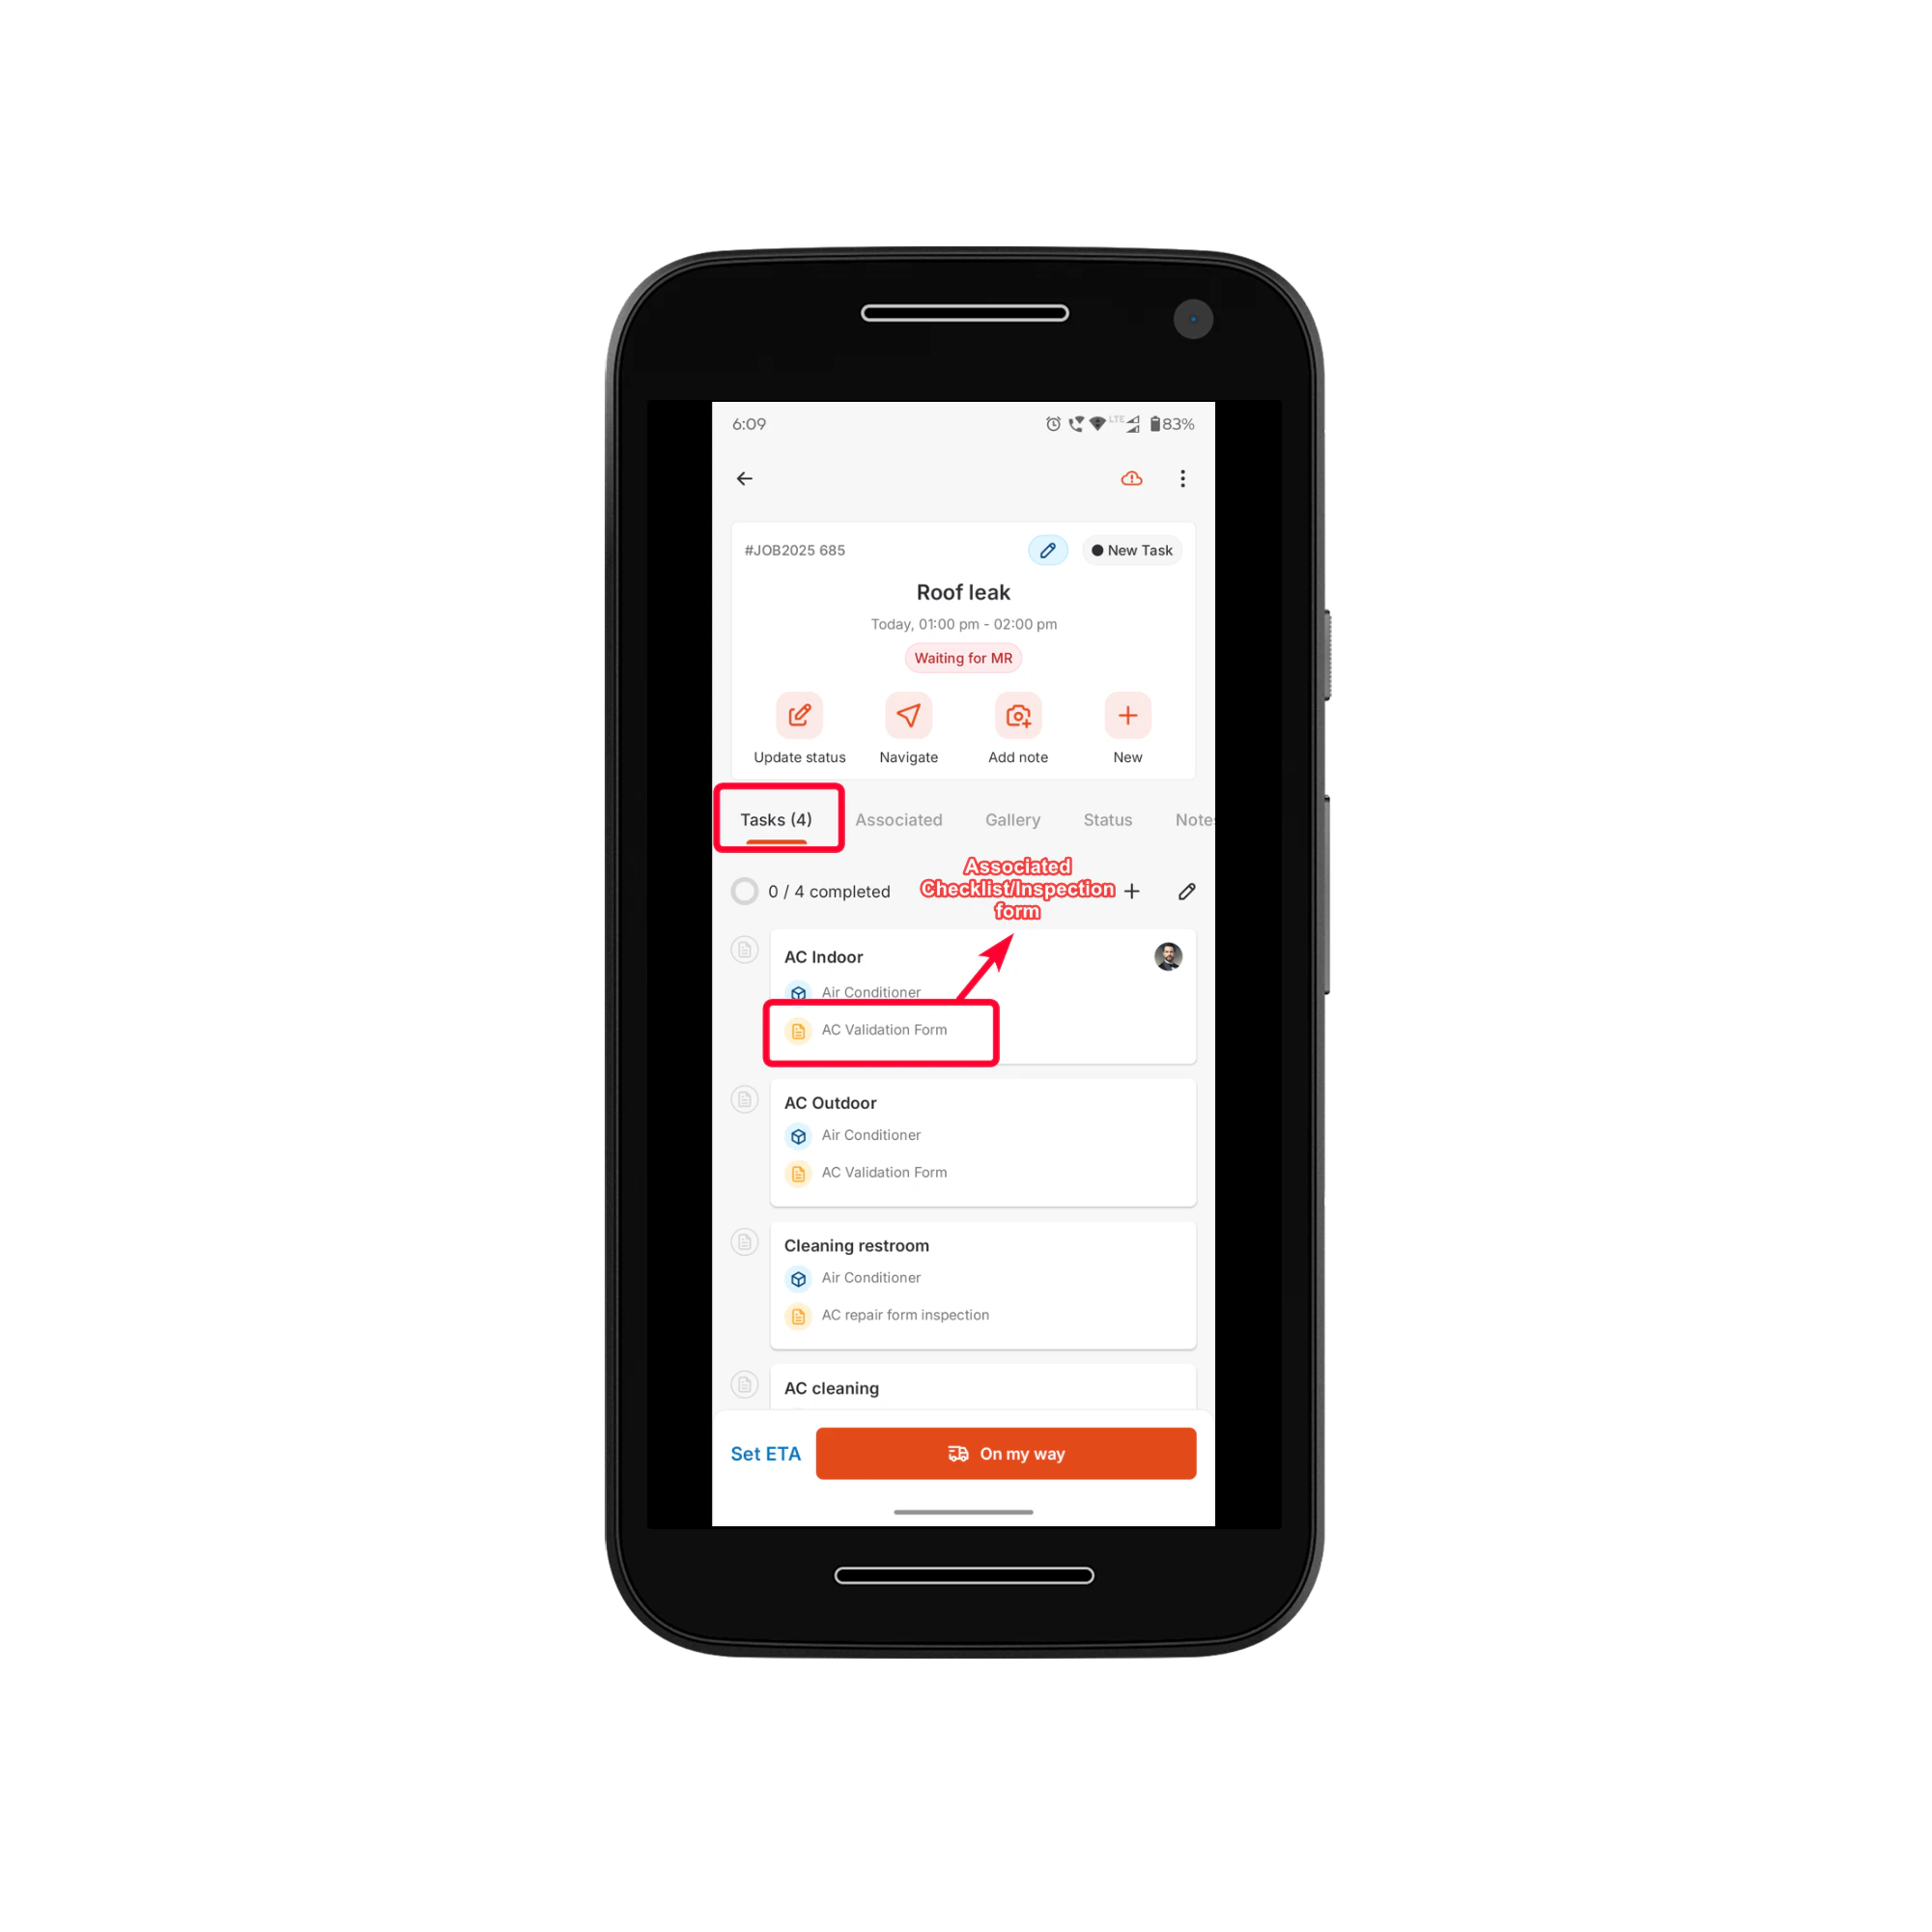 * Fill in the **checklists** or **inspection forms**, if associated.
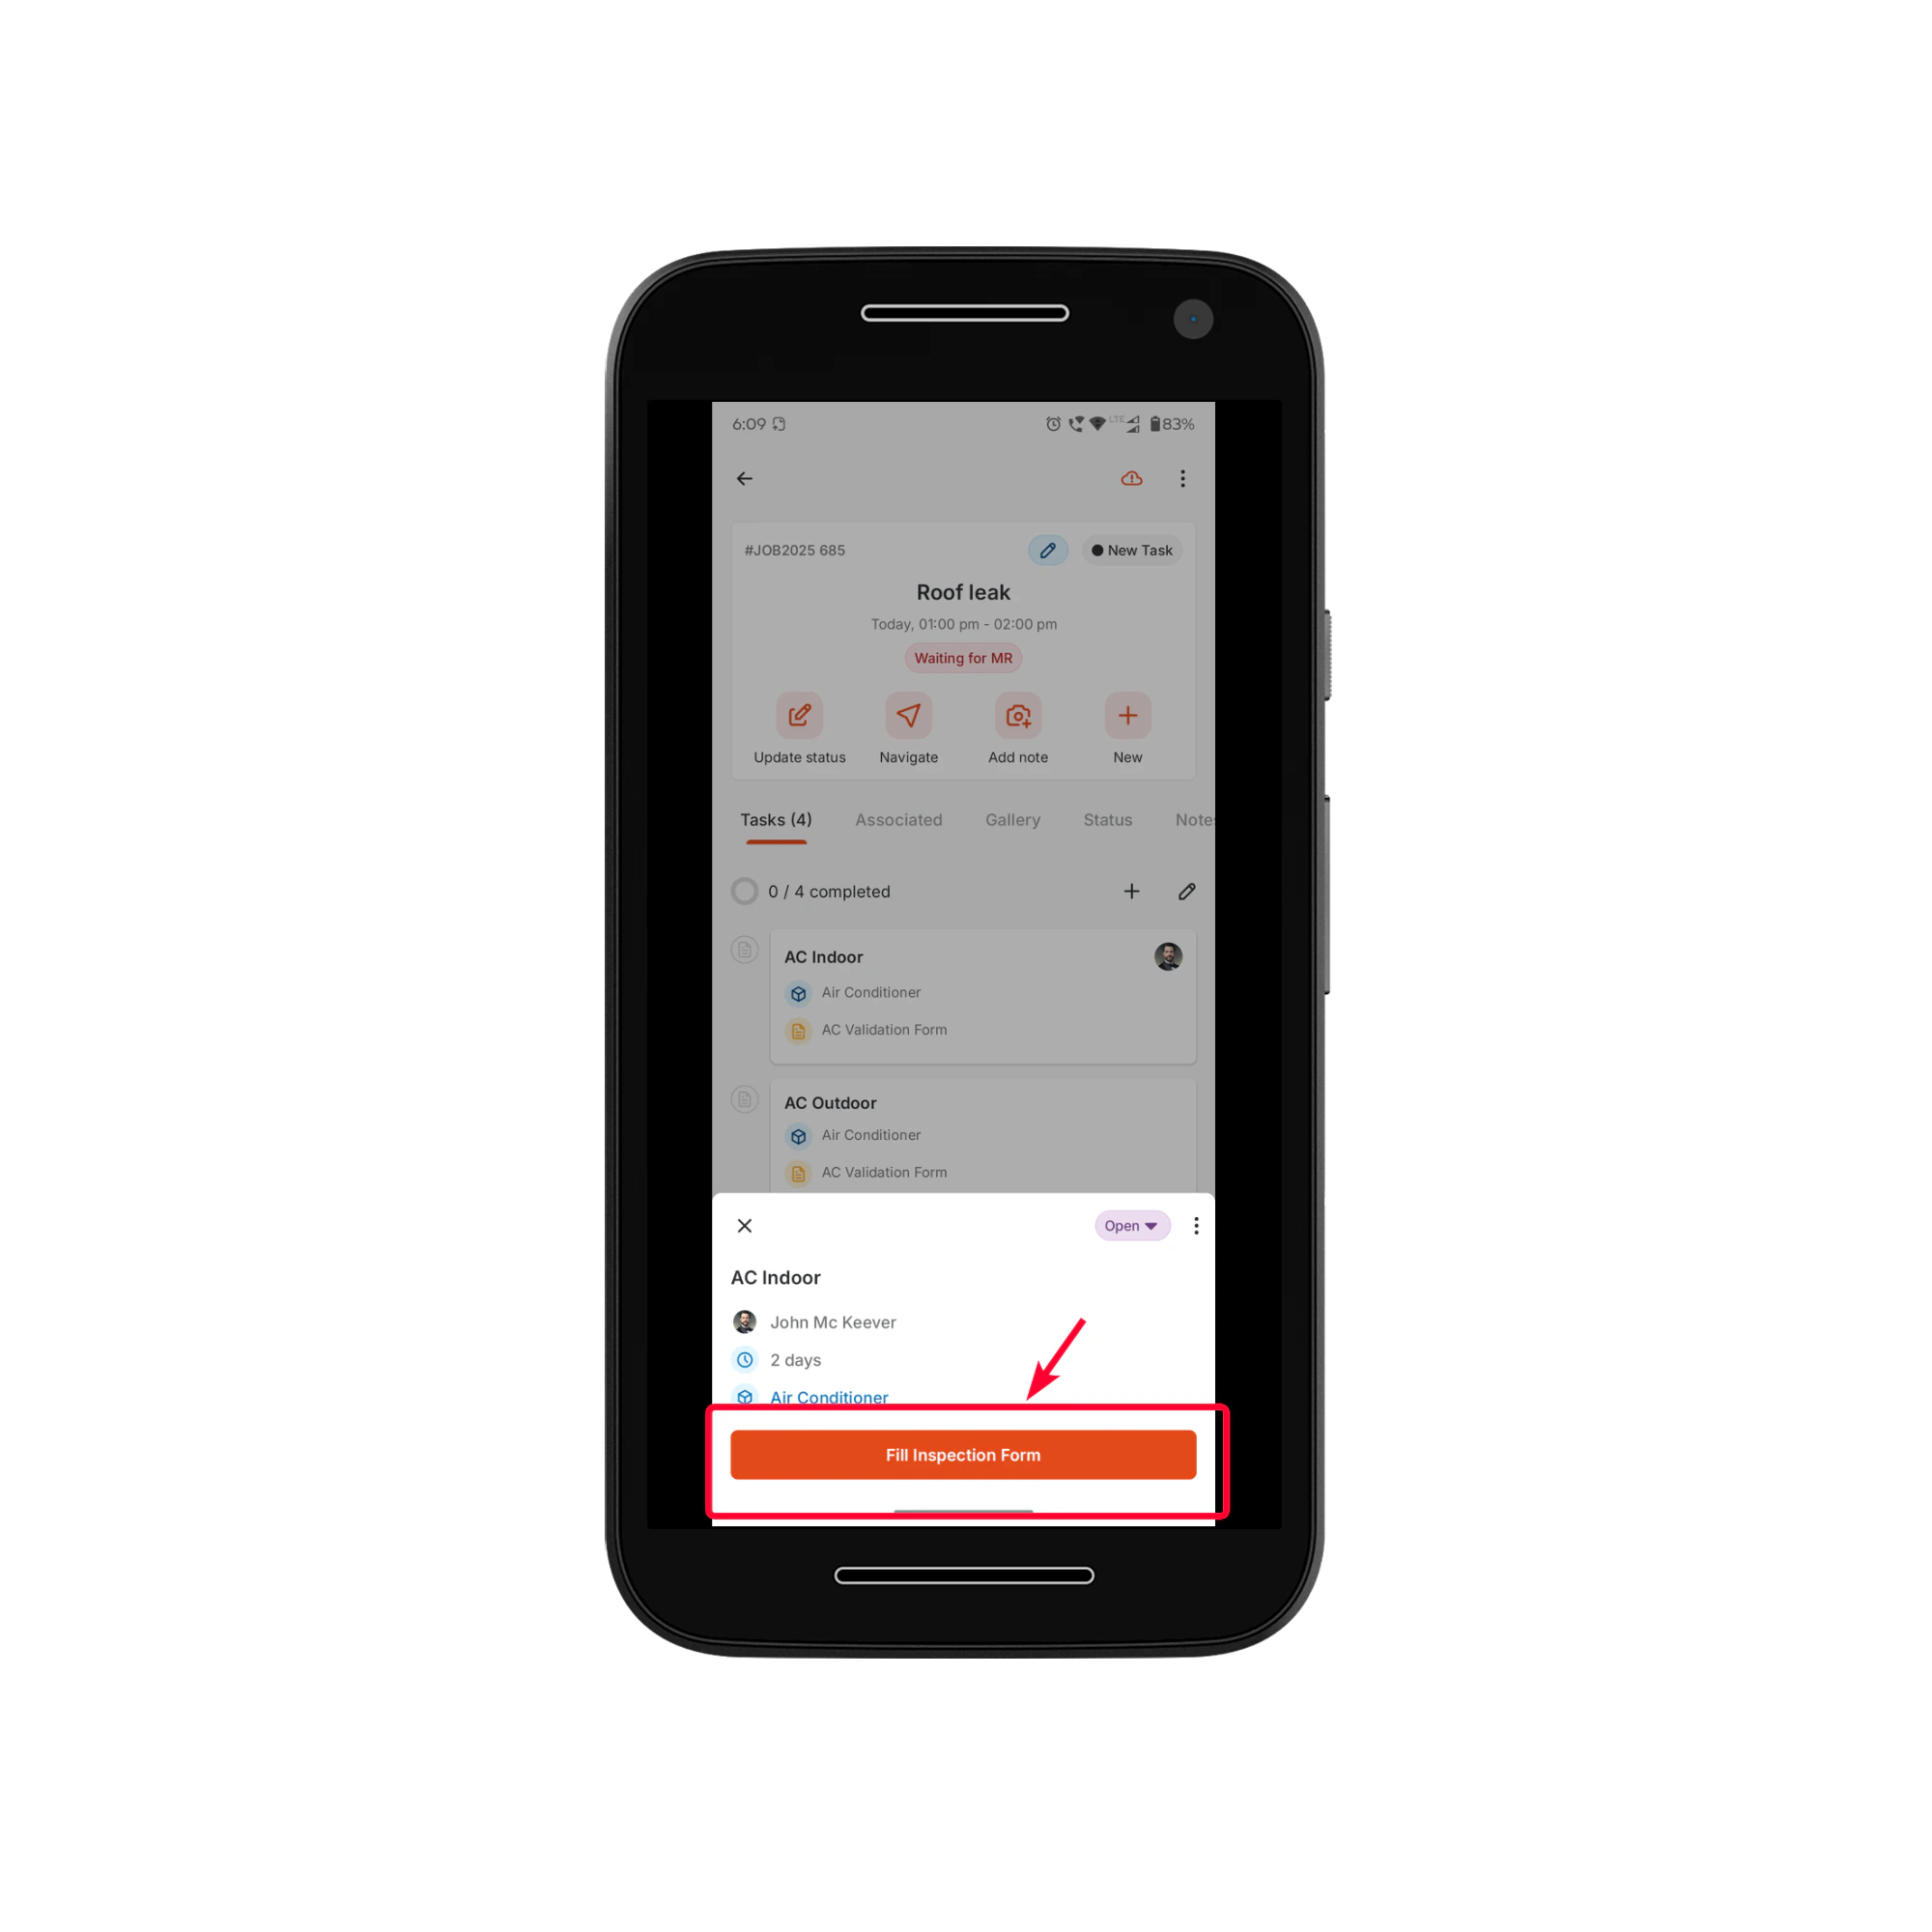 * Mark as completed once you have finished the service task(s).
 For more information on updating service task status, check out this [article](https://docs.zuper.co/Work_Order_Management/Jobs/Creating_and_managing_service_tasks#d-update-service-task-status)
**Associated Tab**
View and access all job-related records, such as:
* Parts & Services
* Material Requests. Learn how to [create a material request](https://docs.zuper.co/Purchasing/Material-Requests/Creating-Material-request-from-mobile)
* Expenses. Learn how to [add expenses to a job](https://docs.zuper.co/Work_Order_Management/Jobs/Add_expenses_to_Job).
* Assets
* Quotes
* Invoices.
For more information on updating service task status, check out this [article](https://docs.zuper.co/Work_Order_Management/Jobs/Creating_and_managing_service_tasks#d-update-service-task-status)
**Associated Tab**
View and access all job-related records, such as:
* Parts & Services
* Material Requests. Learn how to [create a material request](https://docs.zuper.co/Purchasing/Material-Requests/Creating-Material-request-from-mobile)
* Expenses. Learn how to [add expenses to a job](https://docs.zuper.co/Work_Order_Management/Jobs/Add_expenses_to_Job).
* Assets
* Quotes
* Invoices.
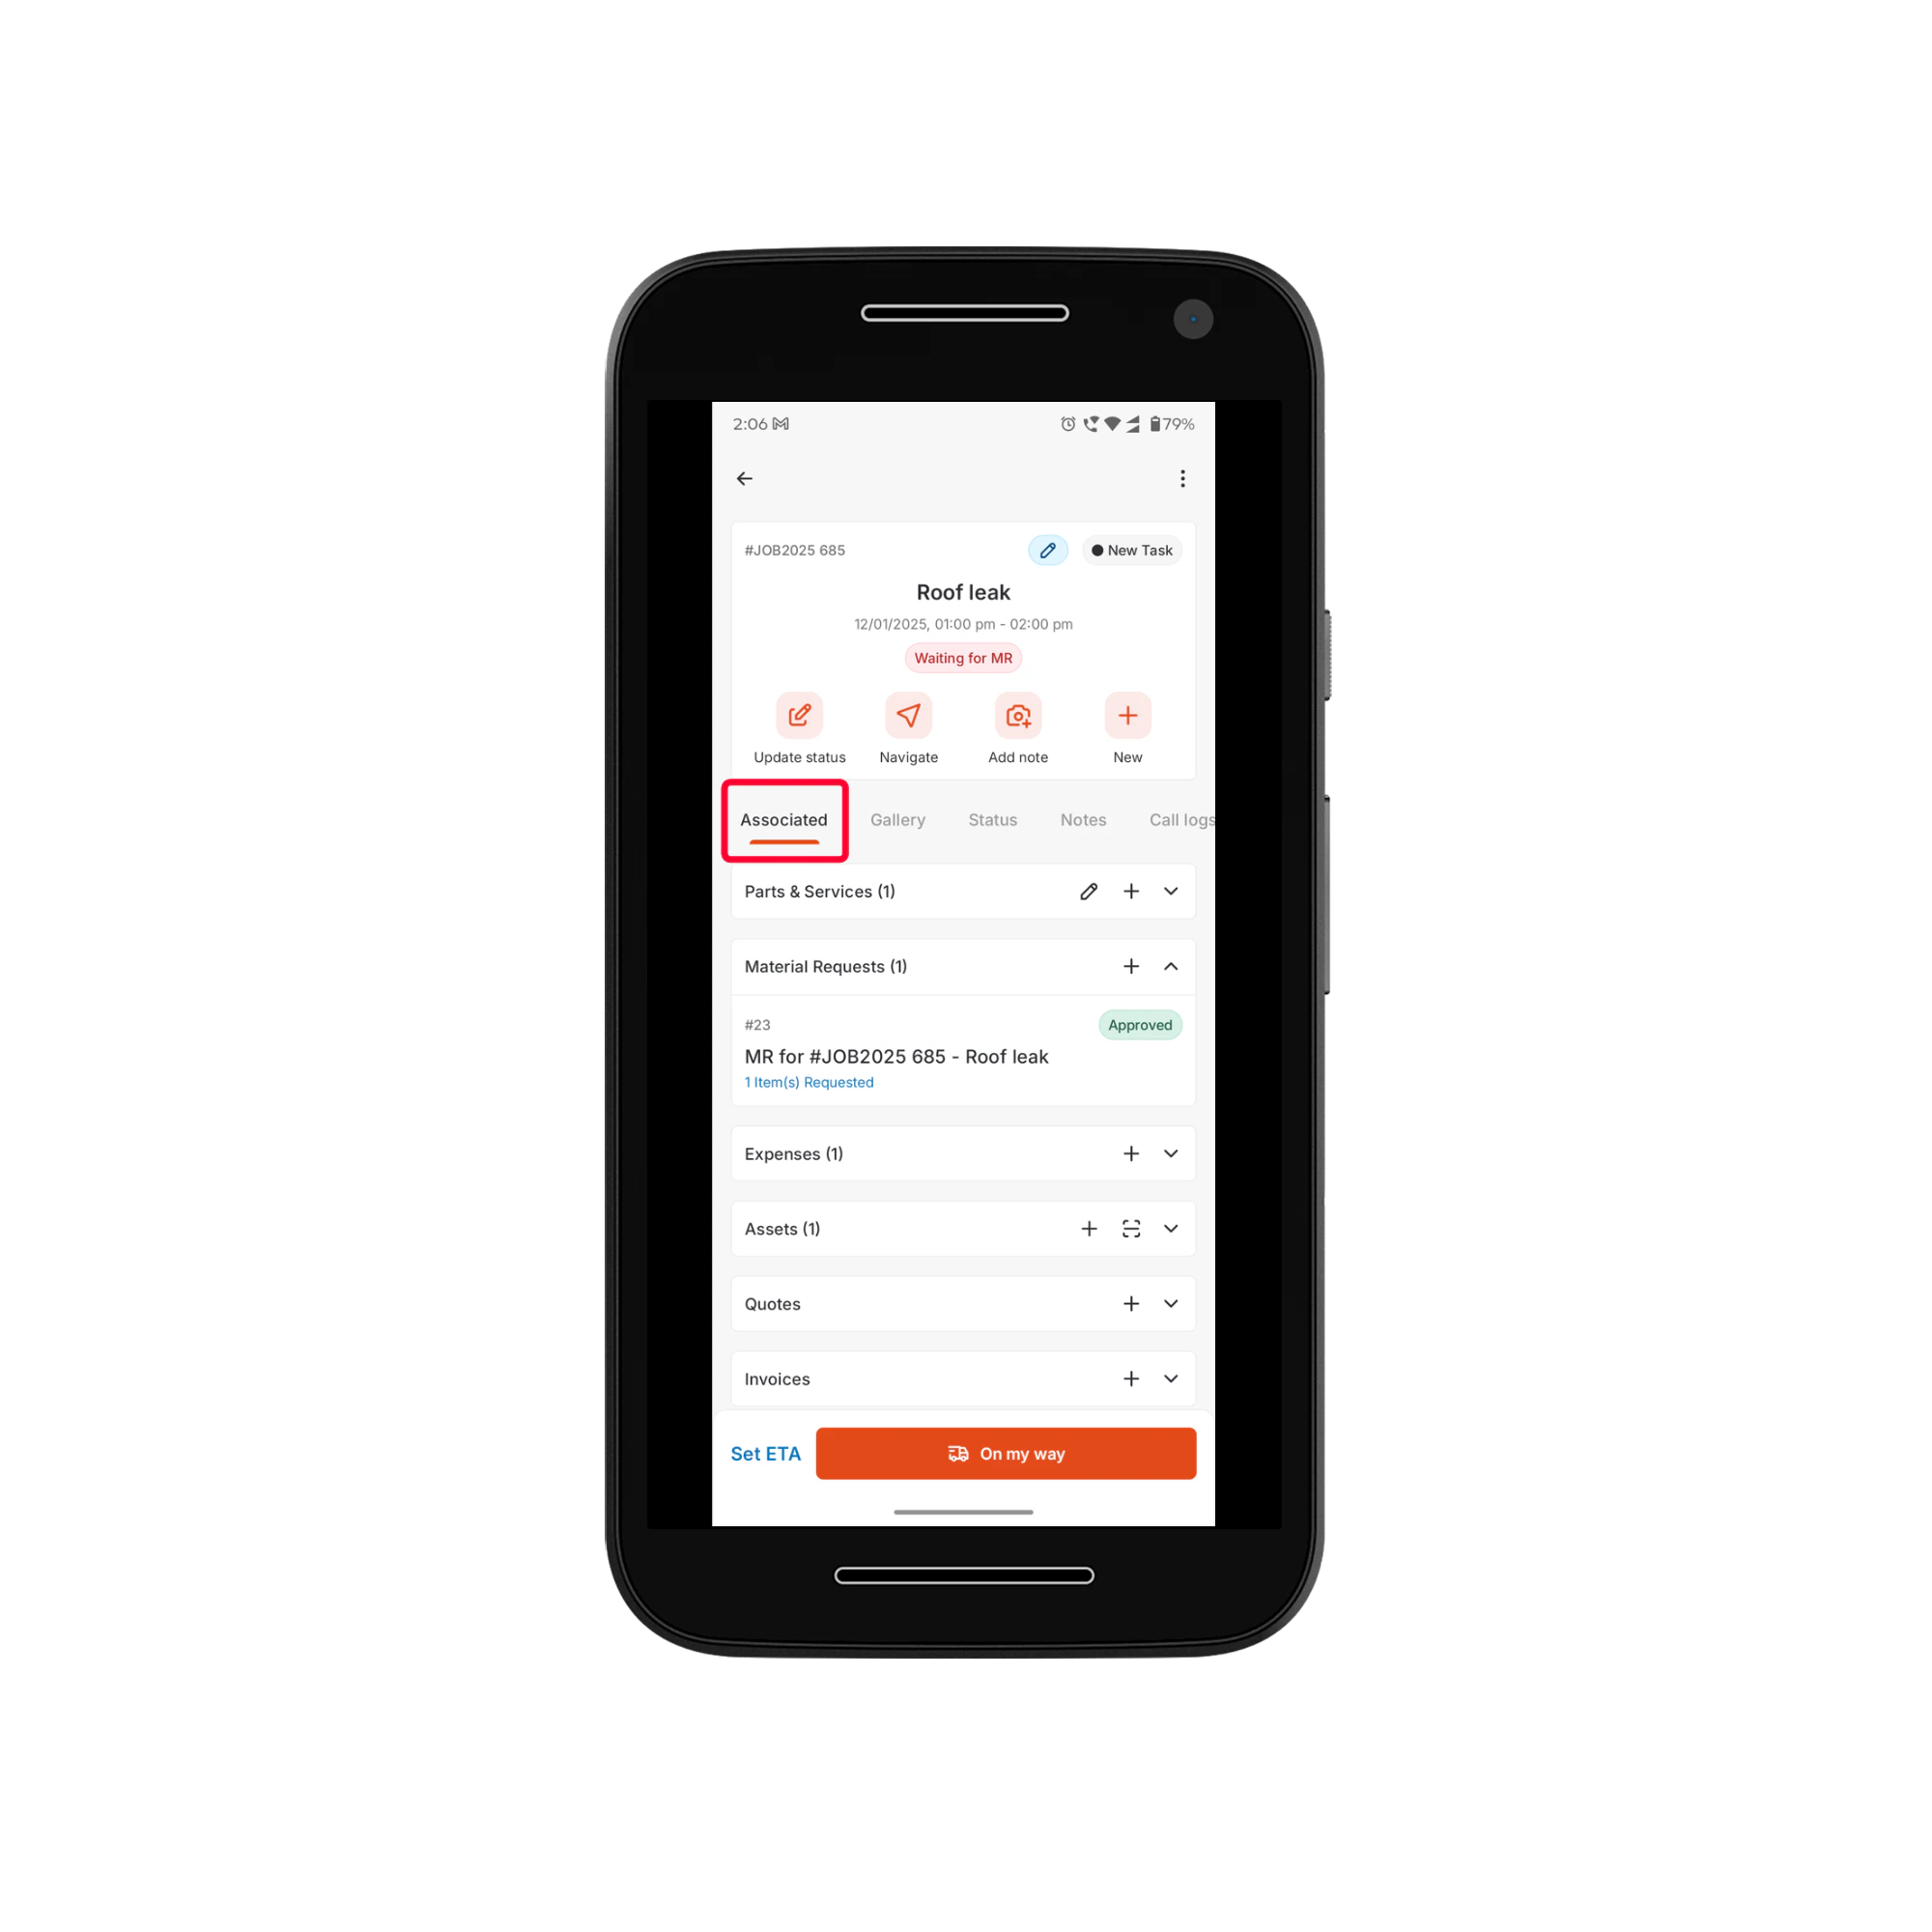 Note: The features listed above will be visible only if they are enabled for your organization.
**Gallery Tab**
* View photos and videos uploaded for the job.
* Upload new media if required.
Note: The features listed above will be visible only if they are enabled for your organization.
**Gallery Tab**
* View photos and videos uploaded for the job.
* Upload new media if required.
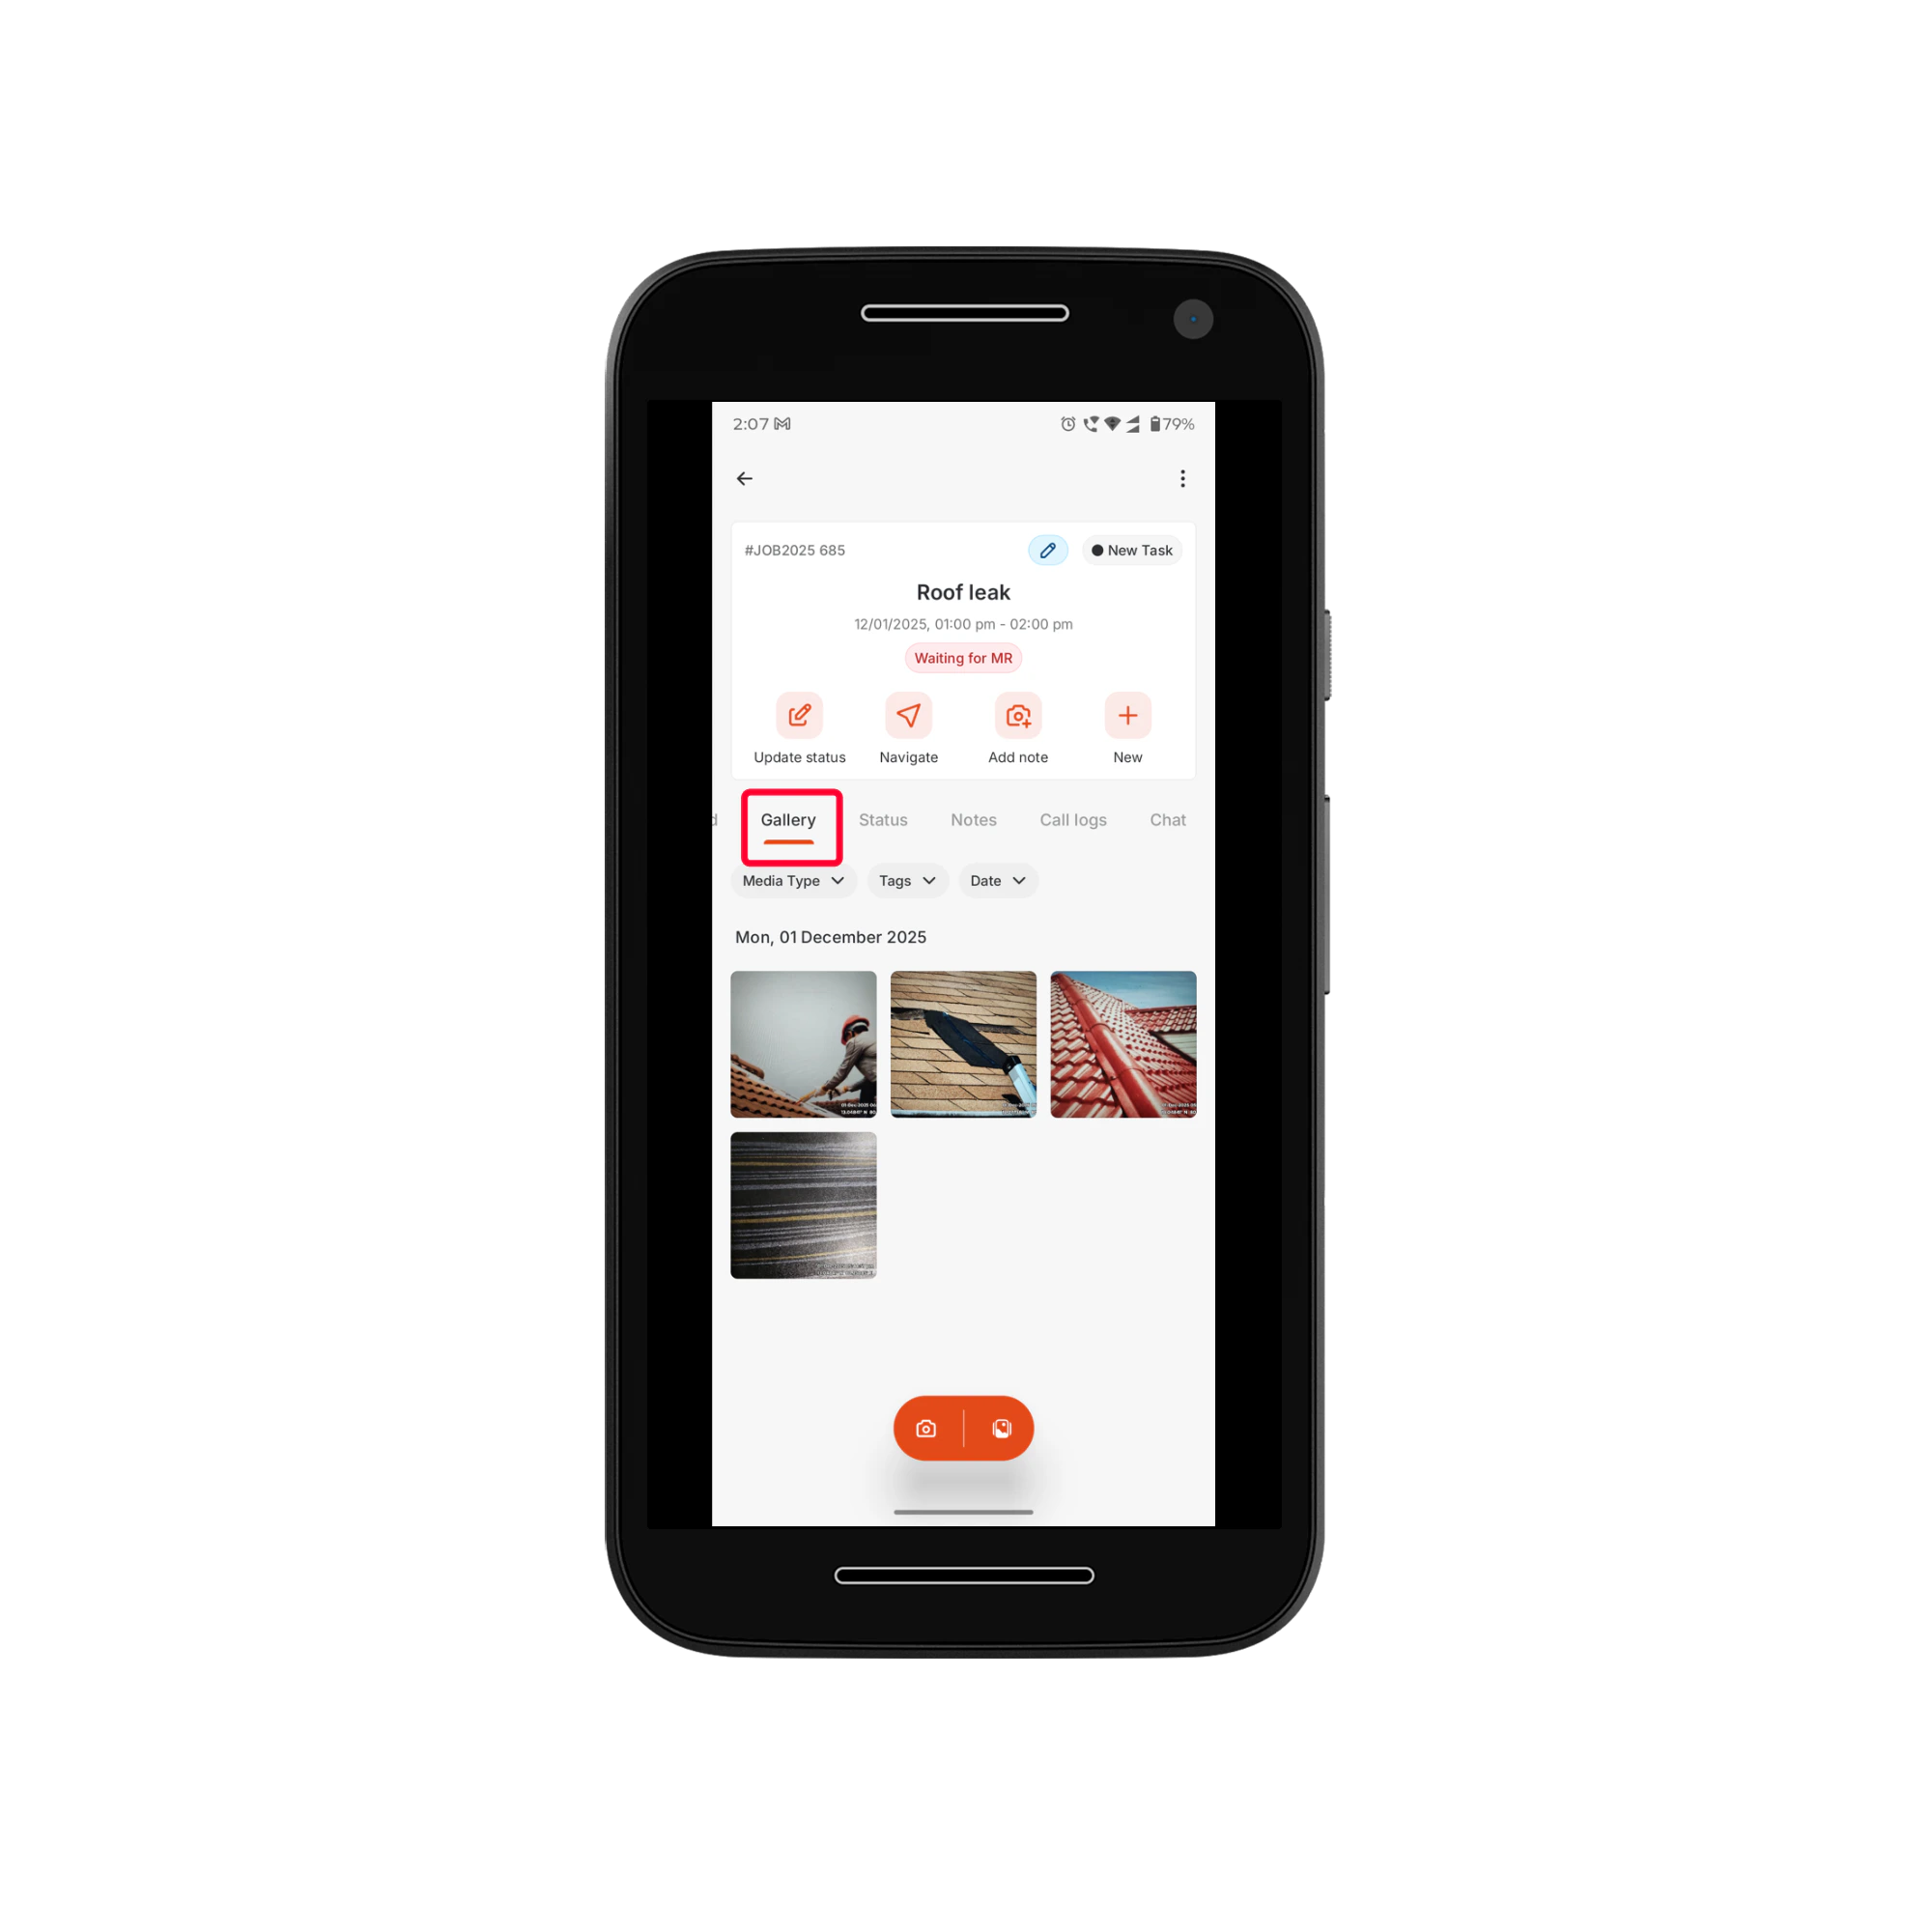 For more information on uploading new media and adding tags, check out this [article](https://docs.zuper.co/Work_Order_Management/Jobs/Jobs_gallery#explore-jobs-gallery-mobile).
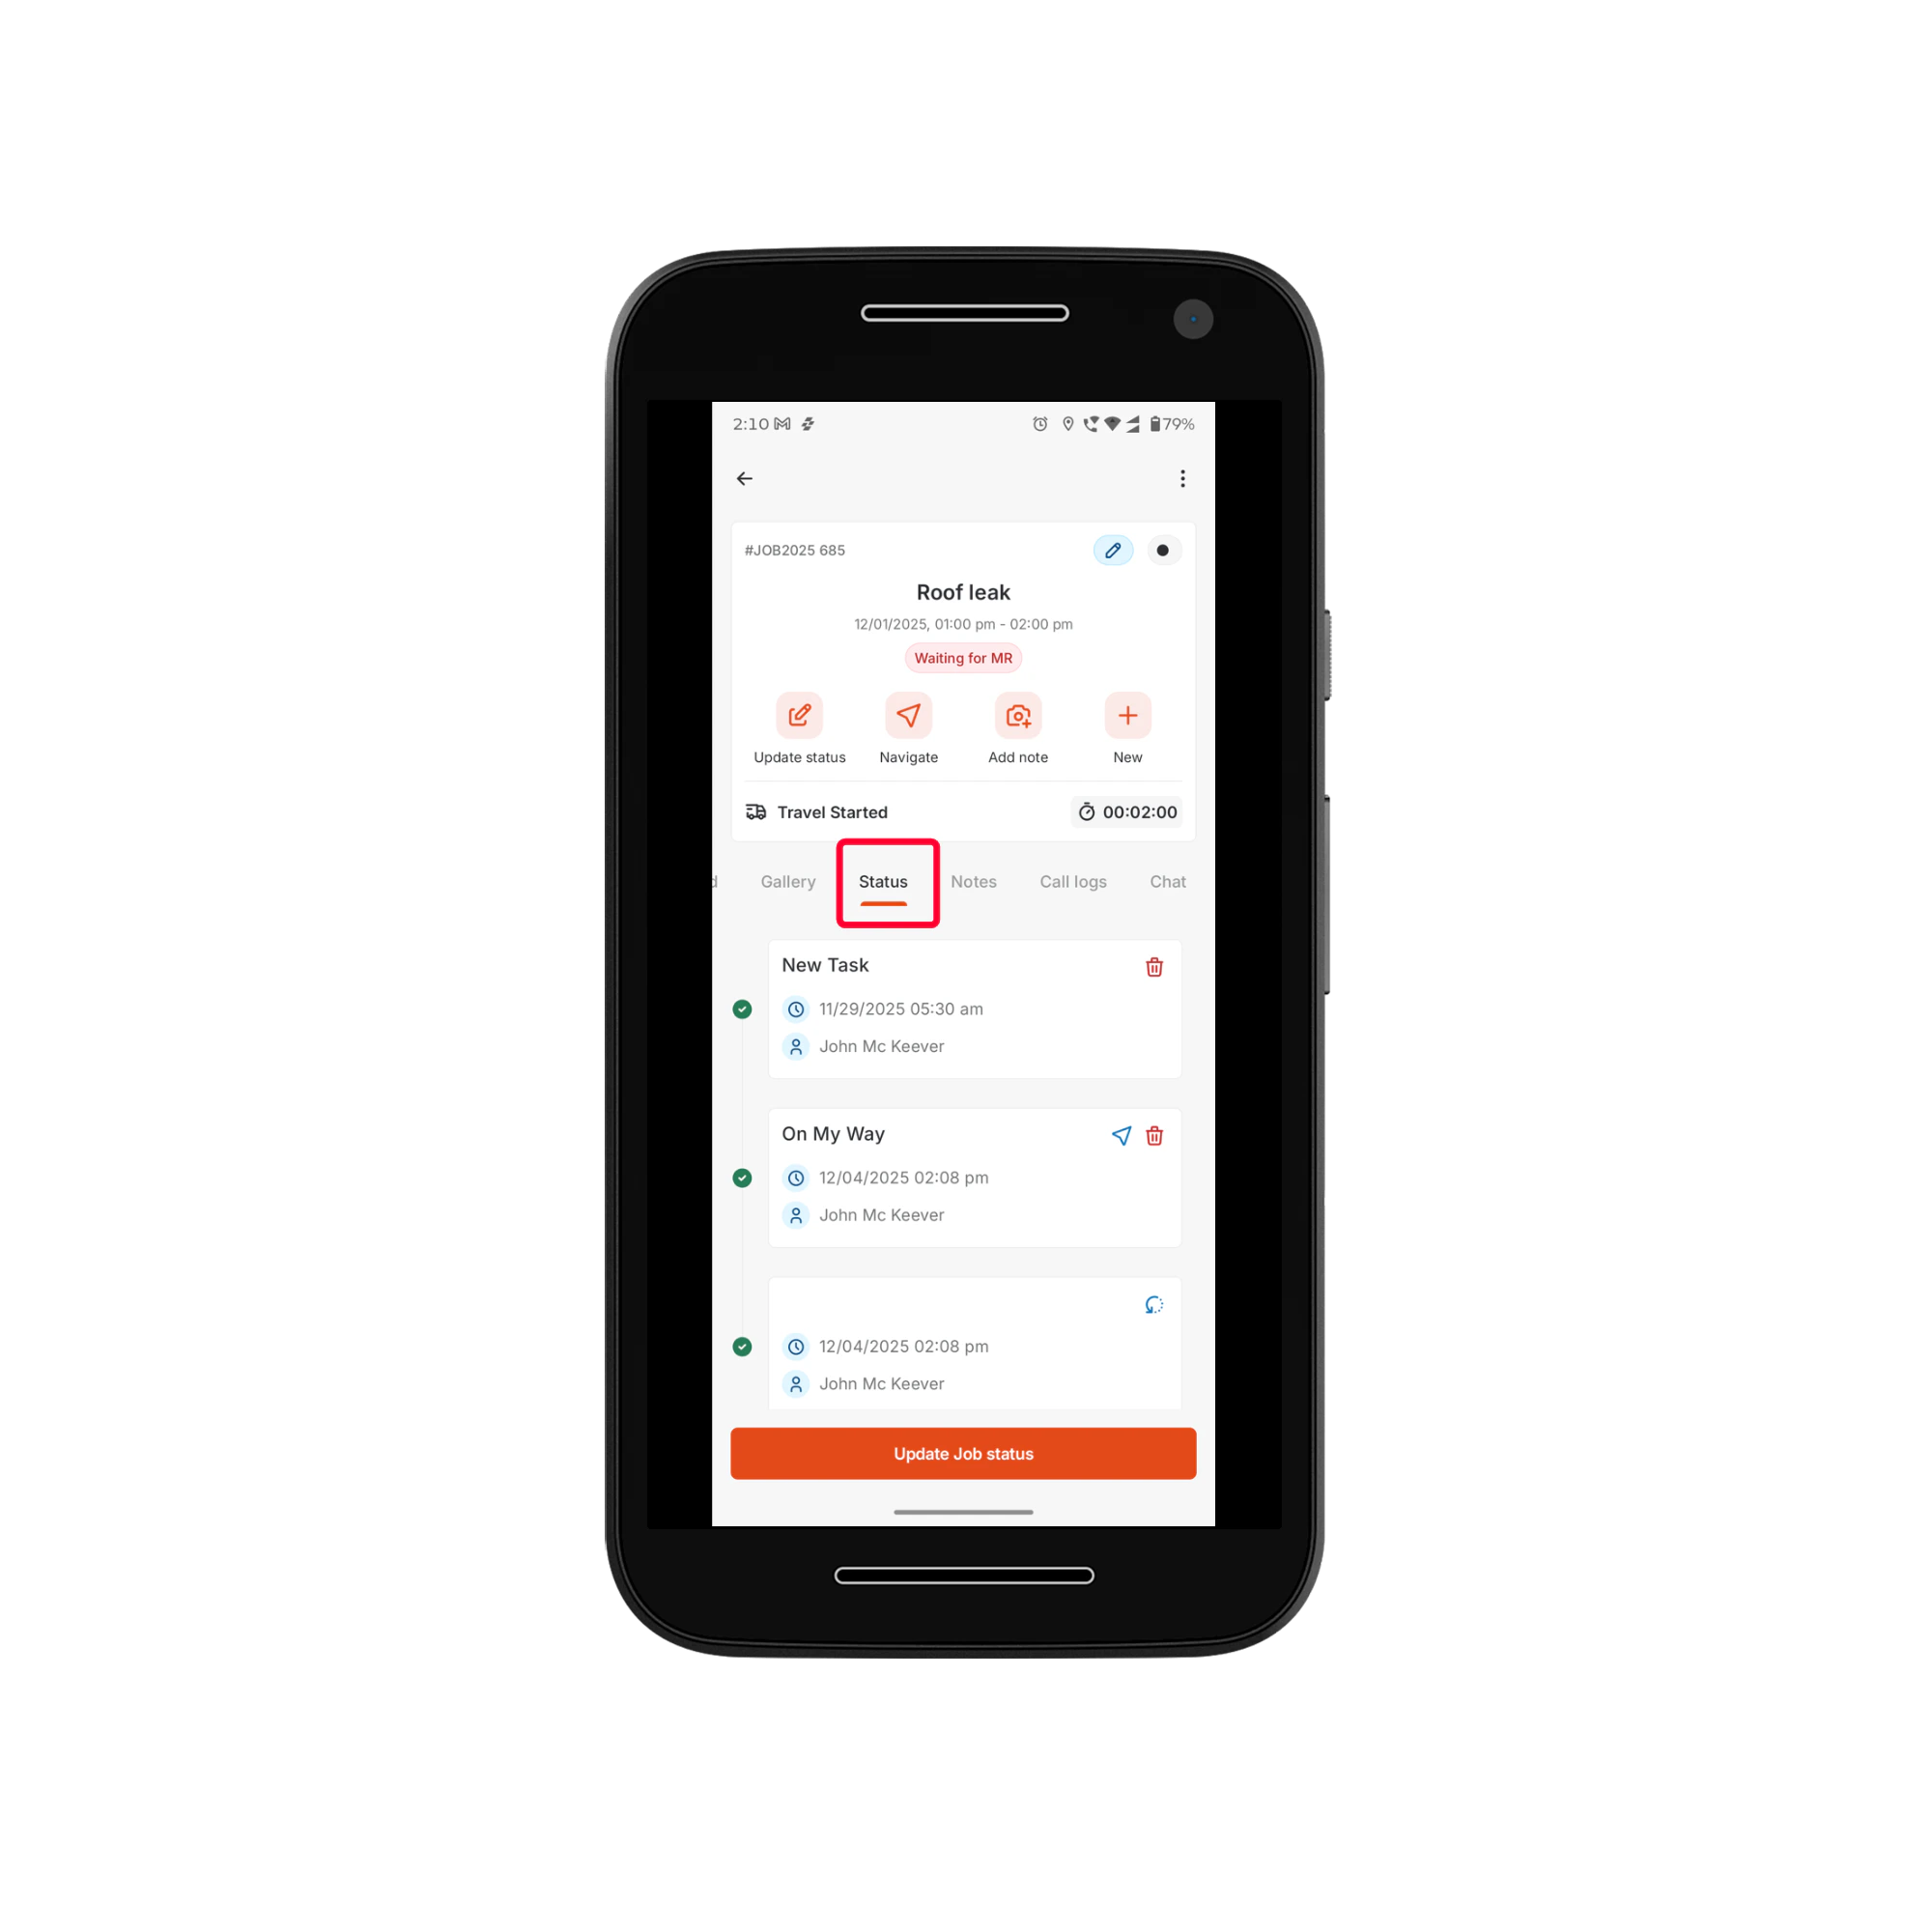
**Status Tab**
* View the complete status timeline in chronological order.
* See timestamps, updated-by details, and any checklist linked to a status update.
For more information on uploading new media and adding tags, check out this [article](https://docs.zuper.co/Work_Order_Management/Jobs/Jobs_gallery#explore-jobs-gallery-mobile).
**Status Tab**
* View the complete status timeline in chronological order.
* See timestamps, updated-by details, and any checklist linked to a status update.
 **Notes Tab**
* View and add internal notes.
**Notes Tab**
* View and add internal notes.
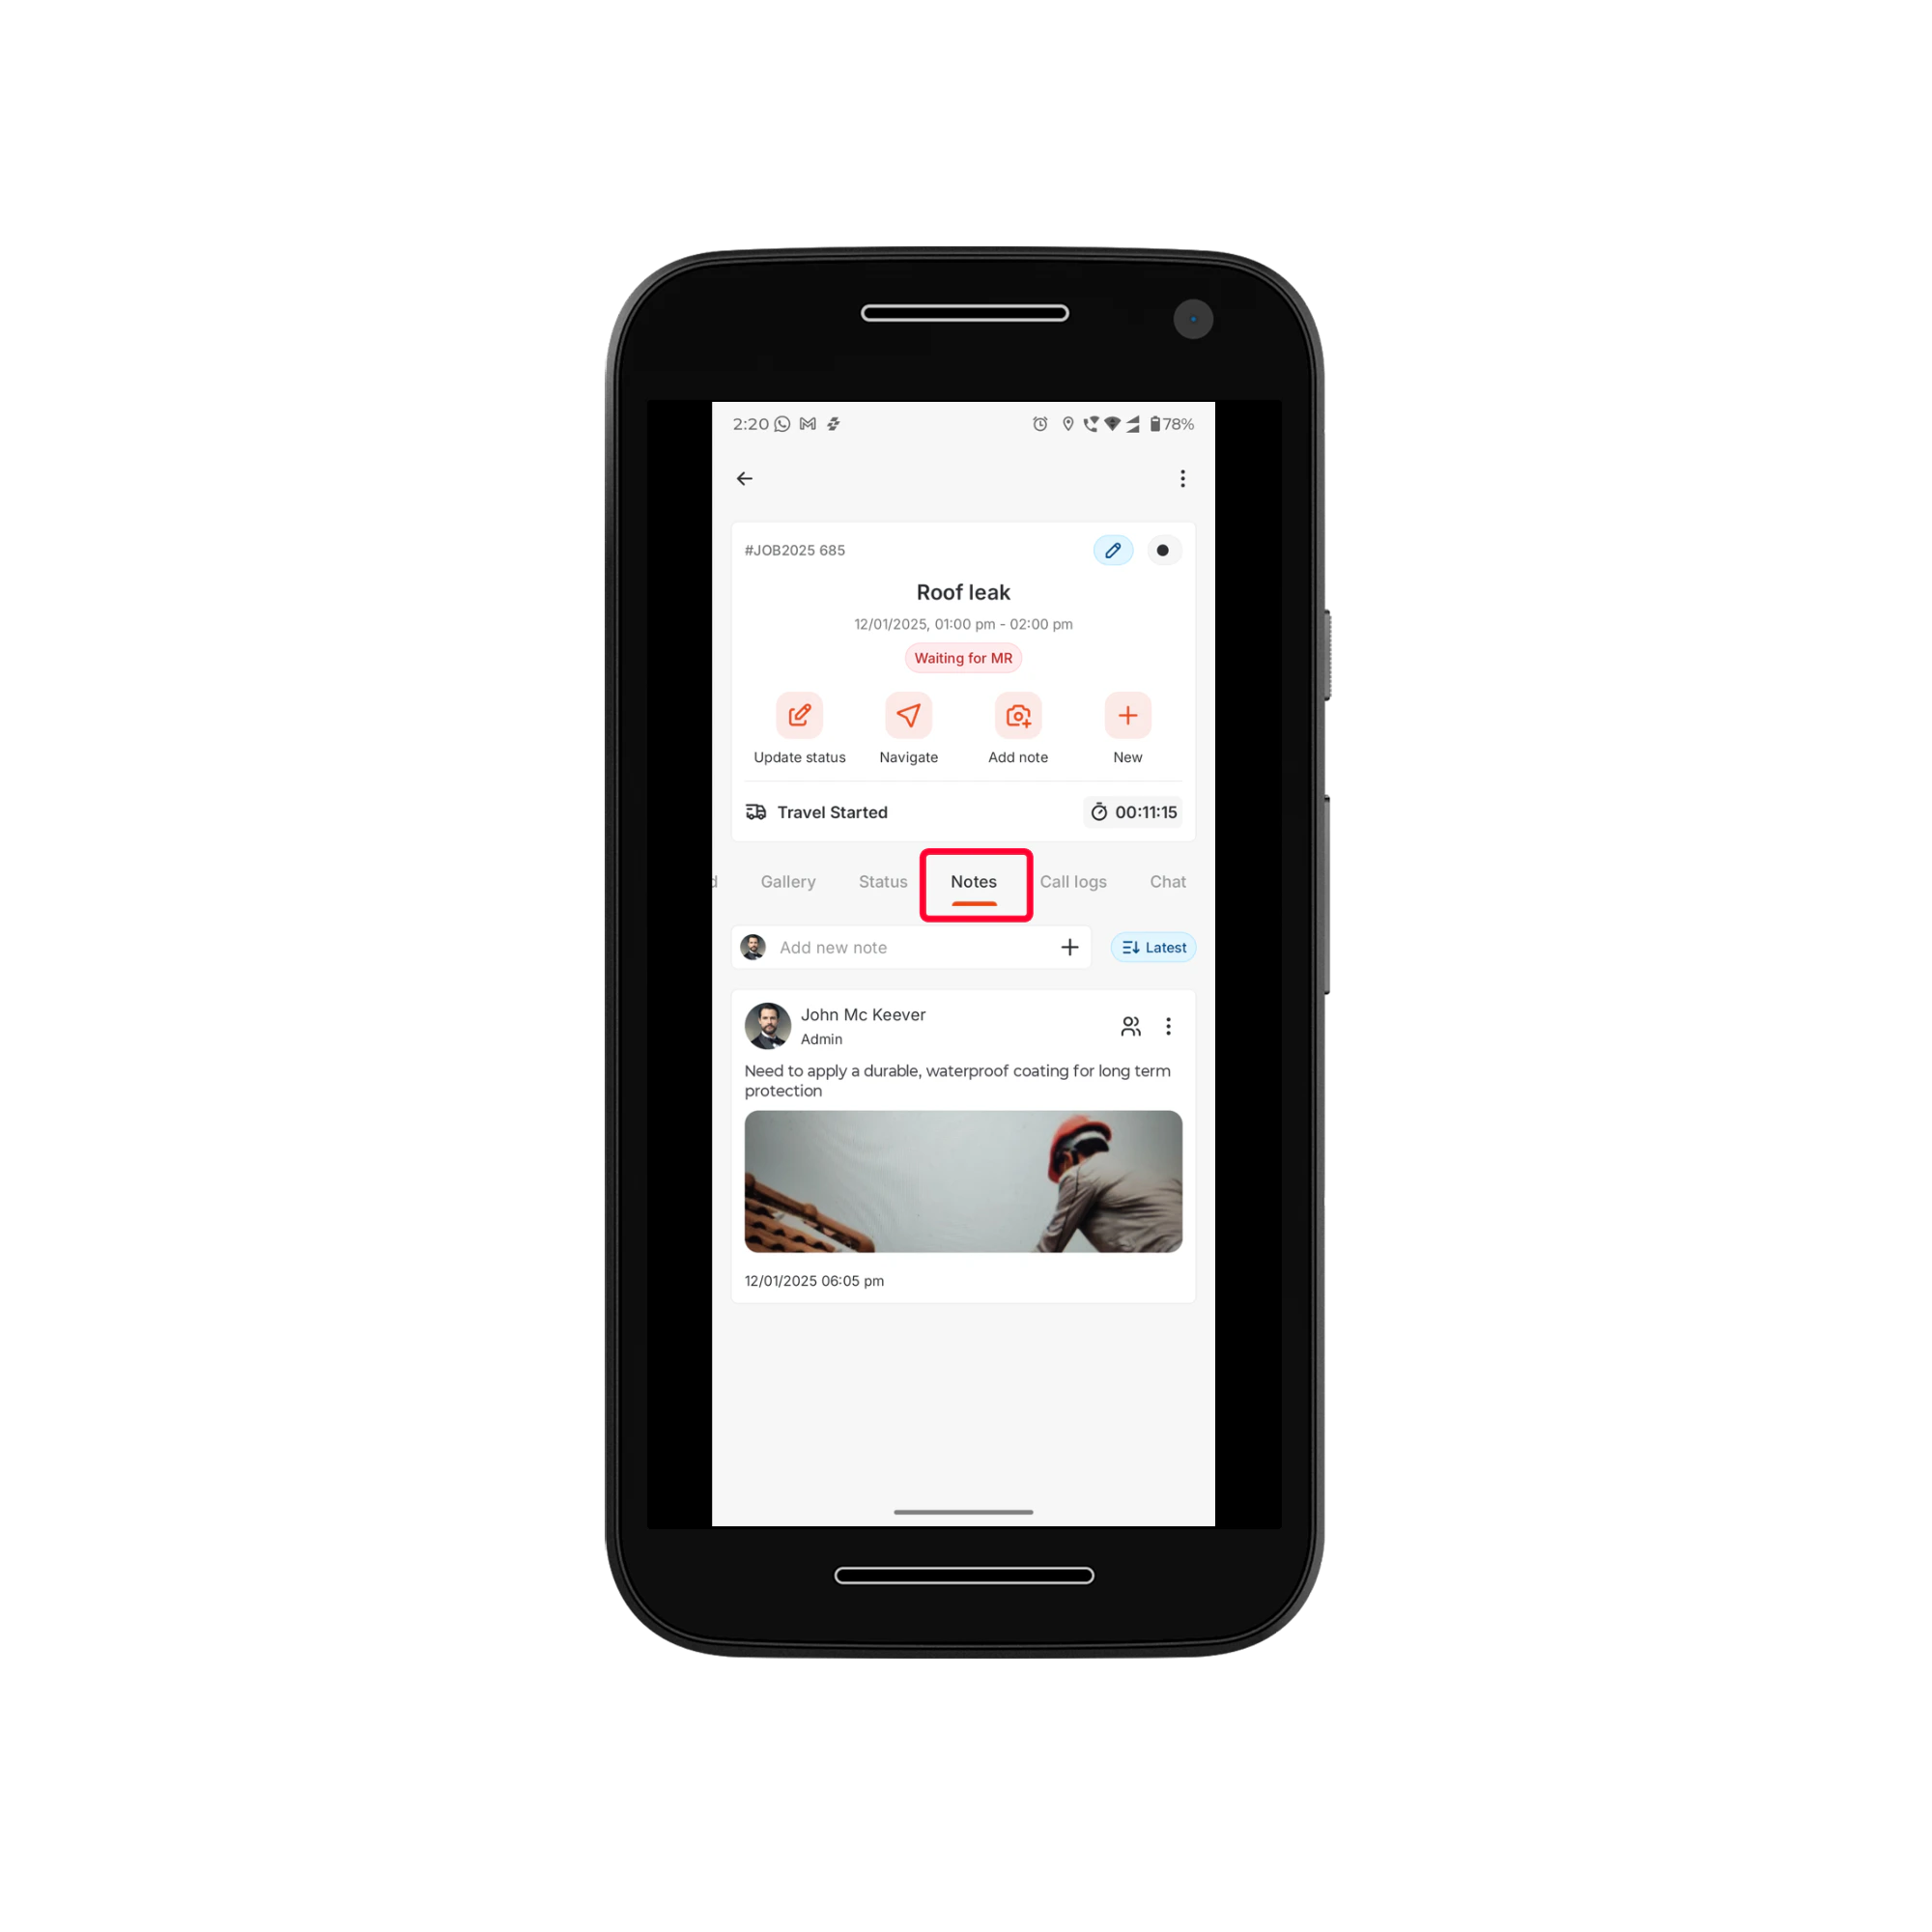 For more information on adding and managing notes, see the [Adding Job Notes](https://docs.zuper.co/Zuper_Mobile_Apps/Quickstart-guide-for-FE#adding-job-notes) section below.
**Call Logs Tab**
* View inbound and outbound calls (if the Zuper Connect feature is enabled)
For more information on accessing Connect on mobile, check out this [article](https://docs.zuper.co/Zuper_Connect/Using_Connect_on_mobile#accessing-zuper-phone-on-mobile).
**Chat Tab**
* Communicate with your team in real time.
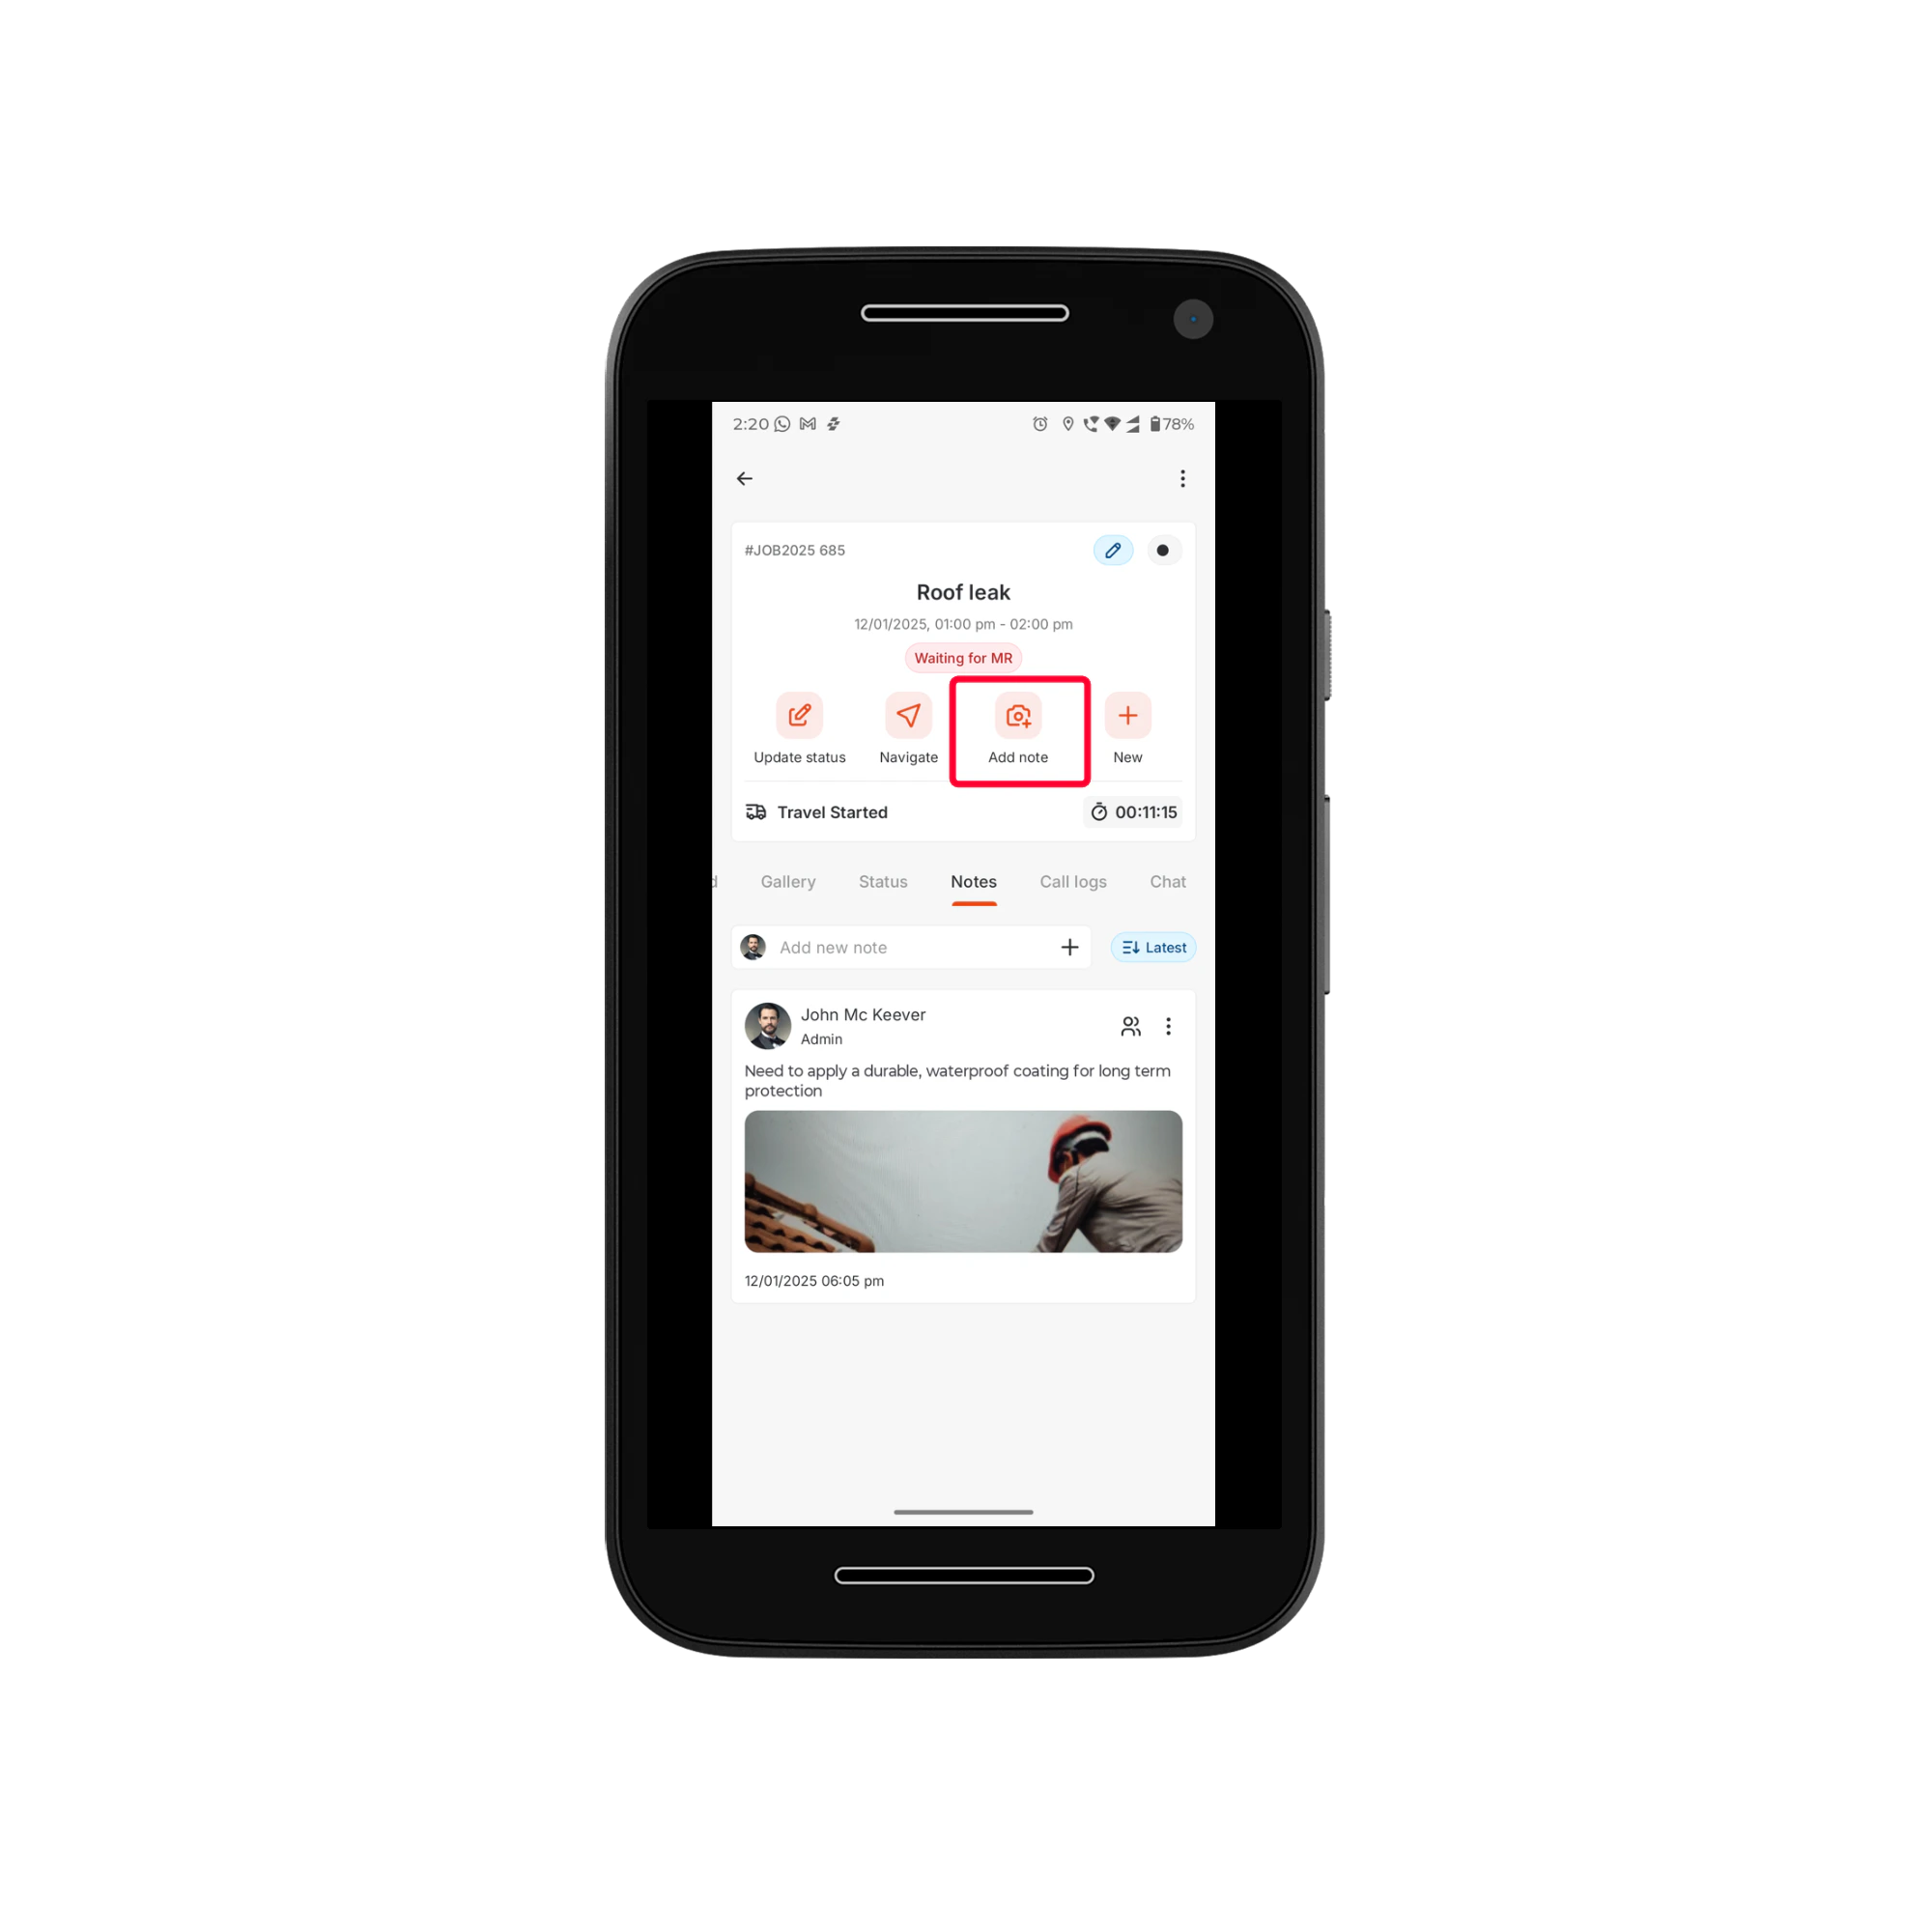
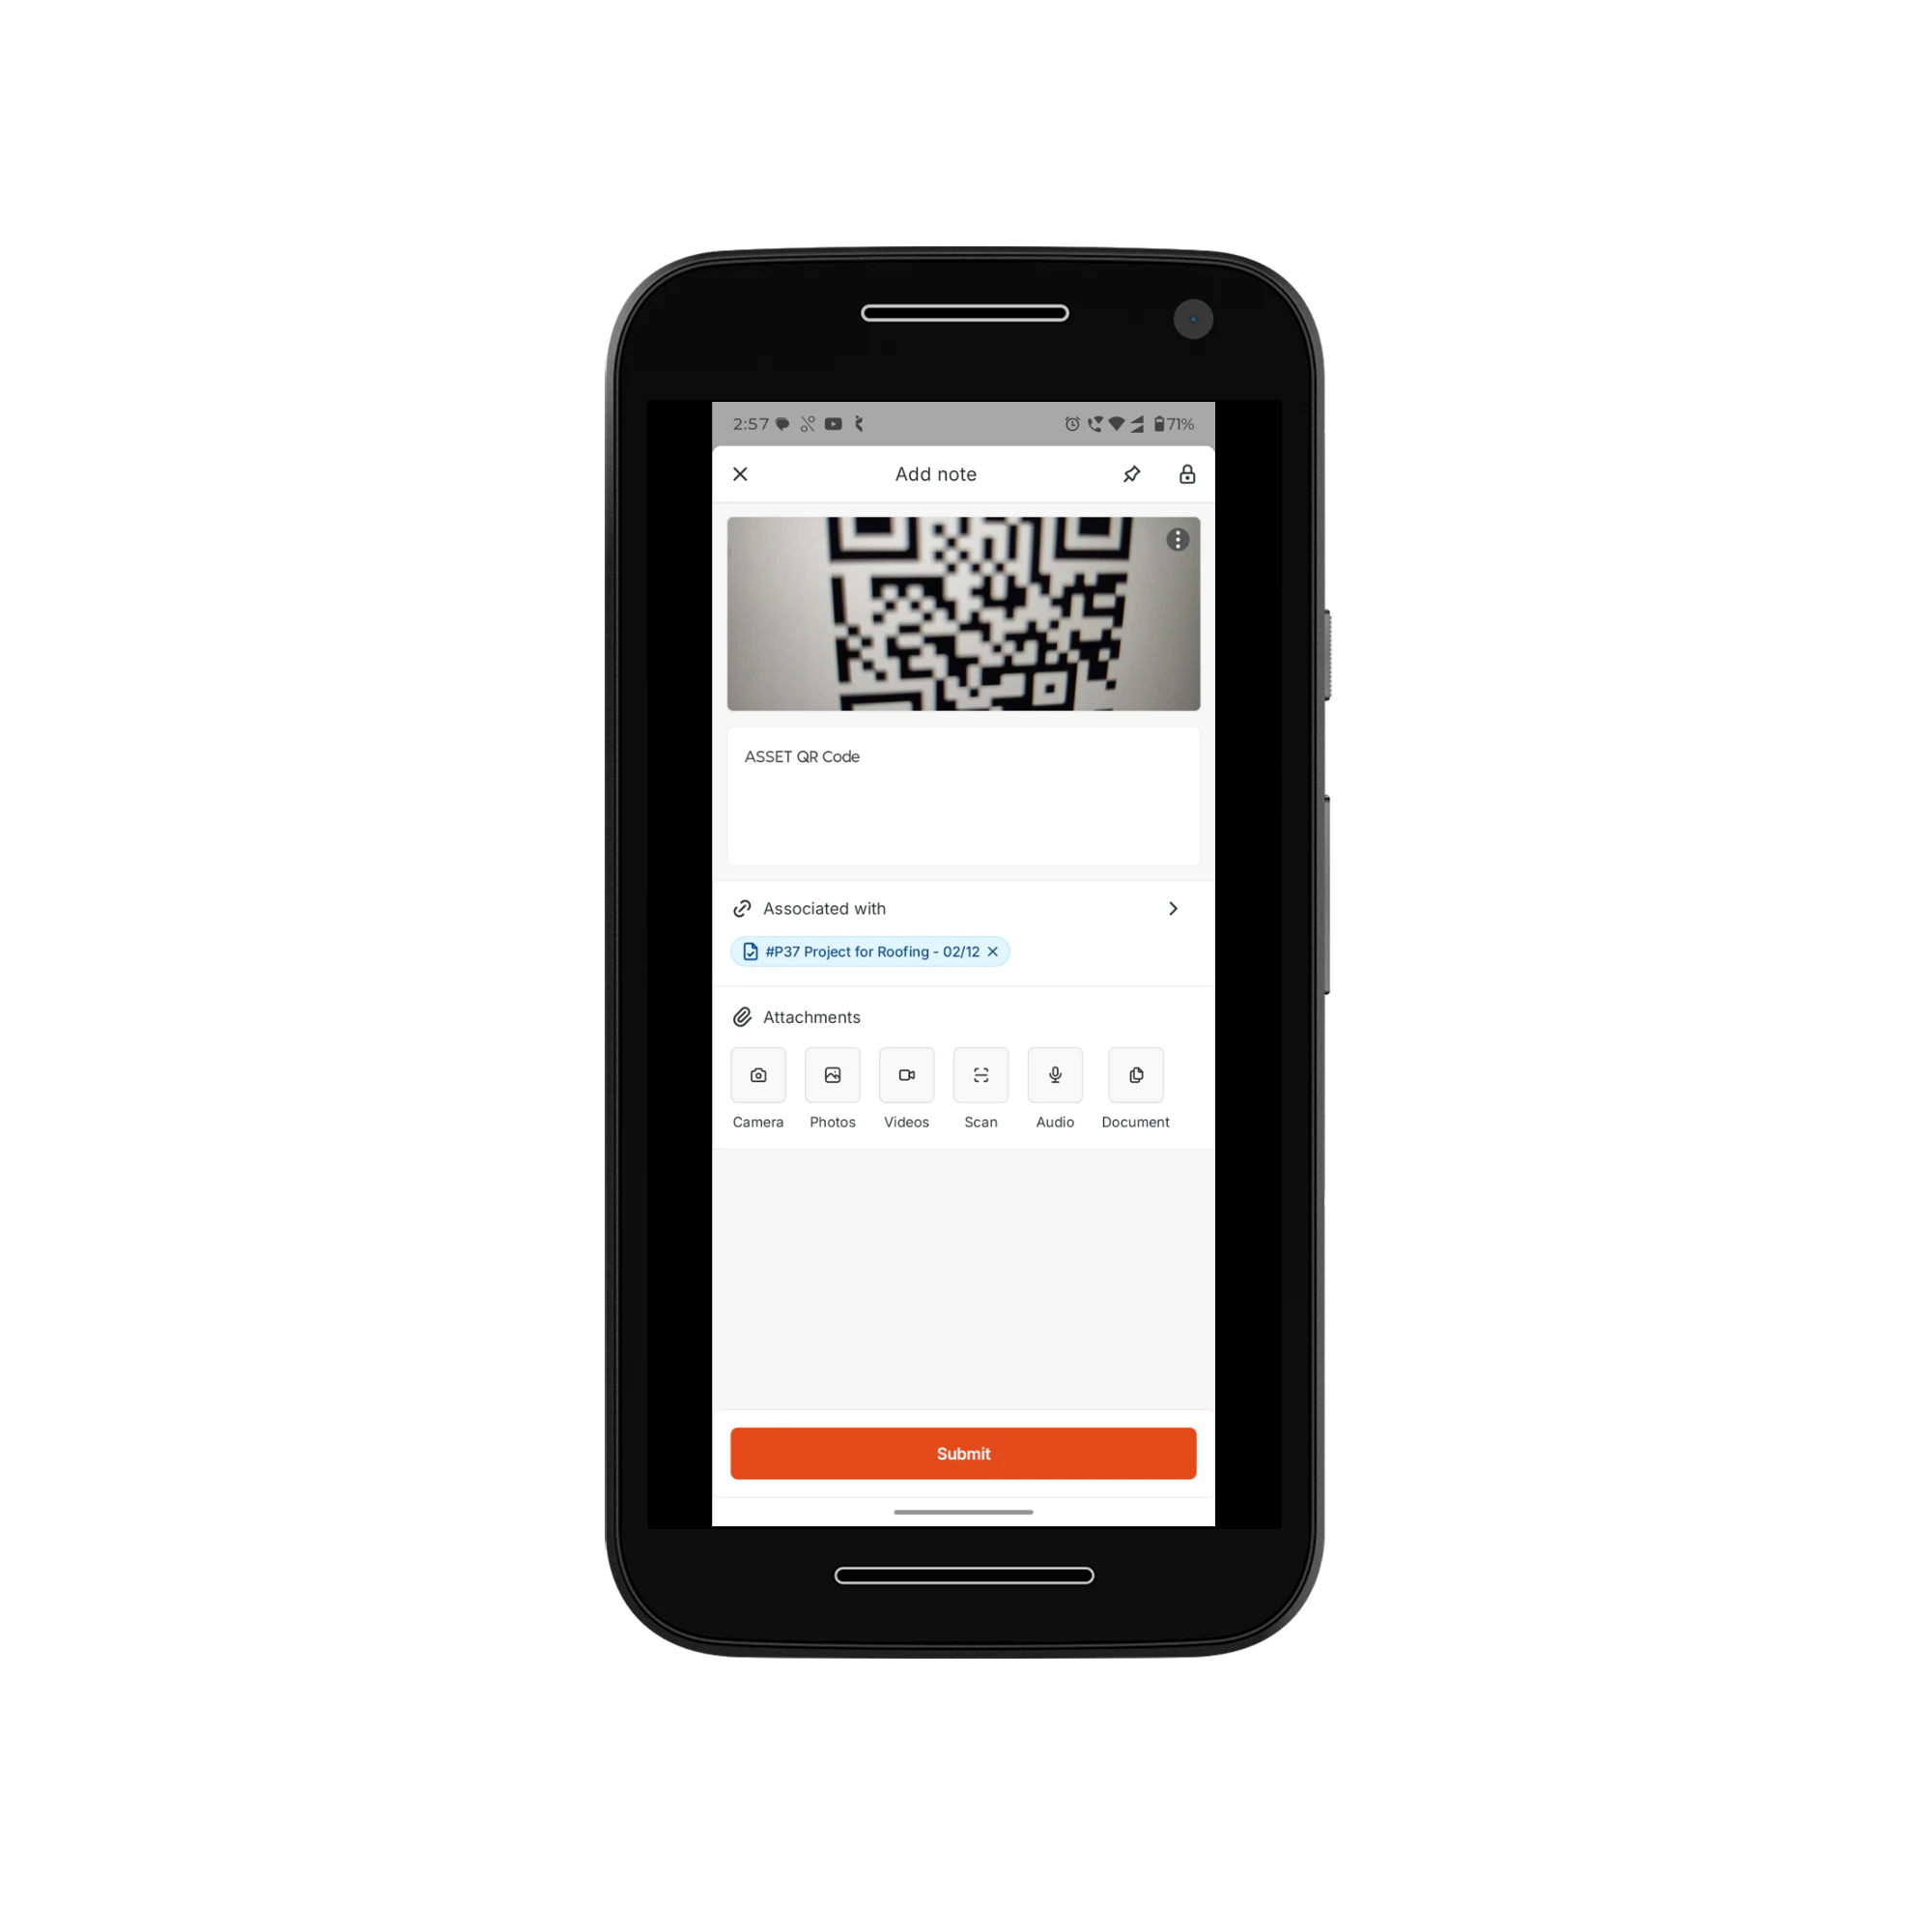
### Adding Job Notes
The **Notes** feature allows you to capture, upload, and manage various types of content in real time. You can add photos, videos, audio, documents, text, and scanned files directly to a note.
**Capturing Content**
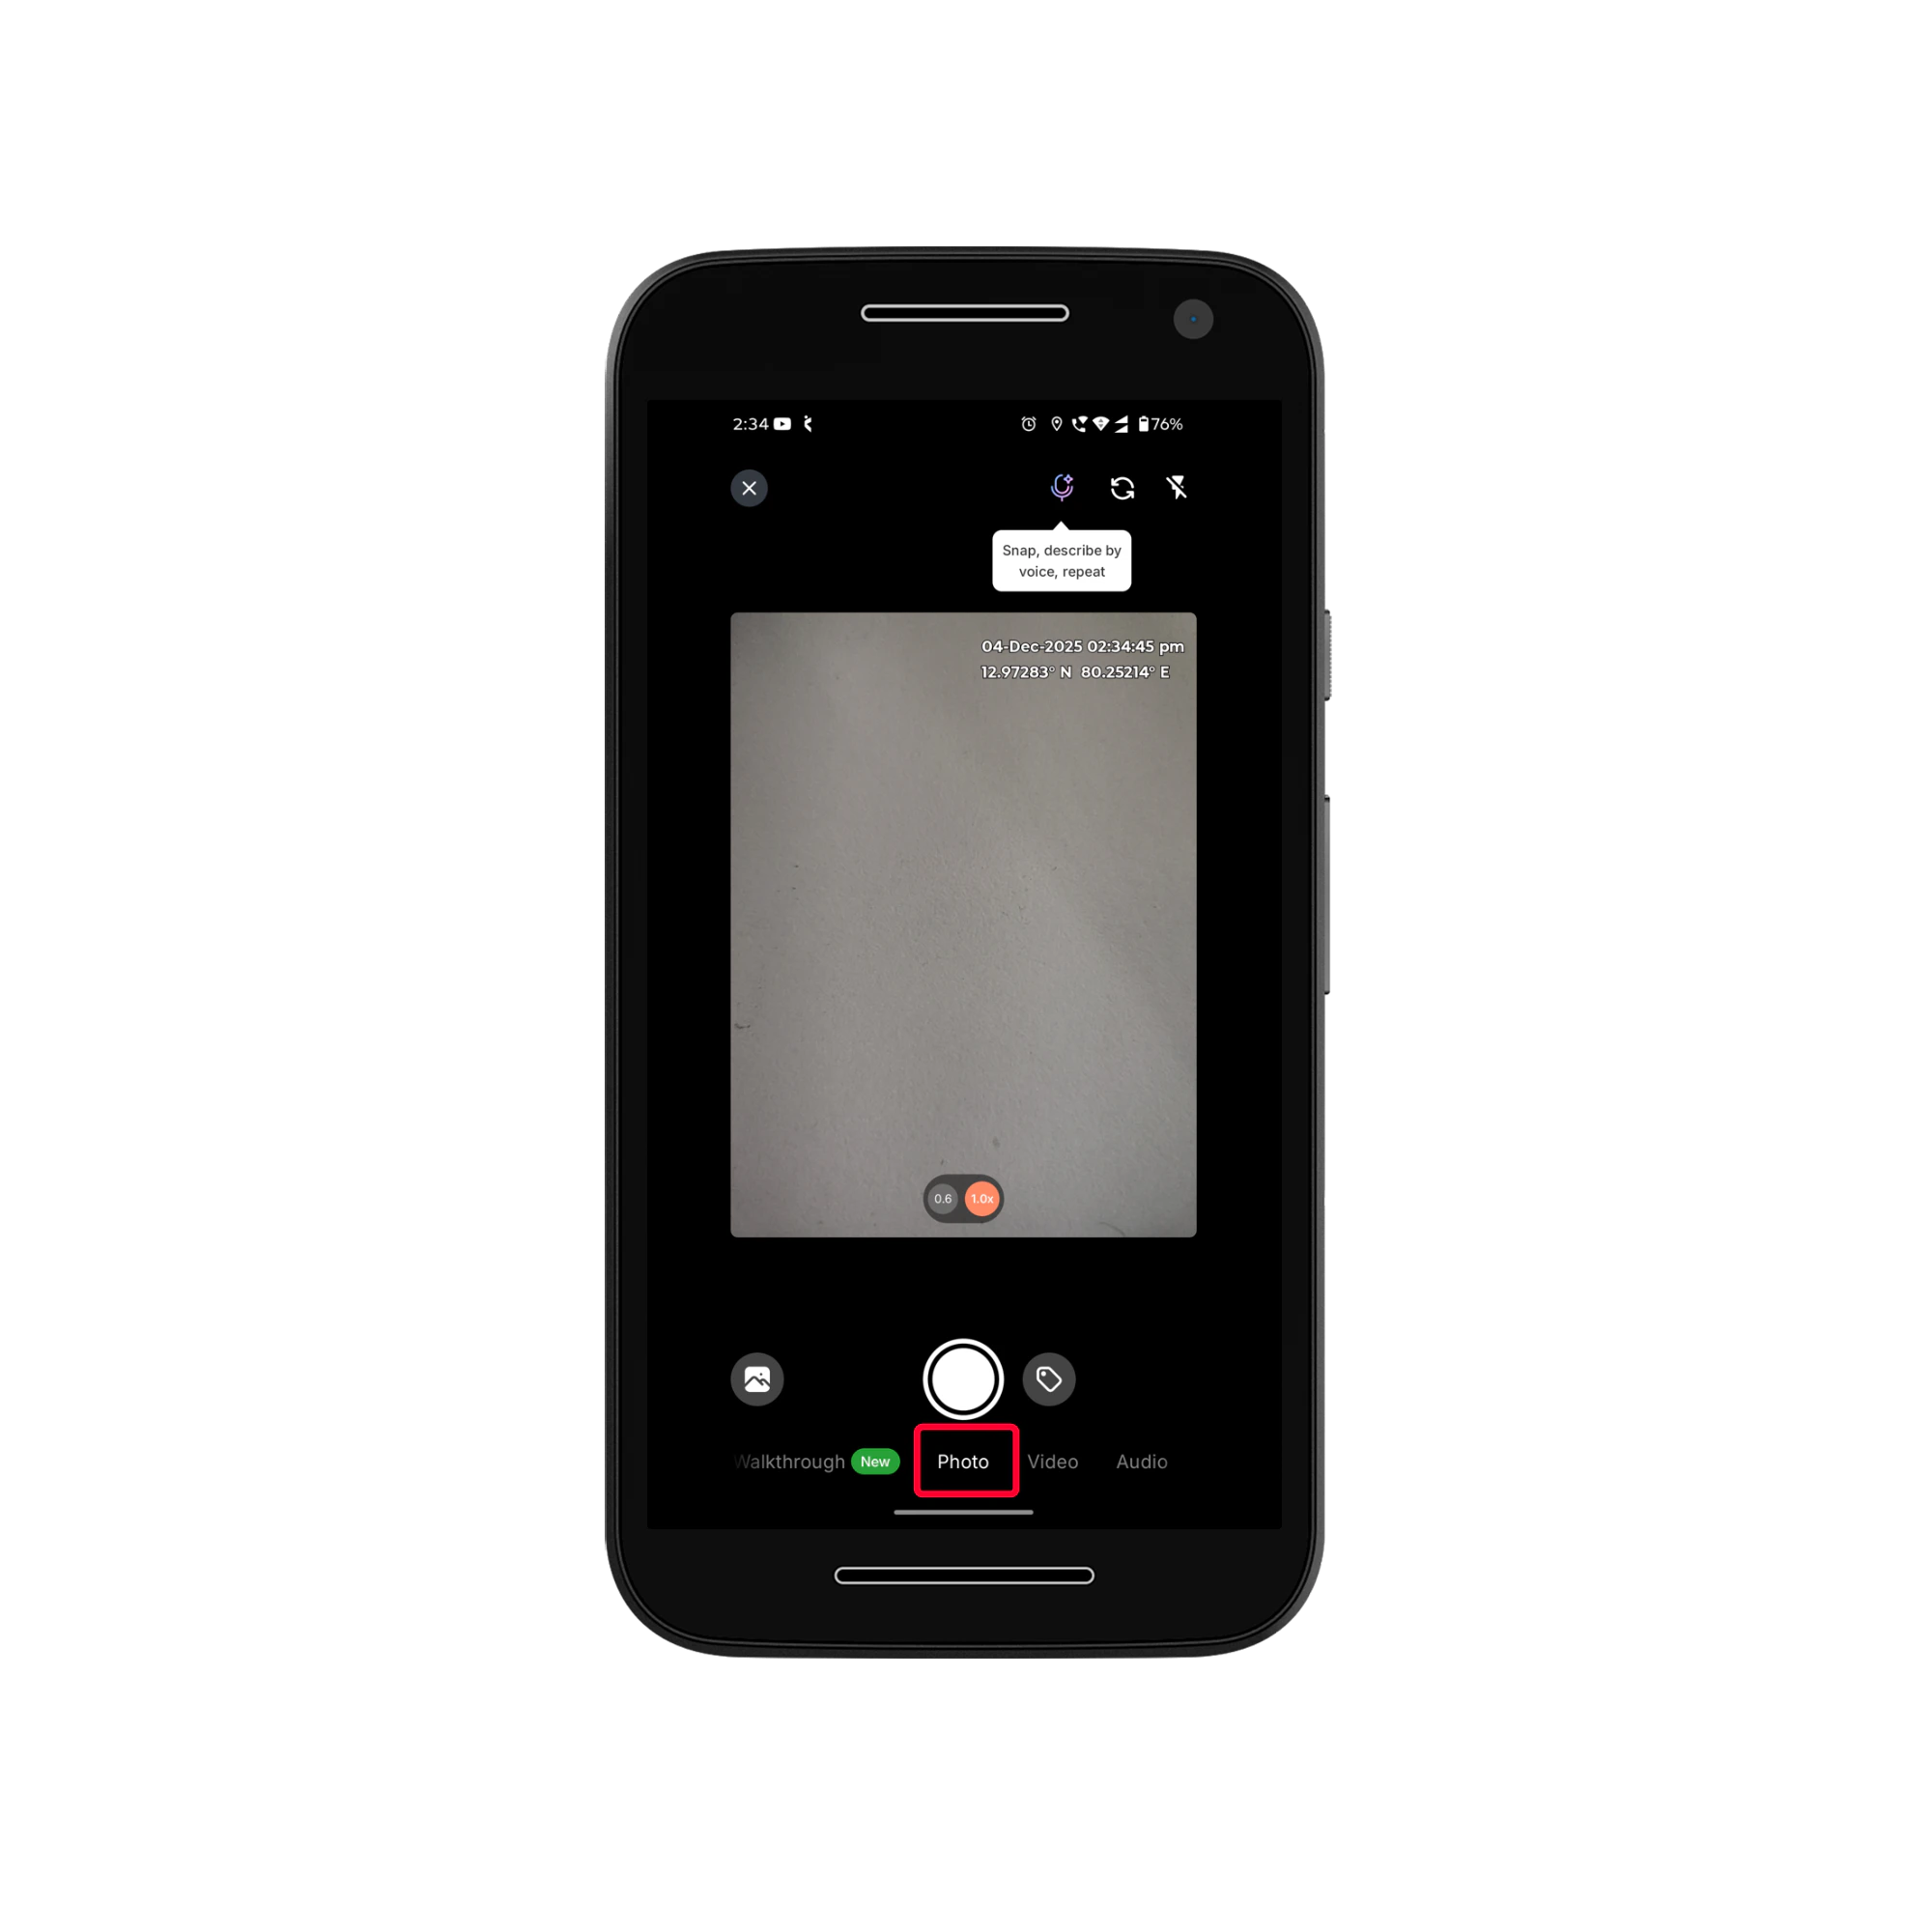
1. **Photo**
* Tap the **Add note** icon from the quick actions bar.
For more information on adding and managing notes, see the [Adding Job Notes](https://docs.zuper.co/Zuper_Mobile_Apps/Quickstart-guide-for-FE#adding-job-notes) section below.
**Call Logs Tab**
* View inbound and outbound calls (if the Zuper Connect feature is enabled)
For more information on accessing Connect on mobile, check out this [article](https://docs.zuper.co/Zuper_Connect/Using_Connect_on_mobile#accessing-zuper-phone-on-mobile).
**Chat Tab**
* Communicate with your team in real time.
### Adding Job Notes
The **Notes** feature allows you to capture, upload, and manage various types of content in real time. You can add photos, videos, audio, documents, text, and scanned files directly to a note.
**Capturing Content**
1. **Photo**
* Tap the **Add note** icon from the quick actions bar.
 * By default, you’ll land in the **Photos** section.
* Capture a photo using the camera in **0.6x** or **1.0x** size. Multiple photos can be captured in one session.
* By default, you’ll land in the **Photos** section.
* Capture a photo using the camera in **0.6x** or **1.0x** size. Multiple photos can be captured in one session.
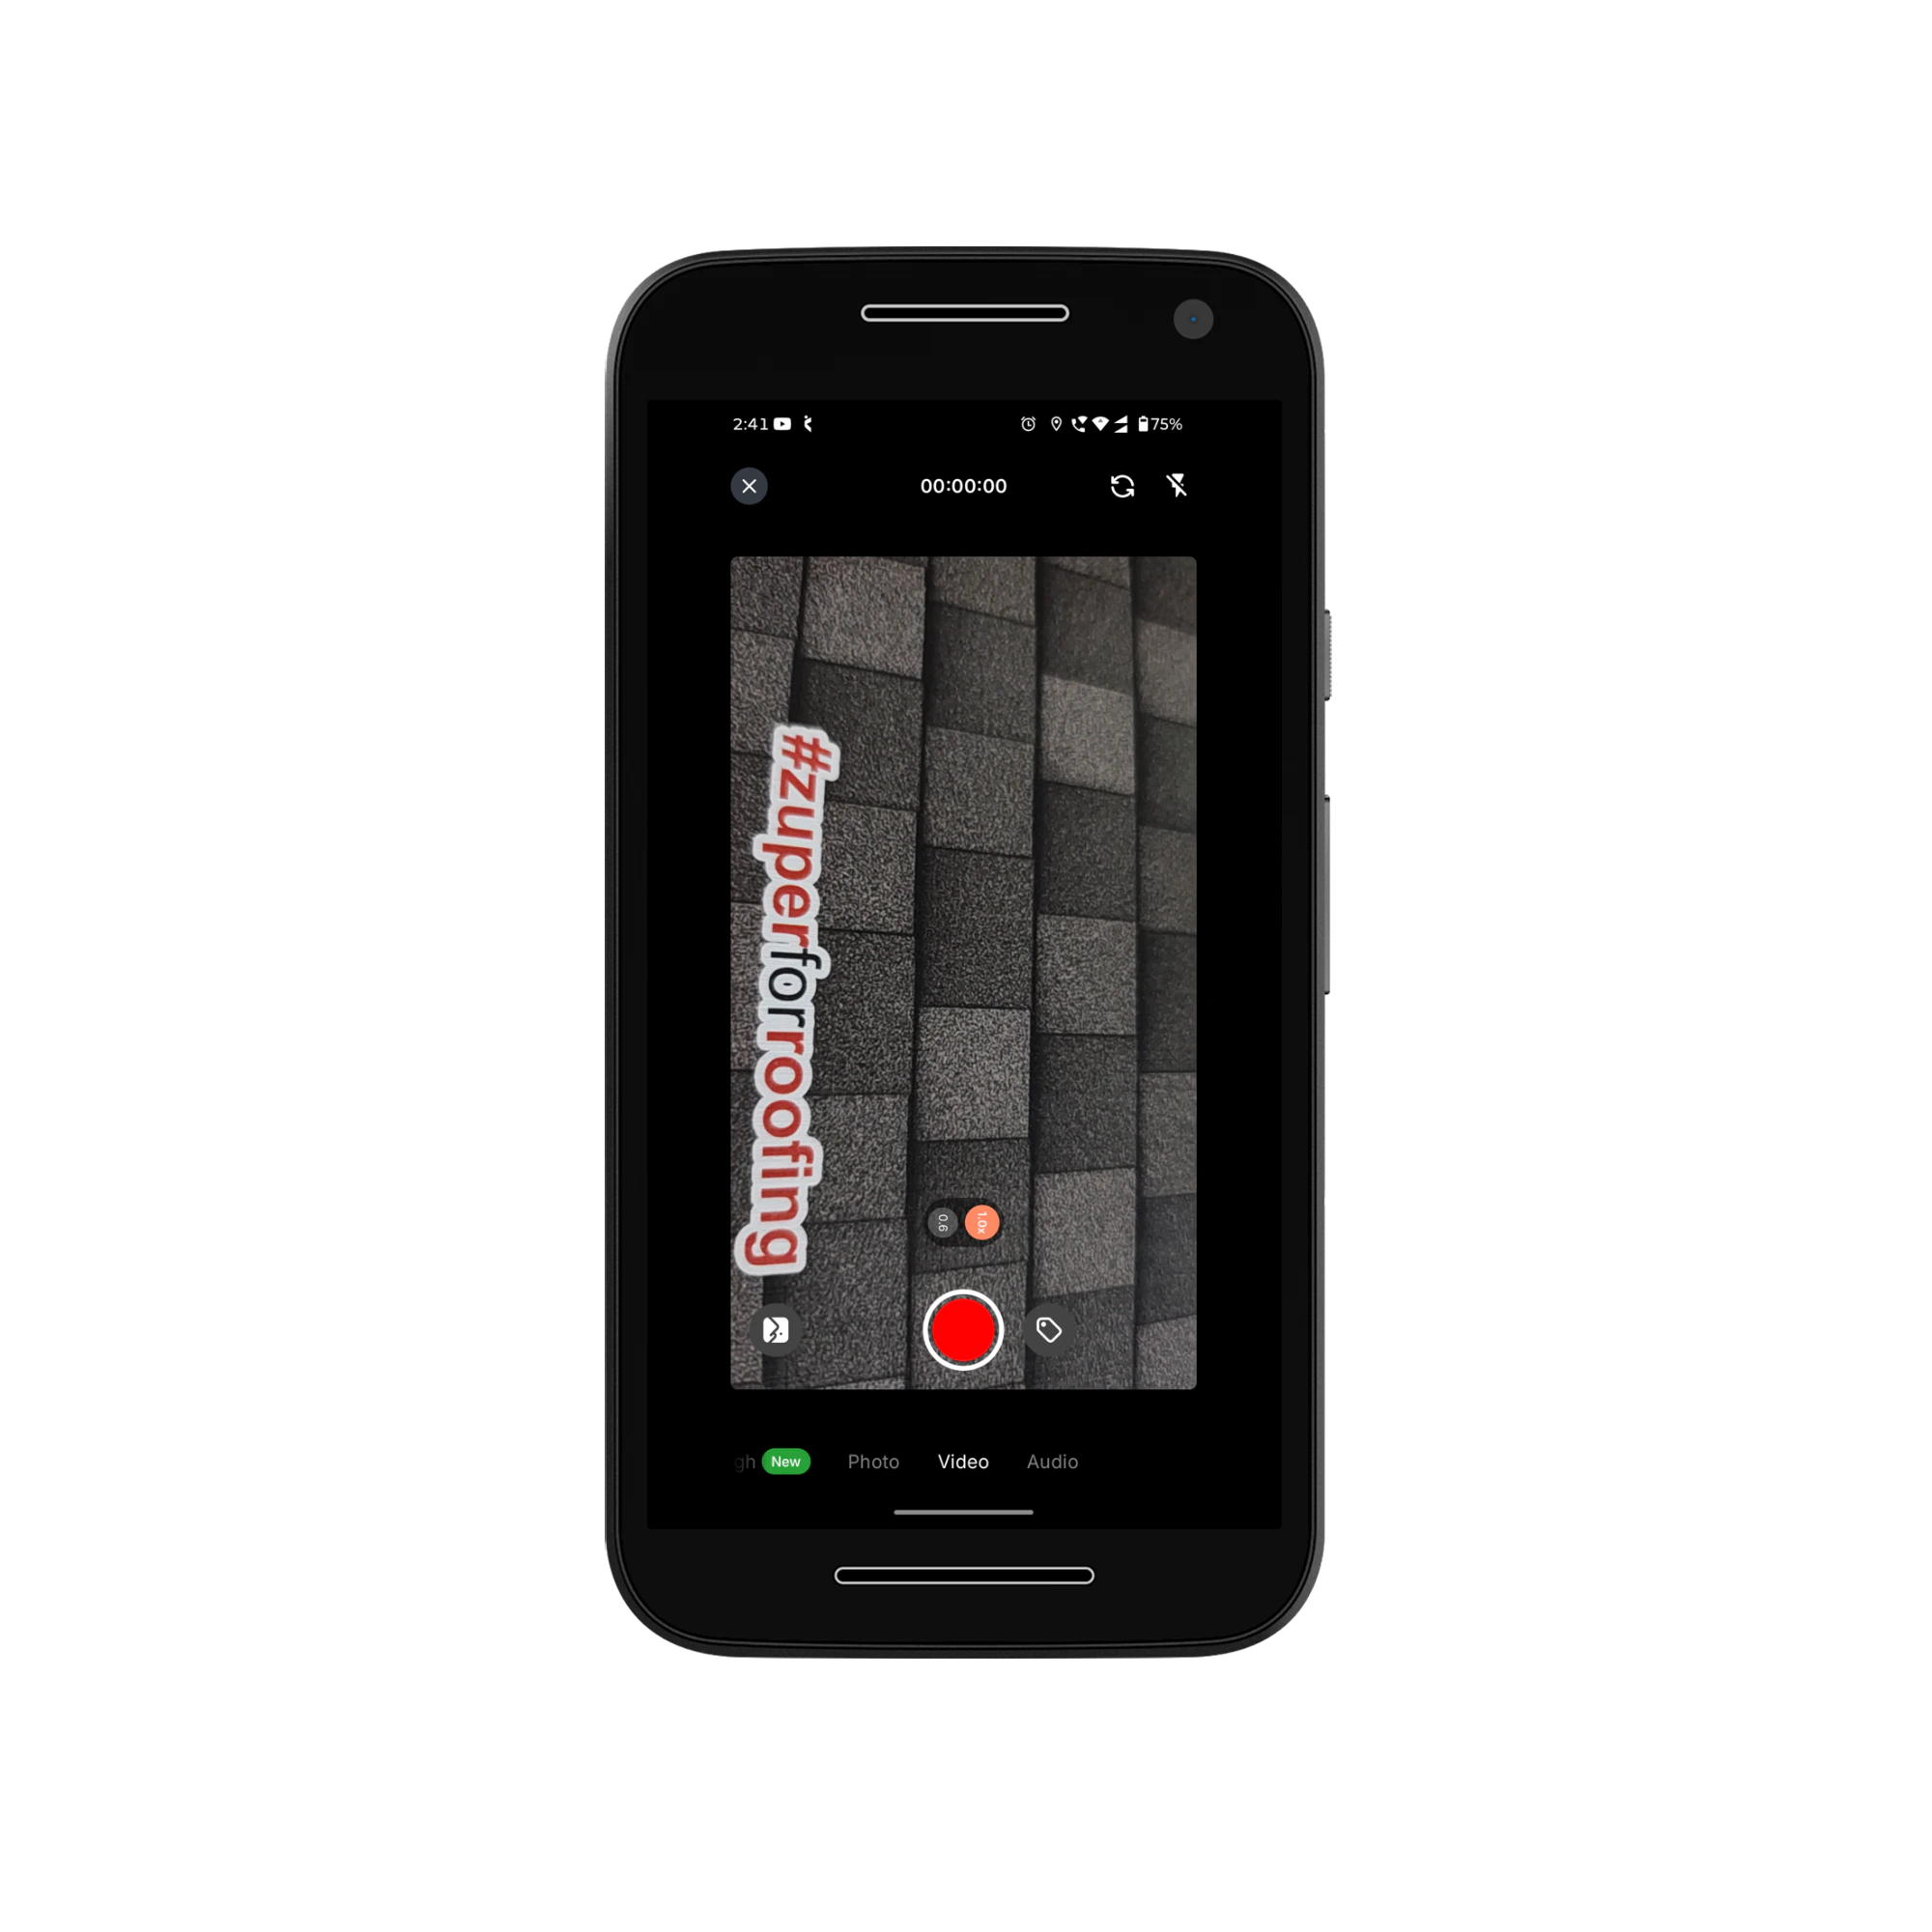
 2. **Video**
* Switch to Video mode in the Notes section.
* Record your video and attach it to the note once you are satisfied.
2. **Video**
* Switch to Video mode in the Notes section.
* Record your video and attach it to the note once you are satisfied.
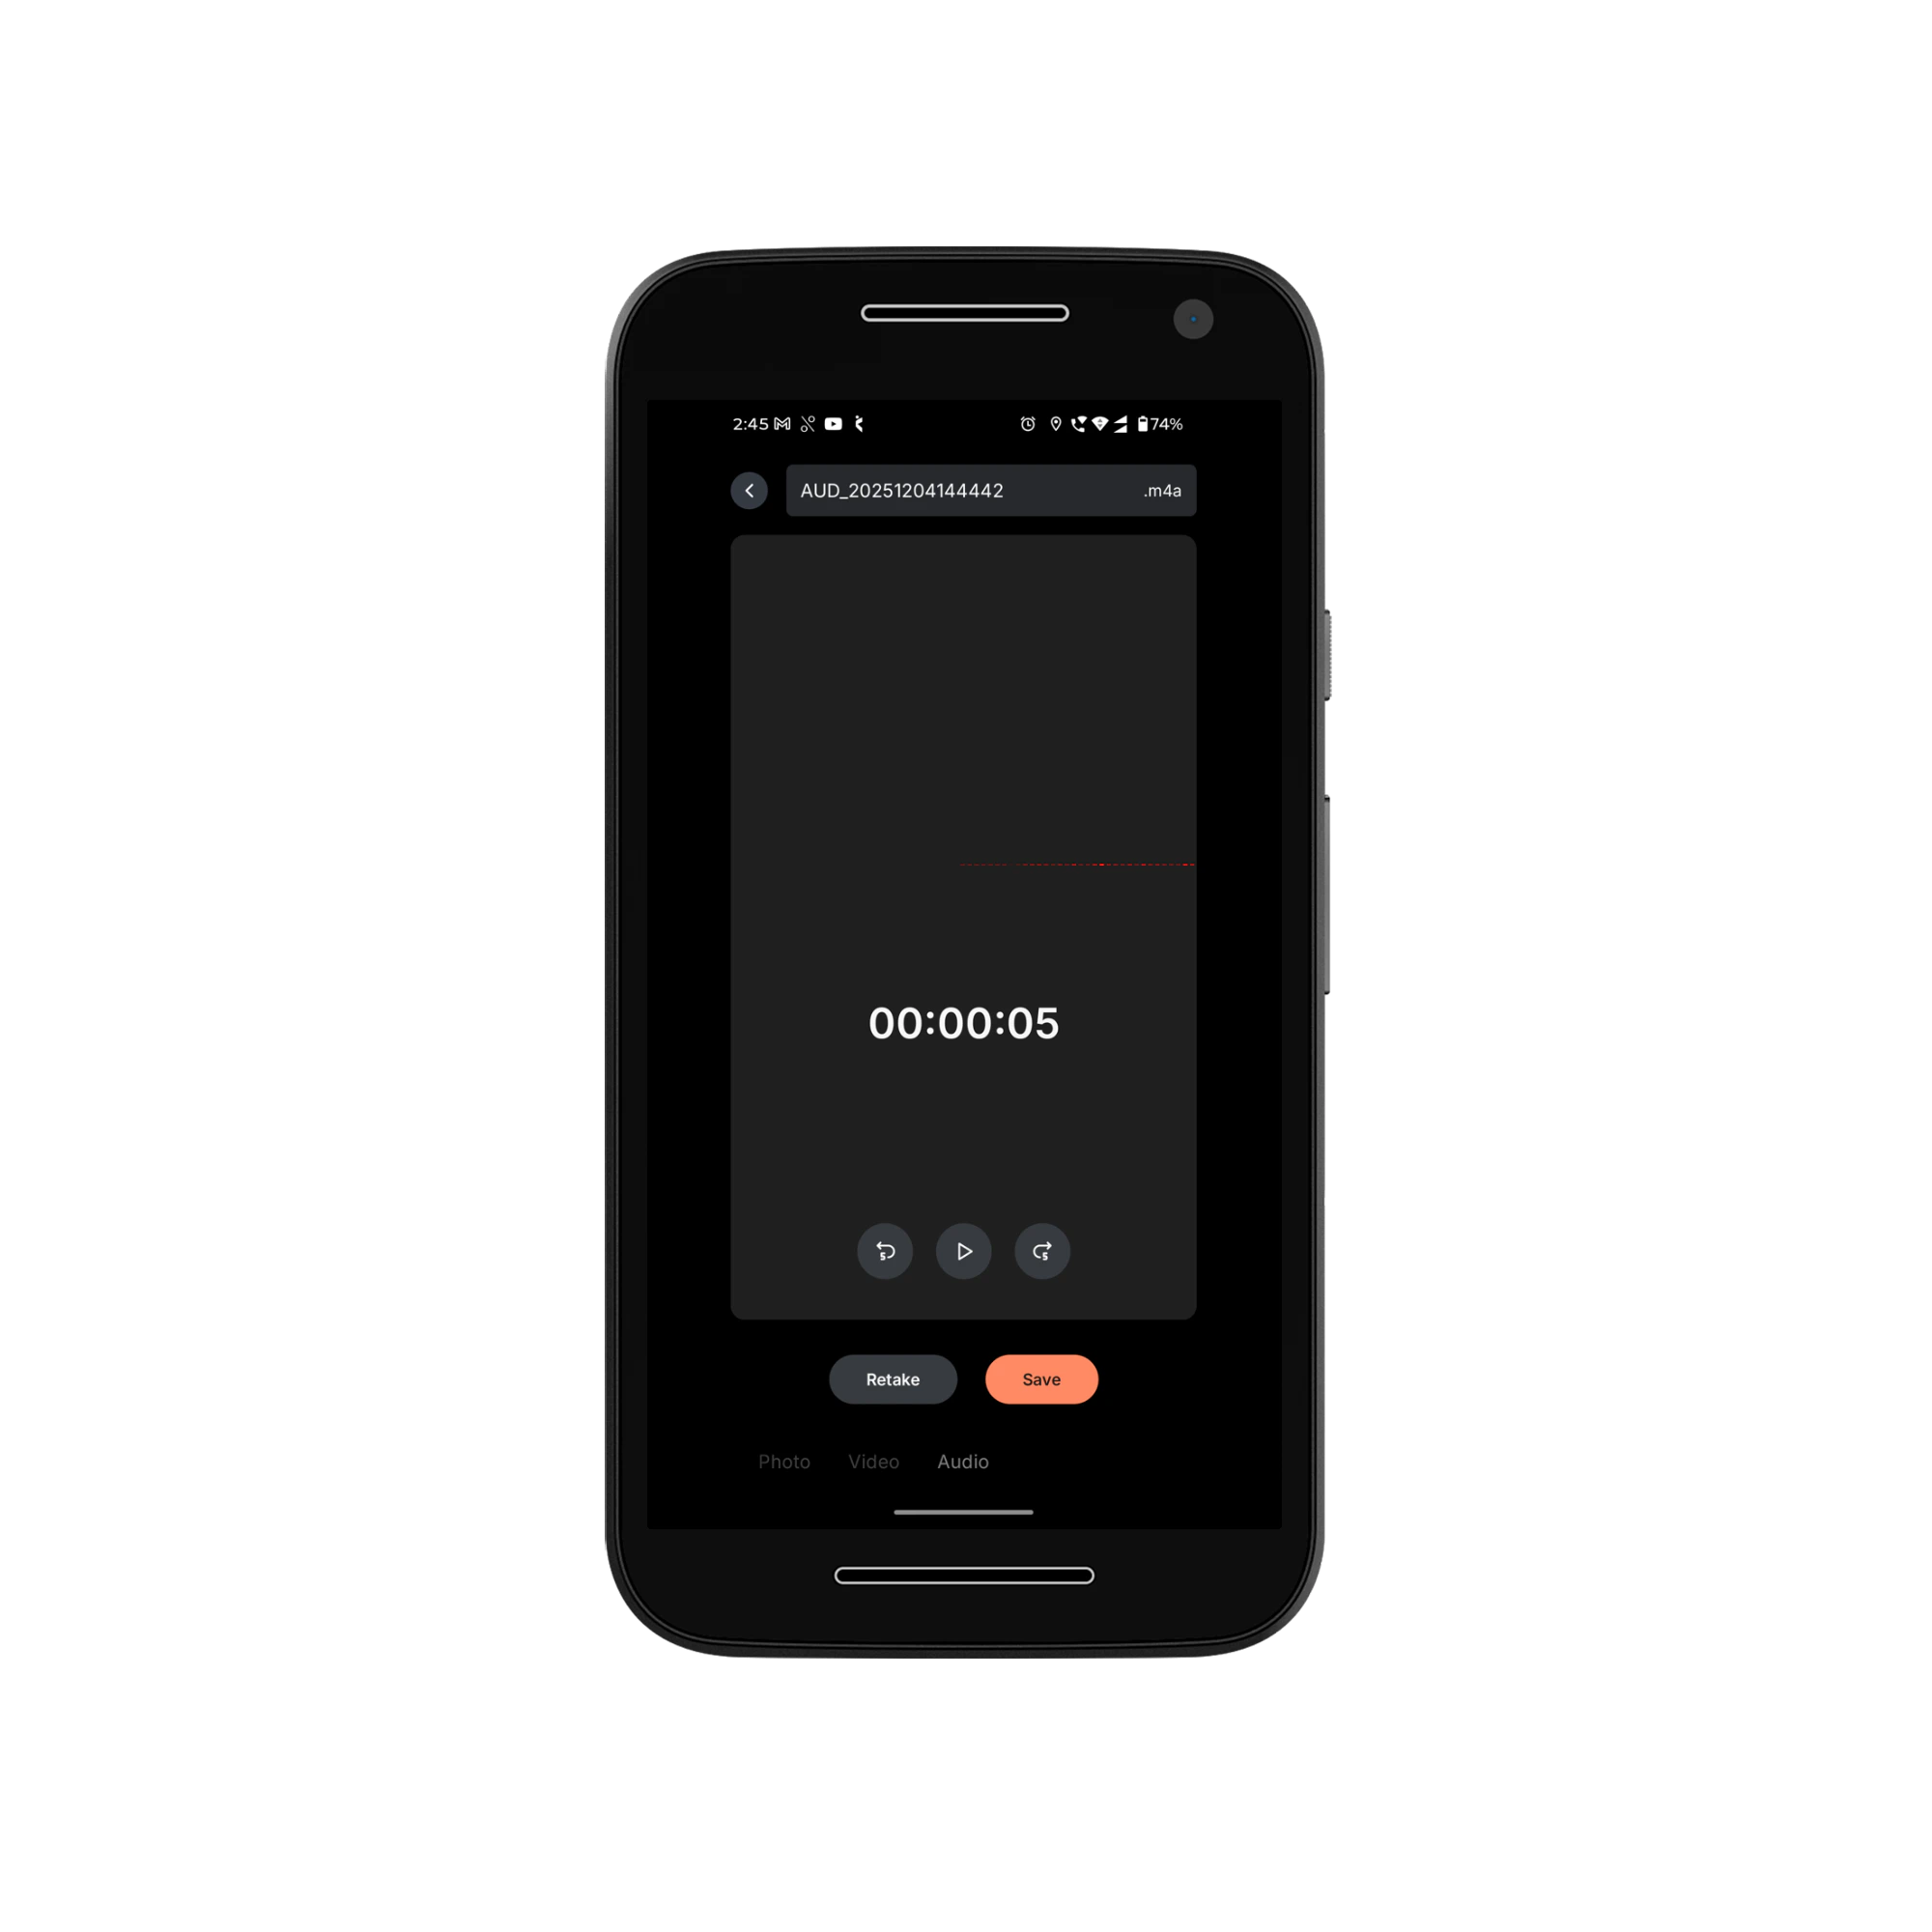
 3. **Audio**
* Use the Audio option to record and upload audio directly to the note.
* You can retake the recording or save it once satisfied.
3. **Audio**
* Use the Audio option to record and upload audio directly to the note.
* You can retake the recording or save it once satisfied.
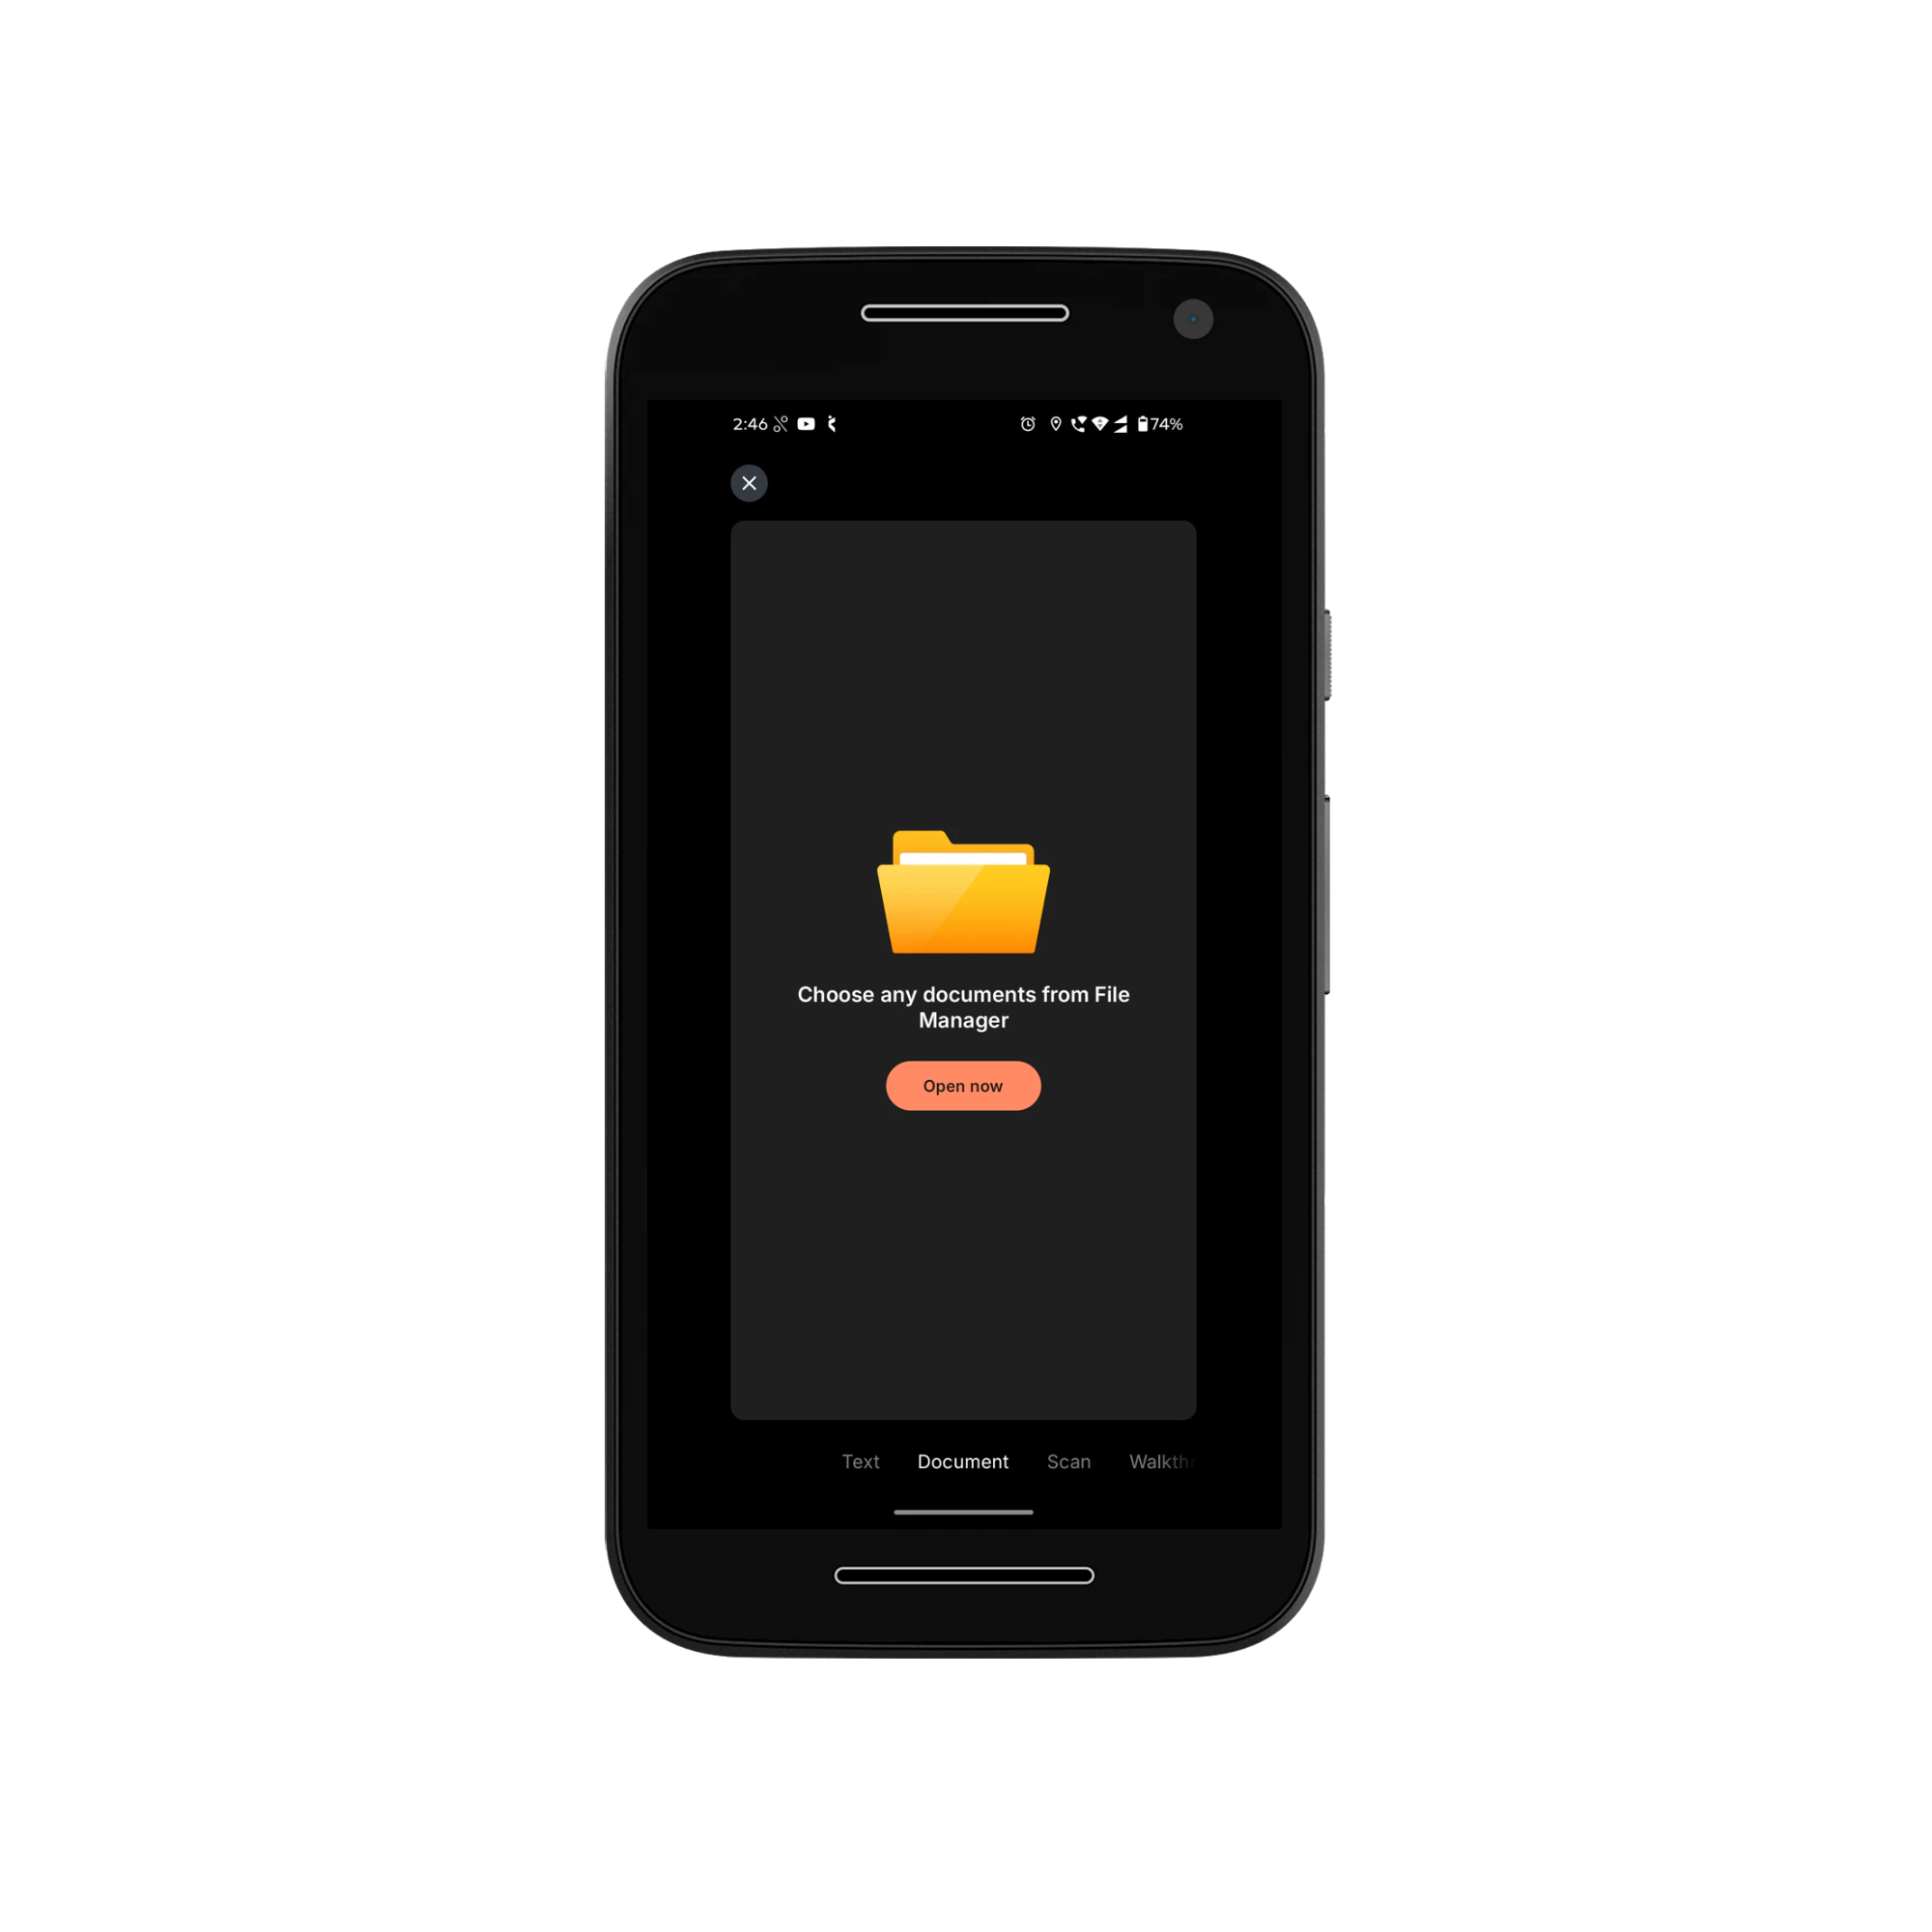
 4. **Document**
* Use the Document option to upload or attach relevant documents from your device.
4. **Document**
* Use the Document option to upload or attach relevant documents from your device.
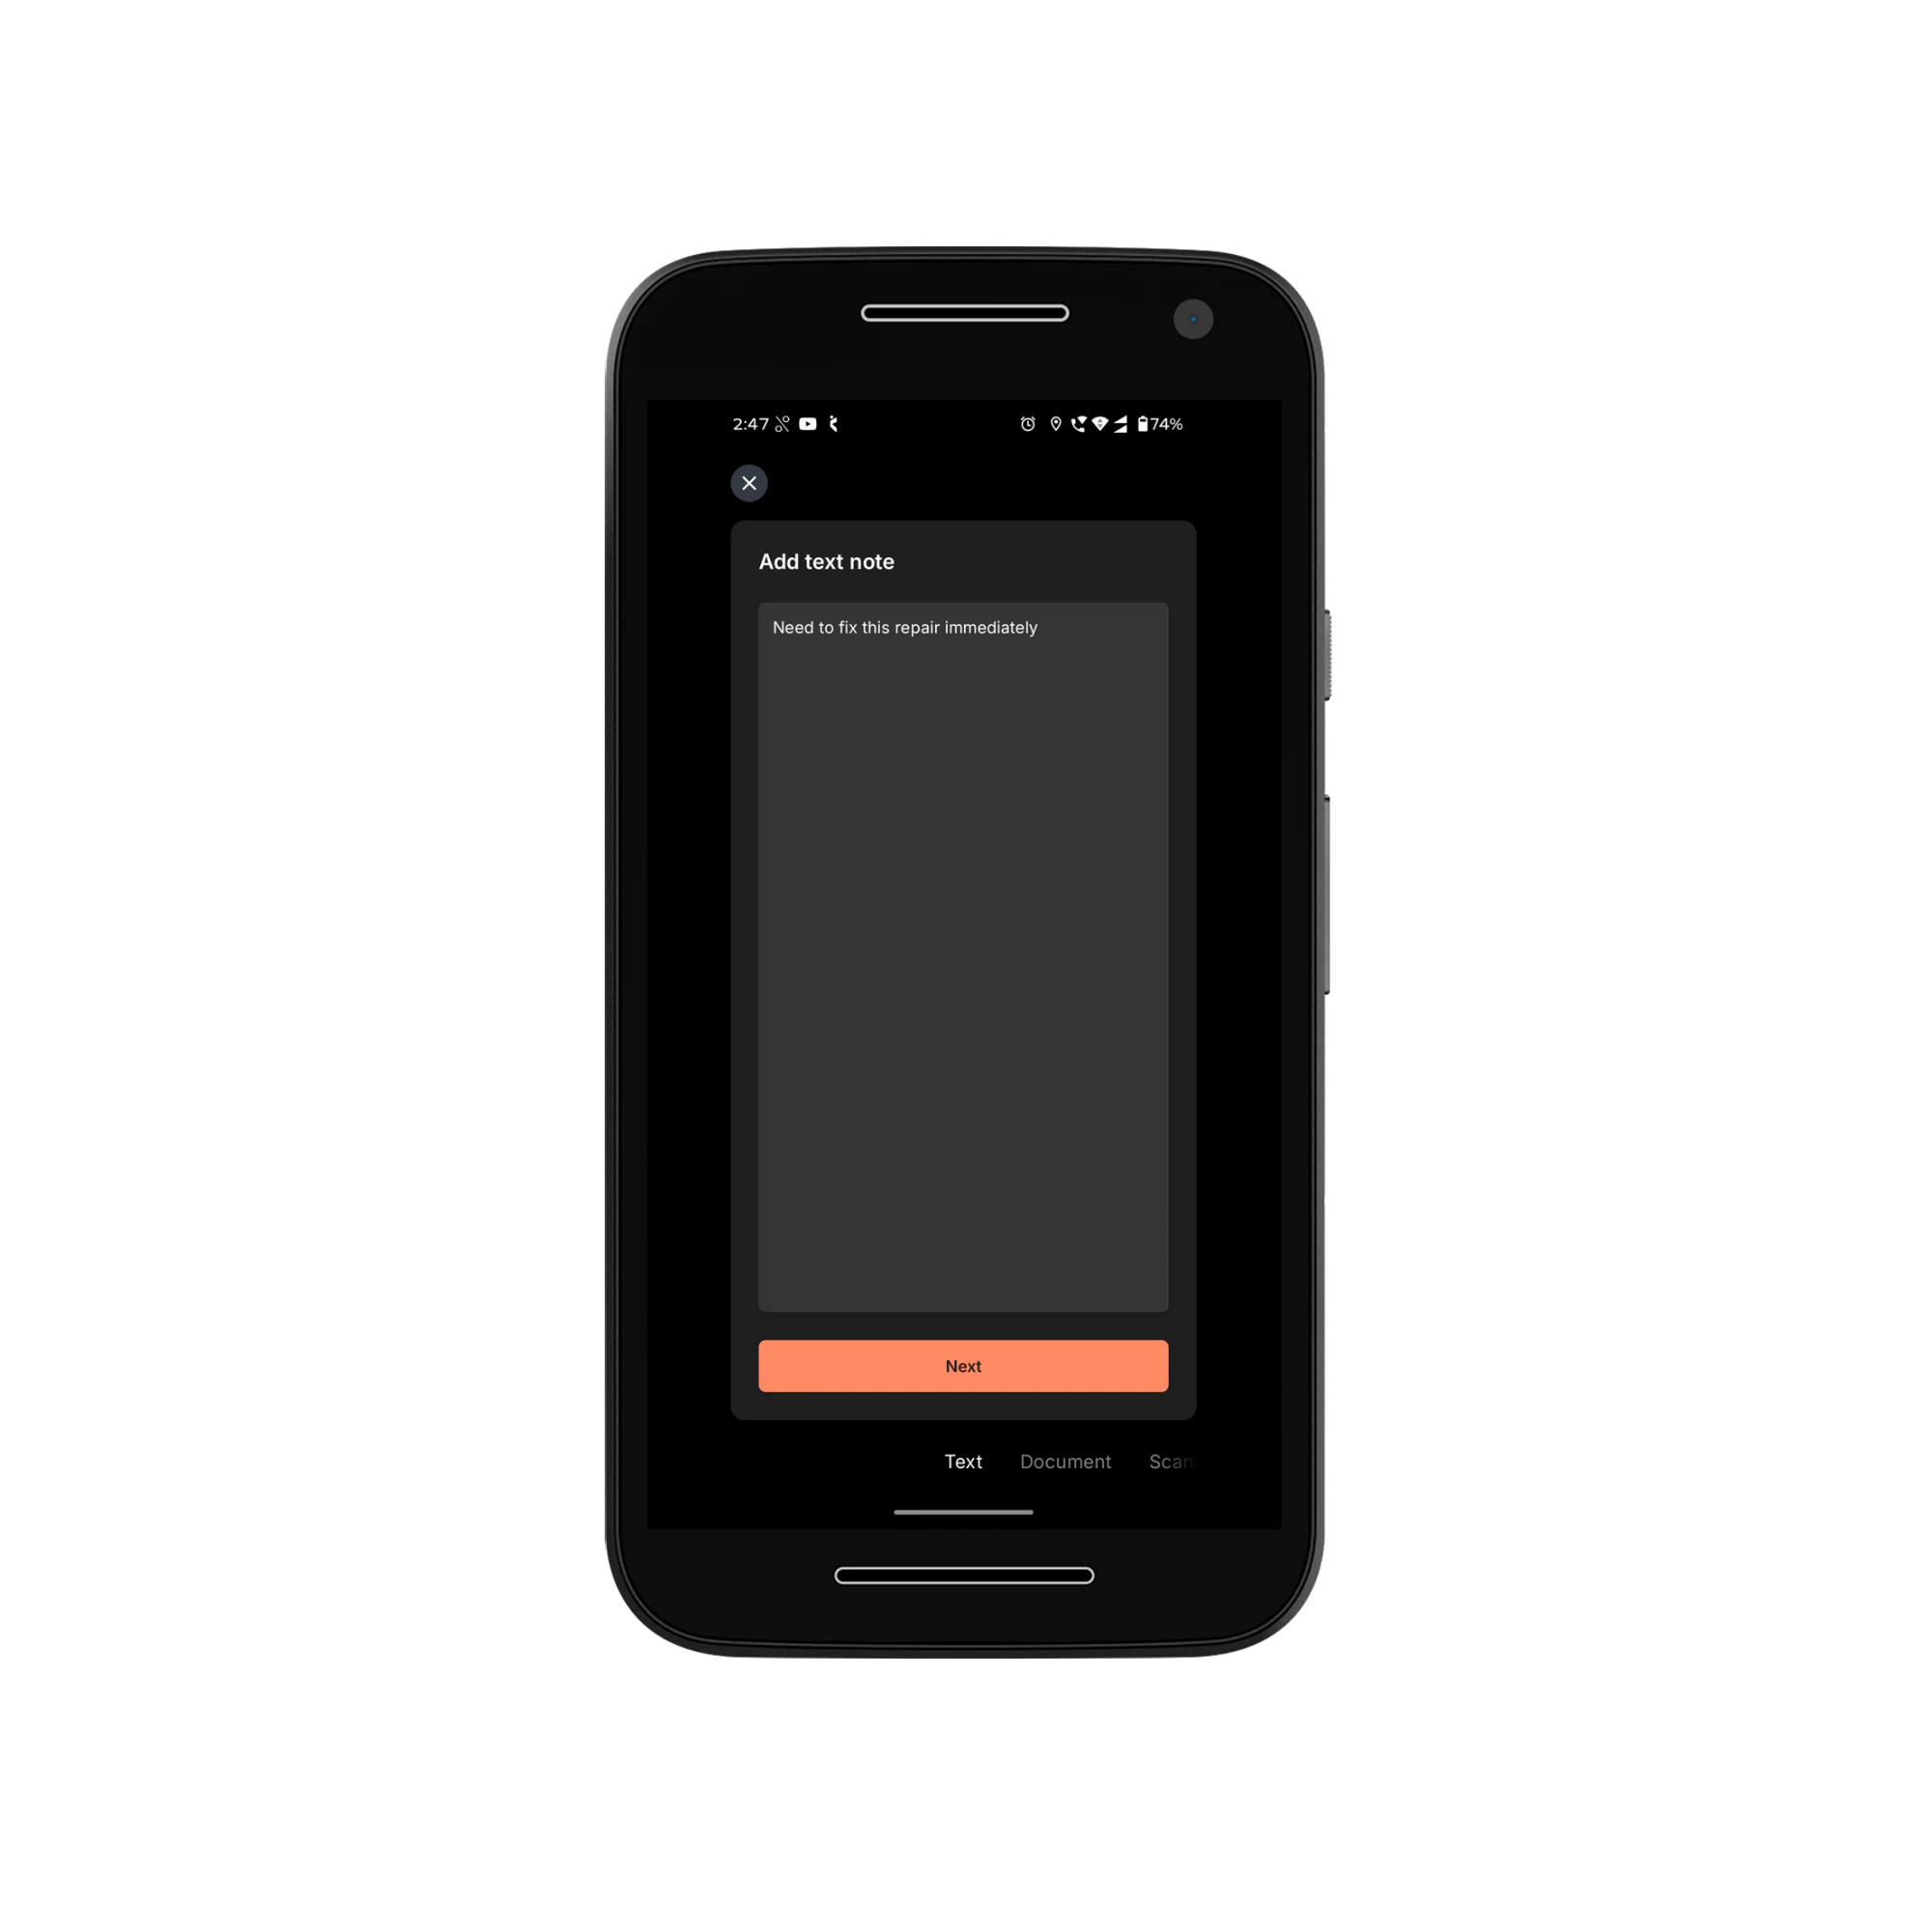
 5. **Text**
* Enter or edit text directly in the note using the text option.
5. **Text**
* Enter or edit text directly in the note using the text option.
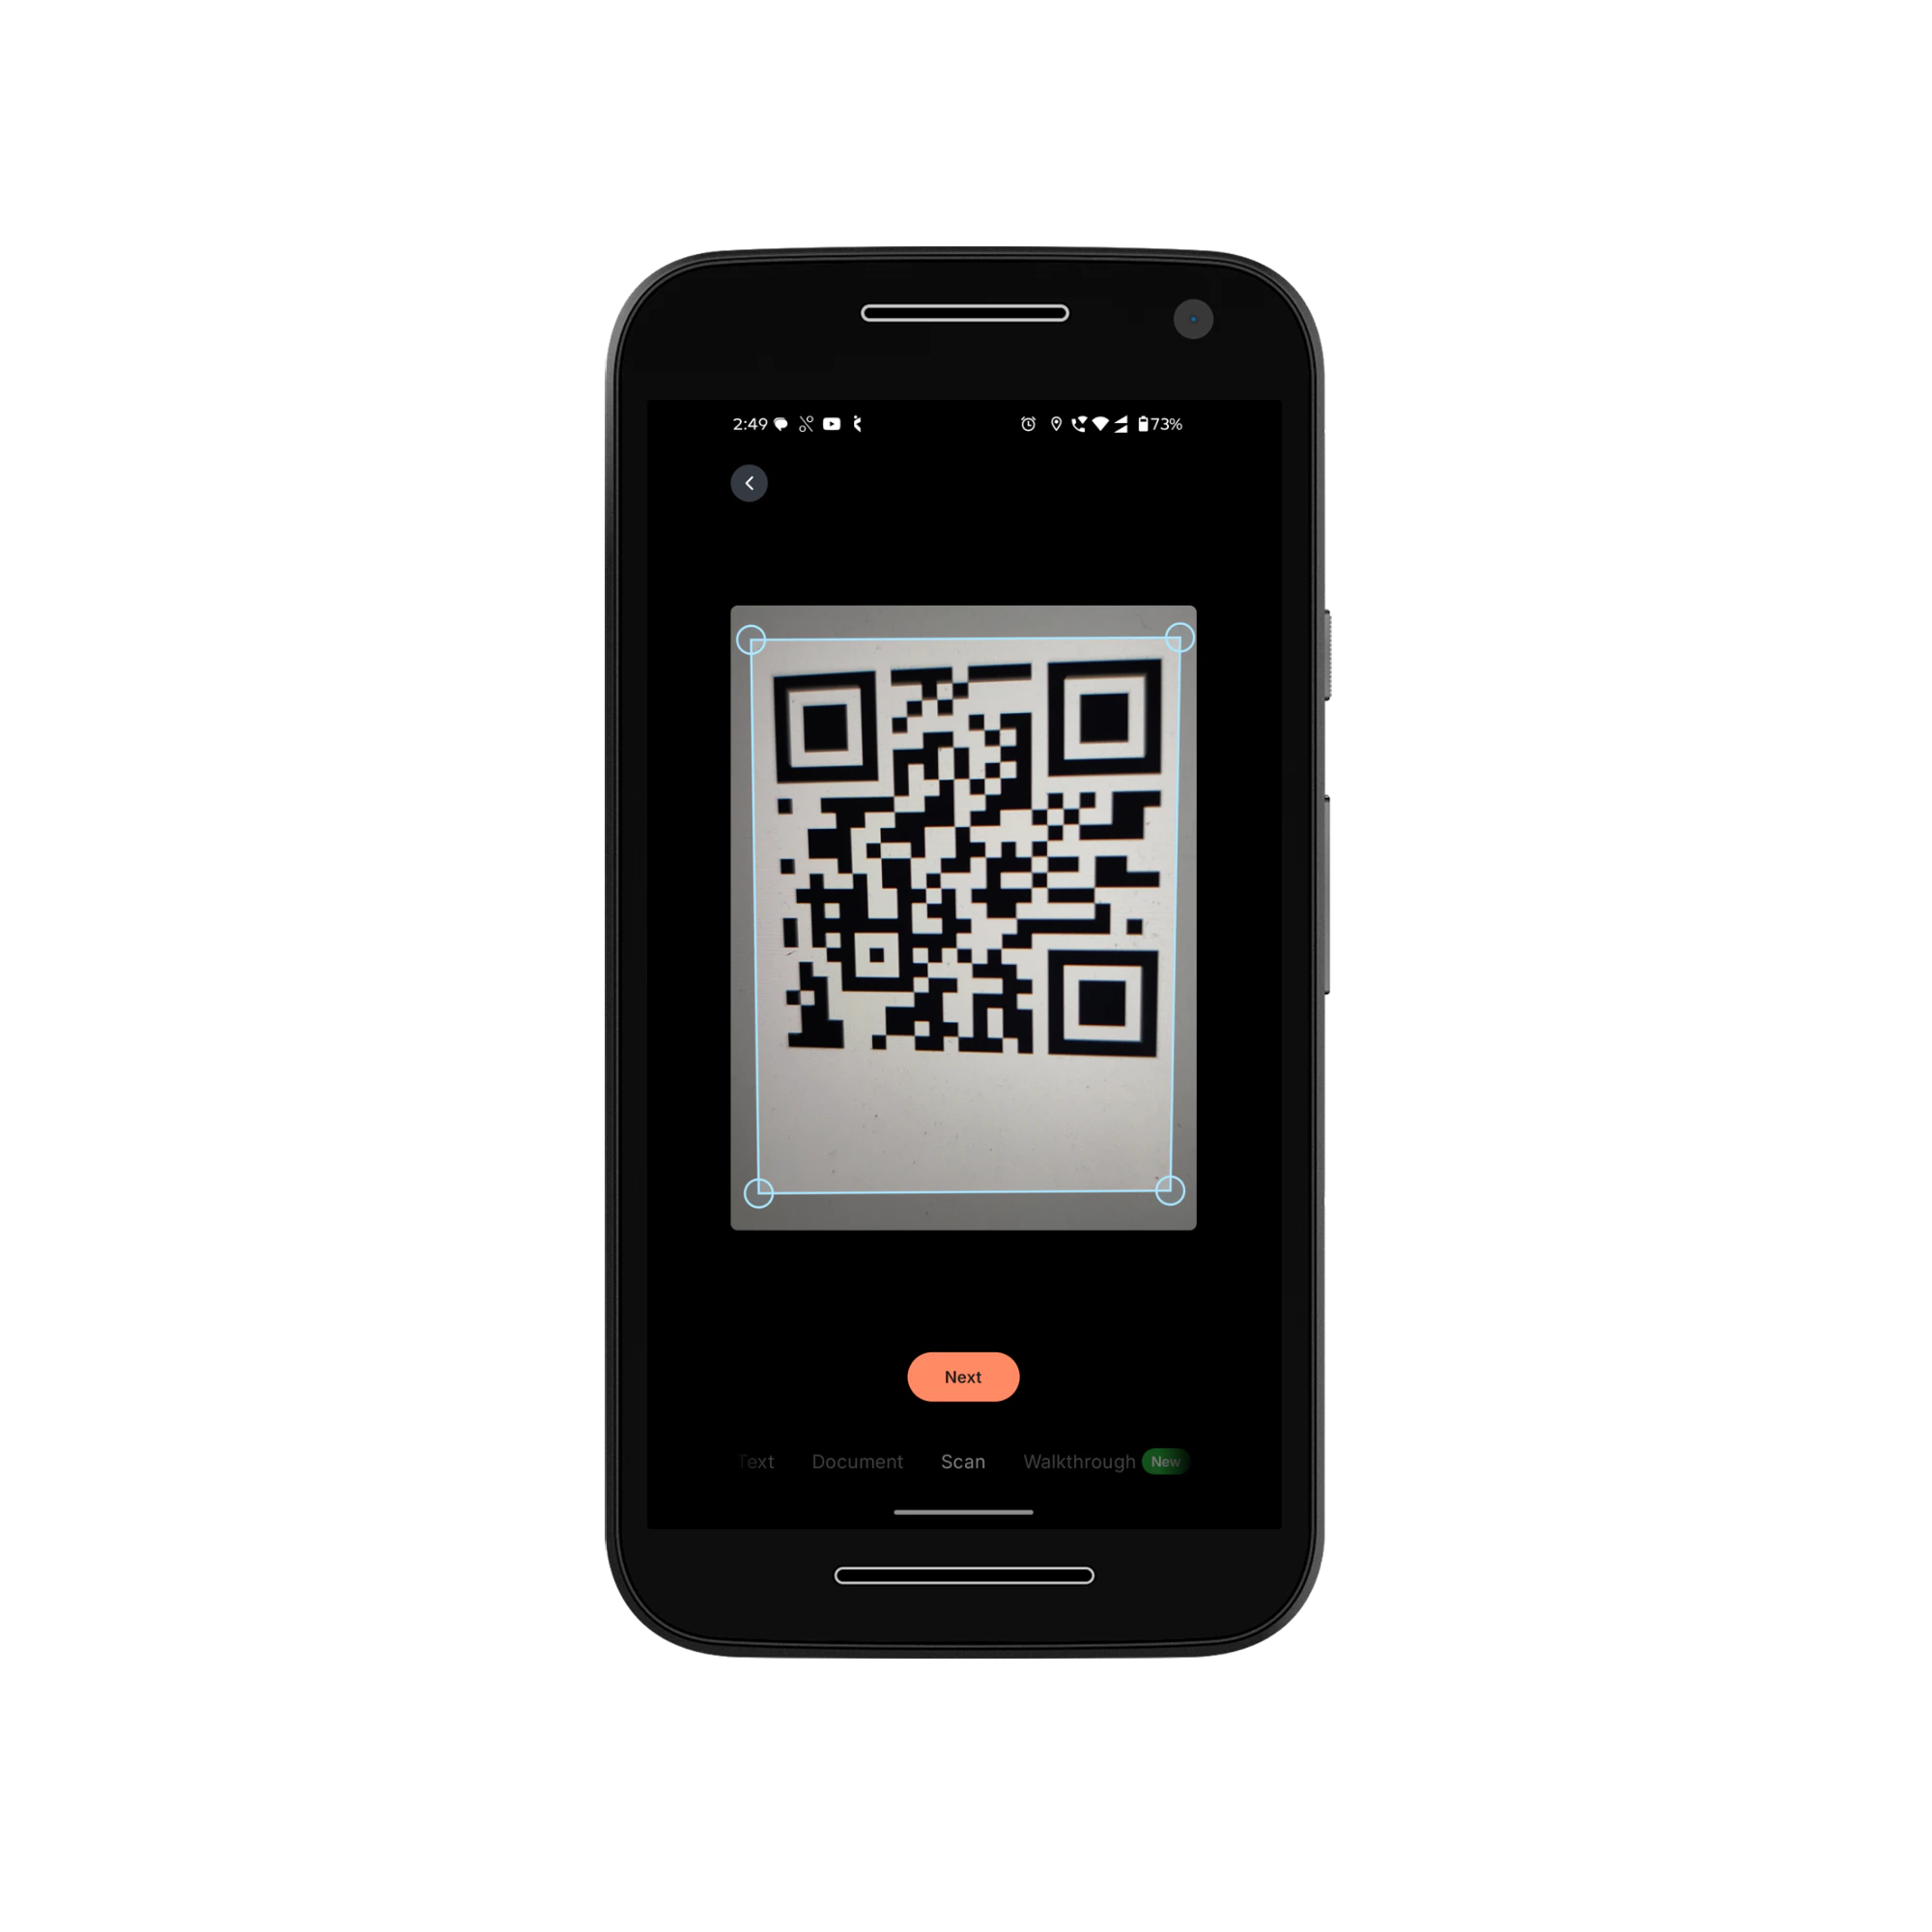
 6. **Scan**
* Go to the Scan option to capture and upload digital versions of physical documents.
* You can crop the edges of scanned documents, if needed.
6. **Scan**
* Go to the Scan option to capture and upload digital versions of physical documents.
* You can crop the edges of scanned documents, if needed.
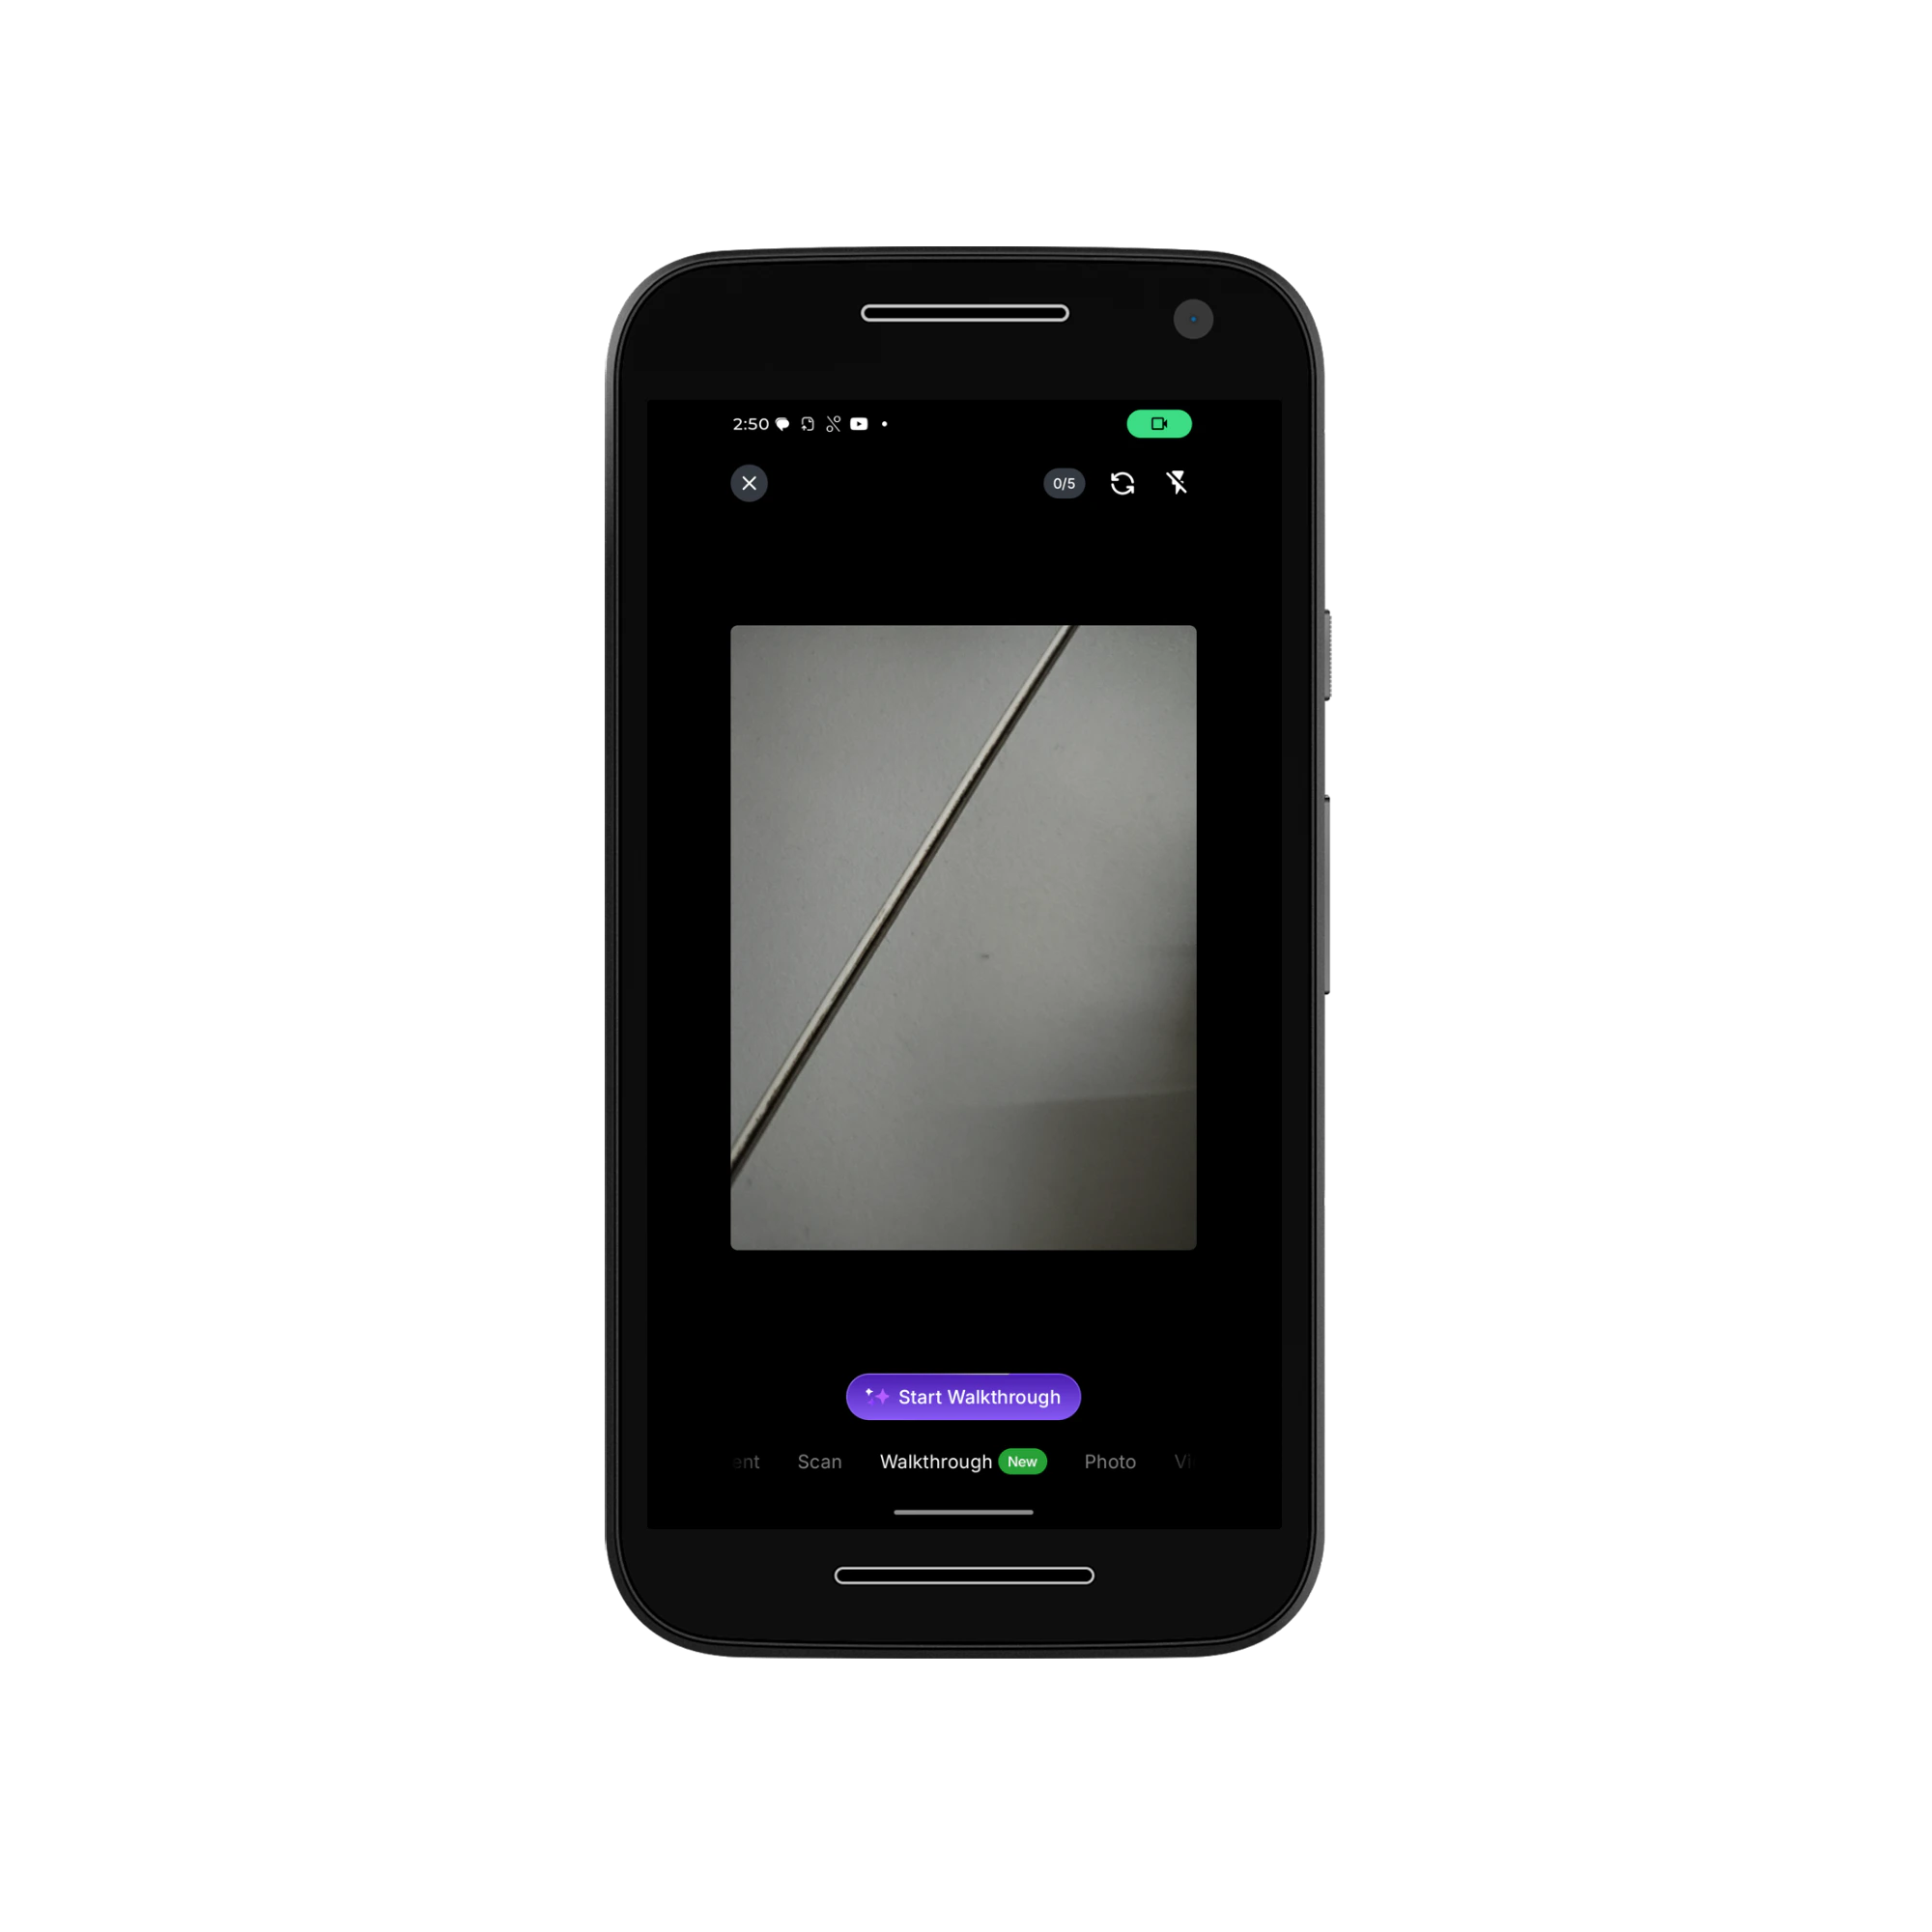
 7. **Walkthrough**
* This option allows you to capture images and record voice input simultaneously during a job.
* Zuper AI then transcribes and summarizes the spoken content, combining it with the captured images to automatically generate a clear and structured job note.
7. **Walkthrough**
* This option allows you to capture images and record voice input simultaneously during a job.
* Zuper AI then transcribes and summarizes the spoken content, combining it with the captured images to automatically generate a clear and structured job note.
 For more information on using the AI Walkthrough Note, check out this [article](https://docs.zuper.co/Zuper_AI/AI_walkthrough_note).
**Tips & Guidelines**
* Maximum file size per attachment: **20 MB**
* Maximum attachments per note: **5**
**Adding and Associating Notes**
After capturing content, you’ll be redirected to the **Add note** section. Here you can:
* Add description, upload additional photos, videos, documents, or other files from your device under **Attachments**
* Associate the note with other modules, such as projects, contacts, organizations, properties, and more, under **Associated with.**
Once ready, click **Submit** to finalize the note.
For more information on using the AI Walkthrough Note, check out this [article](https://docs.zuper.co/Zuper_AI/AI_walkthrough_note).
**Tips & Guidelines**
* Maximum file size per attachment: **20 MB**
* Maximum attachments per note: **5**
**Adding and Associating Notes**
After capturing content, you’ll be redirected to the **Add note** section. Here you can:
* Add description, upload additional photos, videos, documents, or other files from your device under **Attachments**
* Associate the note with other modules, such as projects, contacts, organizations, properties, and more, under **Associated with.**
Once ready, click **Submit** to finalize the note.
 **Managing Notes**
Submitted notes appear in the **Notes** section of the job. You can:
1. Filter notes from **latest to oldest**
**Managing Notes**
Submitted notes appear in the **Notes** section of the job. You can:
1. Filter notes from **latest to oldest**
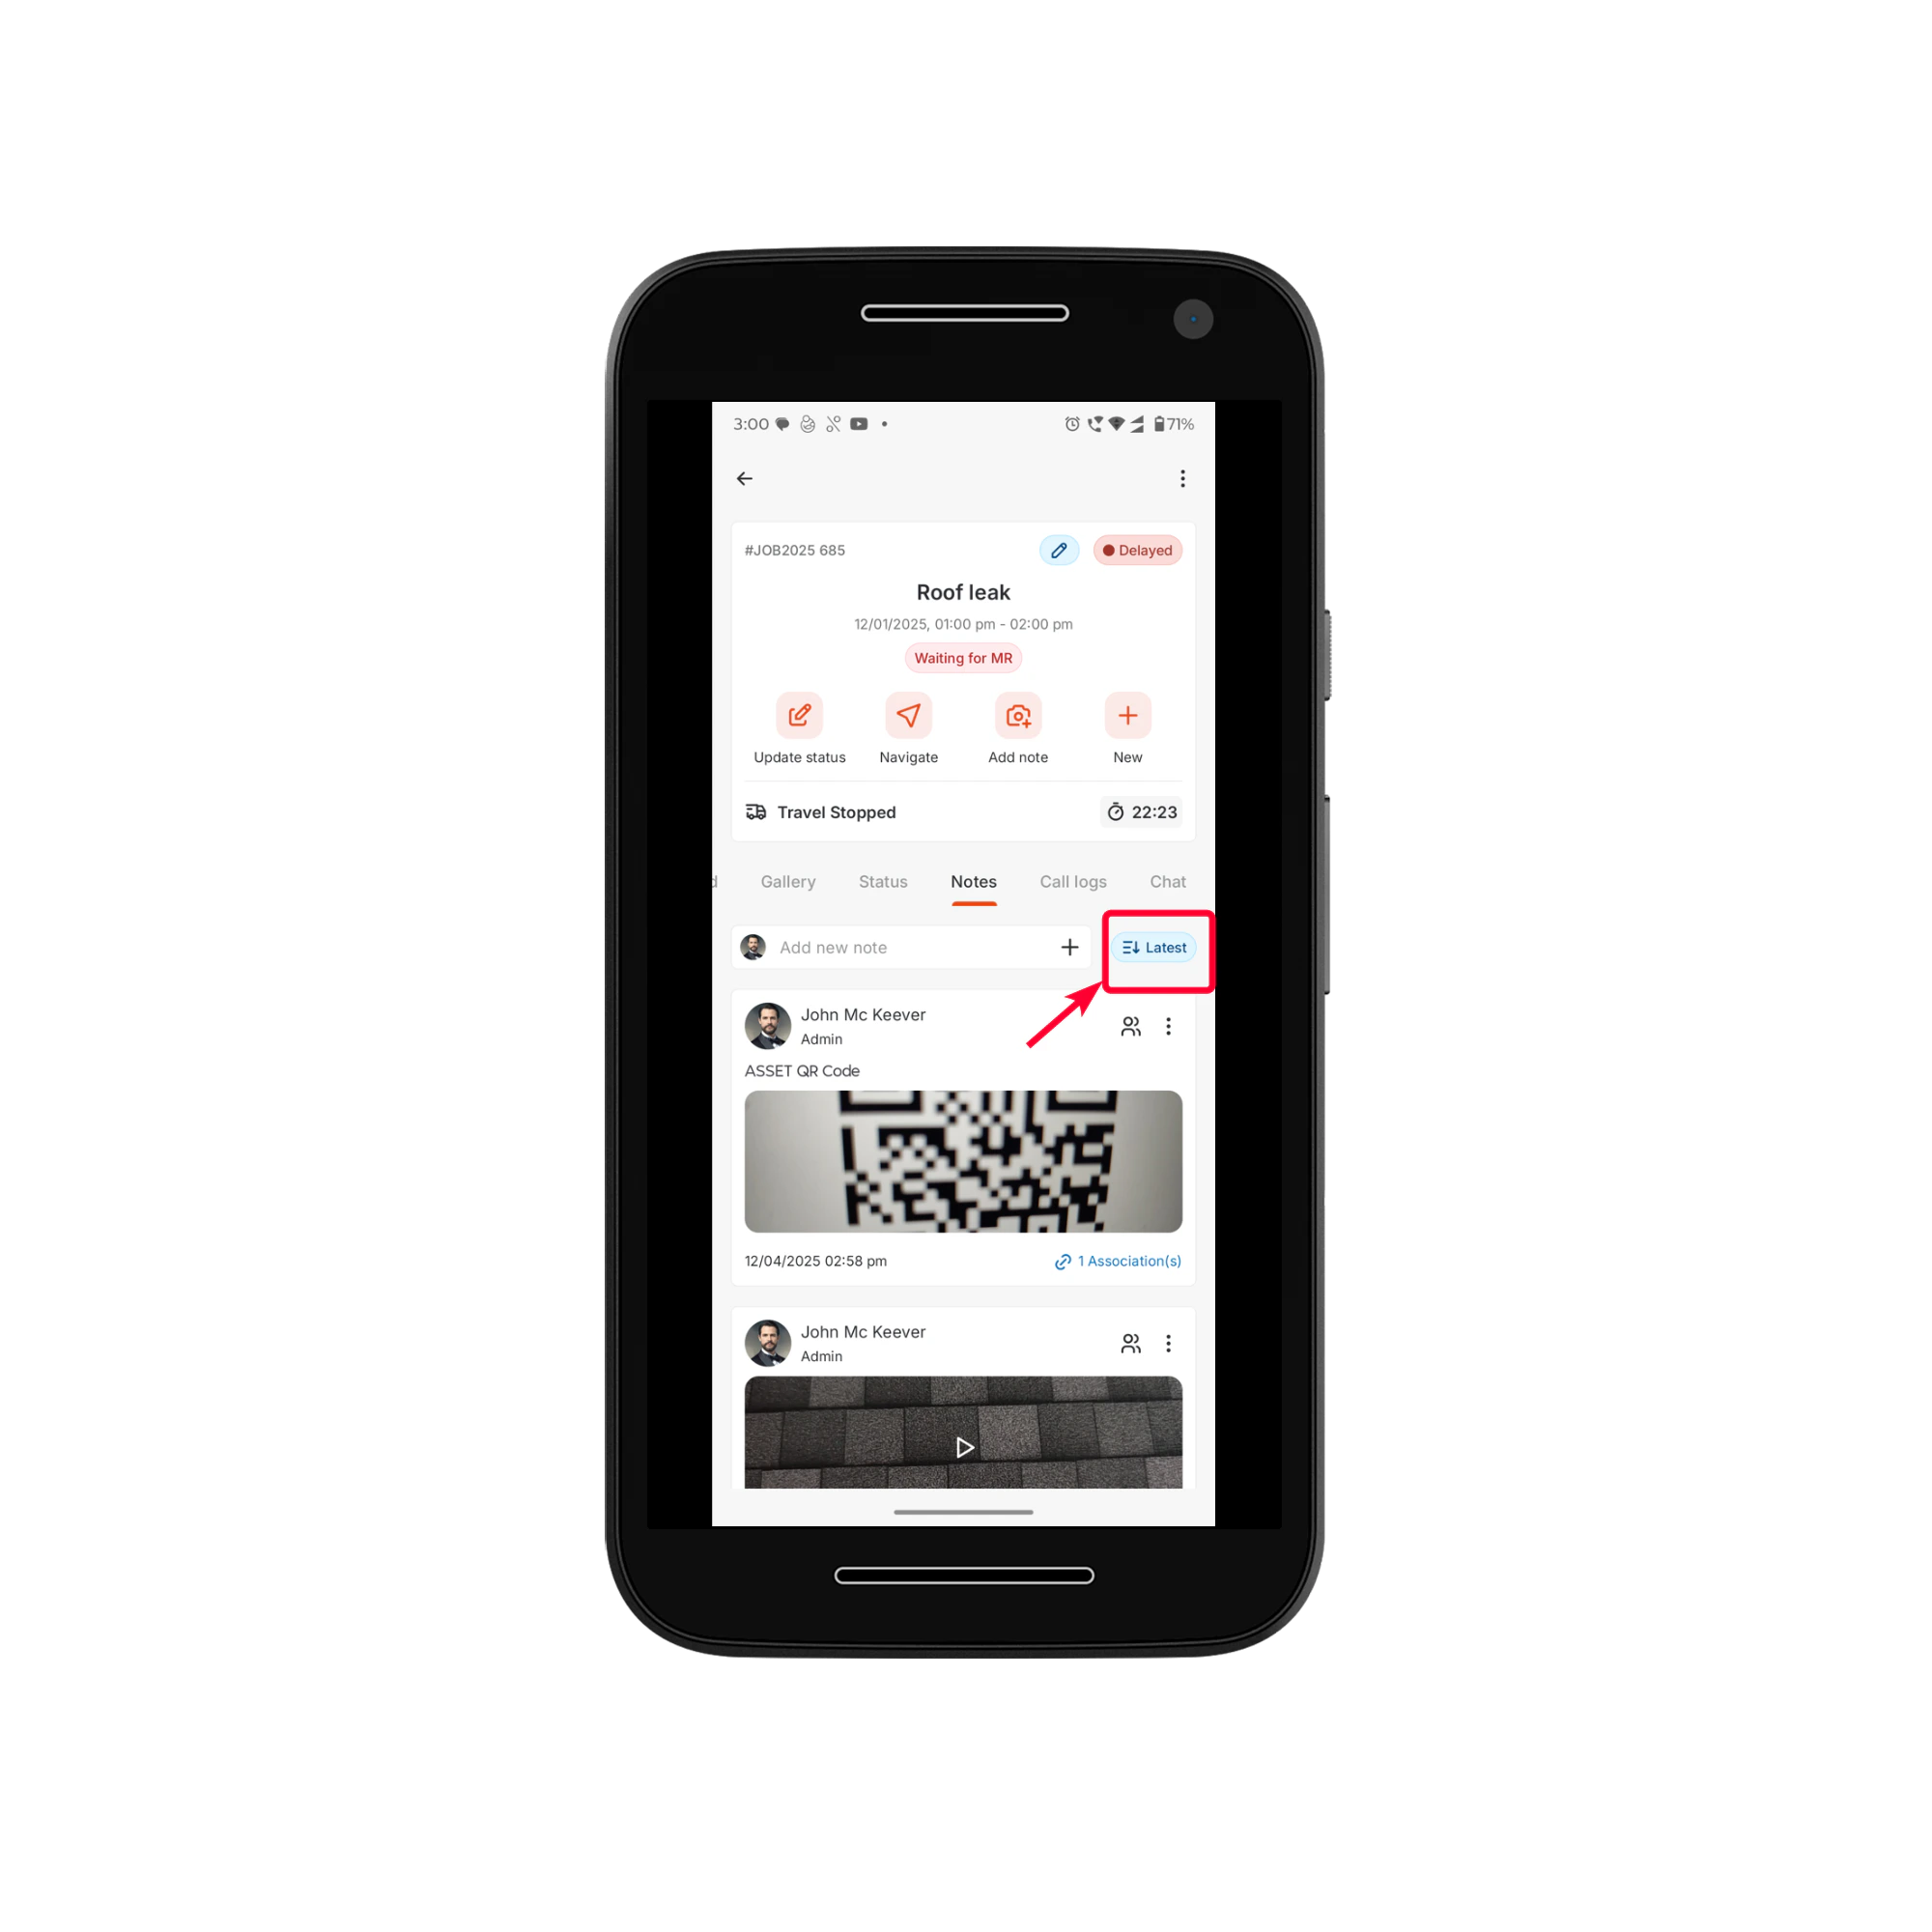 2. Use the **kebab icon (****)** to perform actions, including:
* **Edit Note** – Modify the note’s content and add or remove attachments
* **Pin Note** – Keep important notes at the top
* **Change Note Privacy**:
1. **Private** – Visible only to the note creator
2. **Backoffice Only** – Visible to Admins and Team Leads
3. **Public** – Accessible to all users and the contact
* **Delete** – Remove the note from the associated module
2. Use the **kebab icon (****)** to perform actions, including:
* **Edit Note** – Modify the note’s content and add or remove attachments
* **Pin Note** – Keep important notes at the top
* **Change Note Privacy**:
1. **Private** – Visible only to the note creator
2. **Backoffice Only** – Visible to Admins and Team Leads
3. **Public** – Accessible to all users and the contact
* **Delete** – Remove the note from the associated module
 ### Updating Job Status via the Update Status action button
Updating a job's status keeps your team and customers informed about job progress. Status transitions are managed by your organization’s workflow.
1. Tap the **Update Status** icon at the quick action bar.
### Updating Job Status via the Update Status action button
Updating a job's status keeps your team and customers informed about job progress. Status transitions are managed by your organization’s workflow.
1. Tap the **Update Status** icon at the quick action bar.
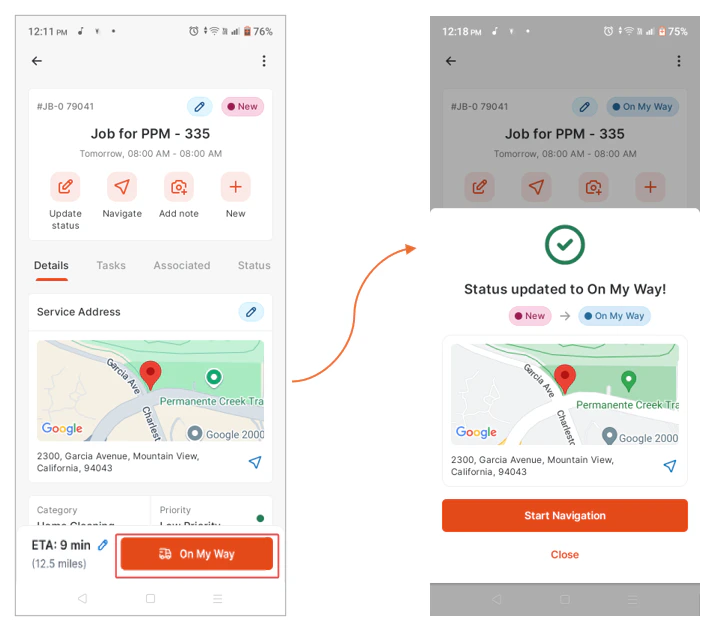
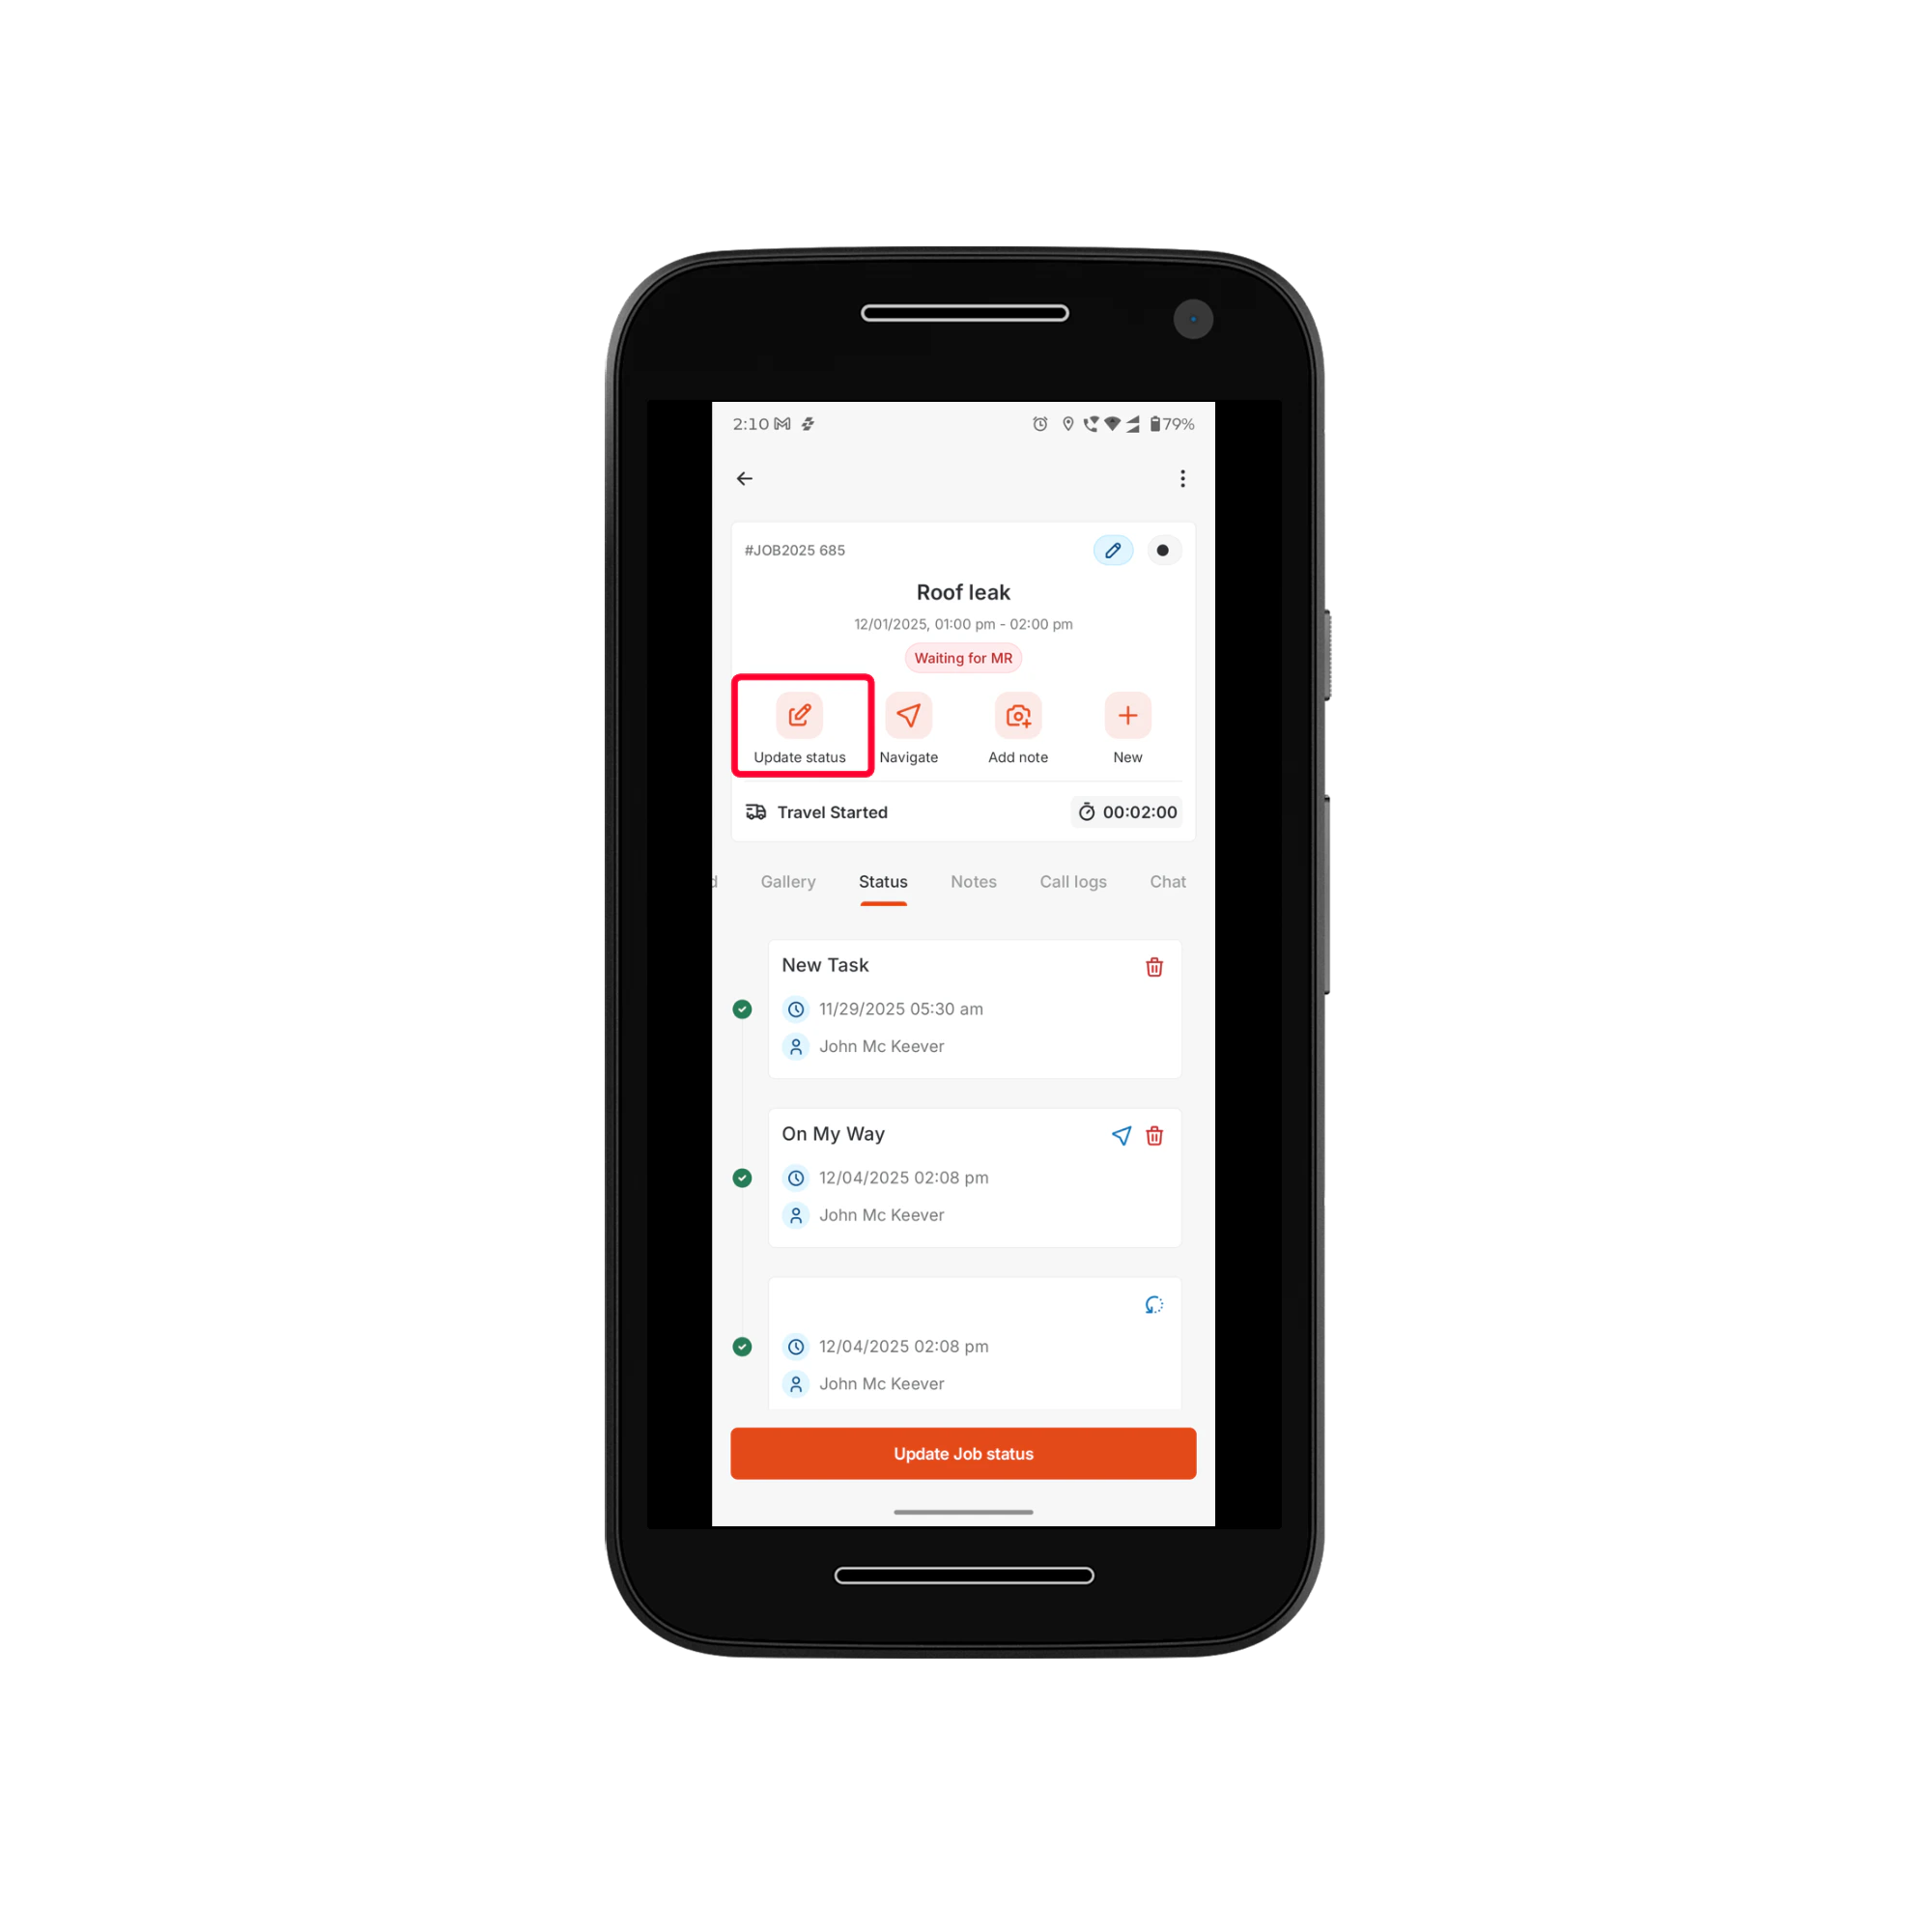 2. Select the next available status—for example:
* On My Way
* Started
* On hold
* Completed
* Closed
2. Select the next available status—for example:
* On My Way
* Started
* On hold
* Completed
* Closed
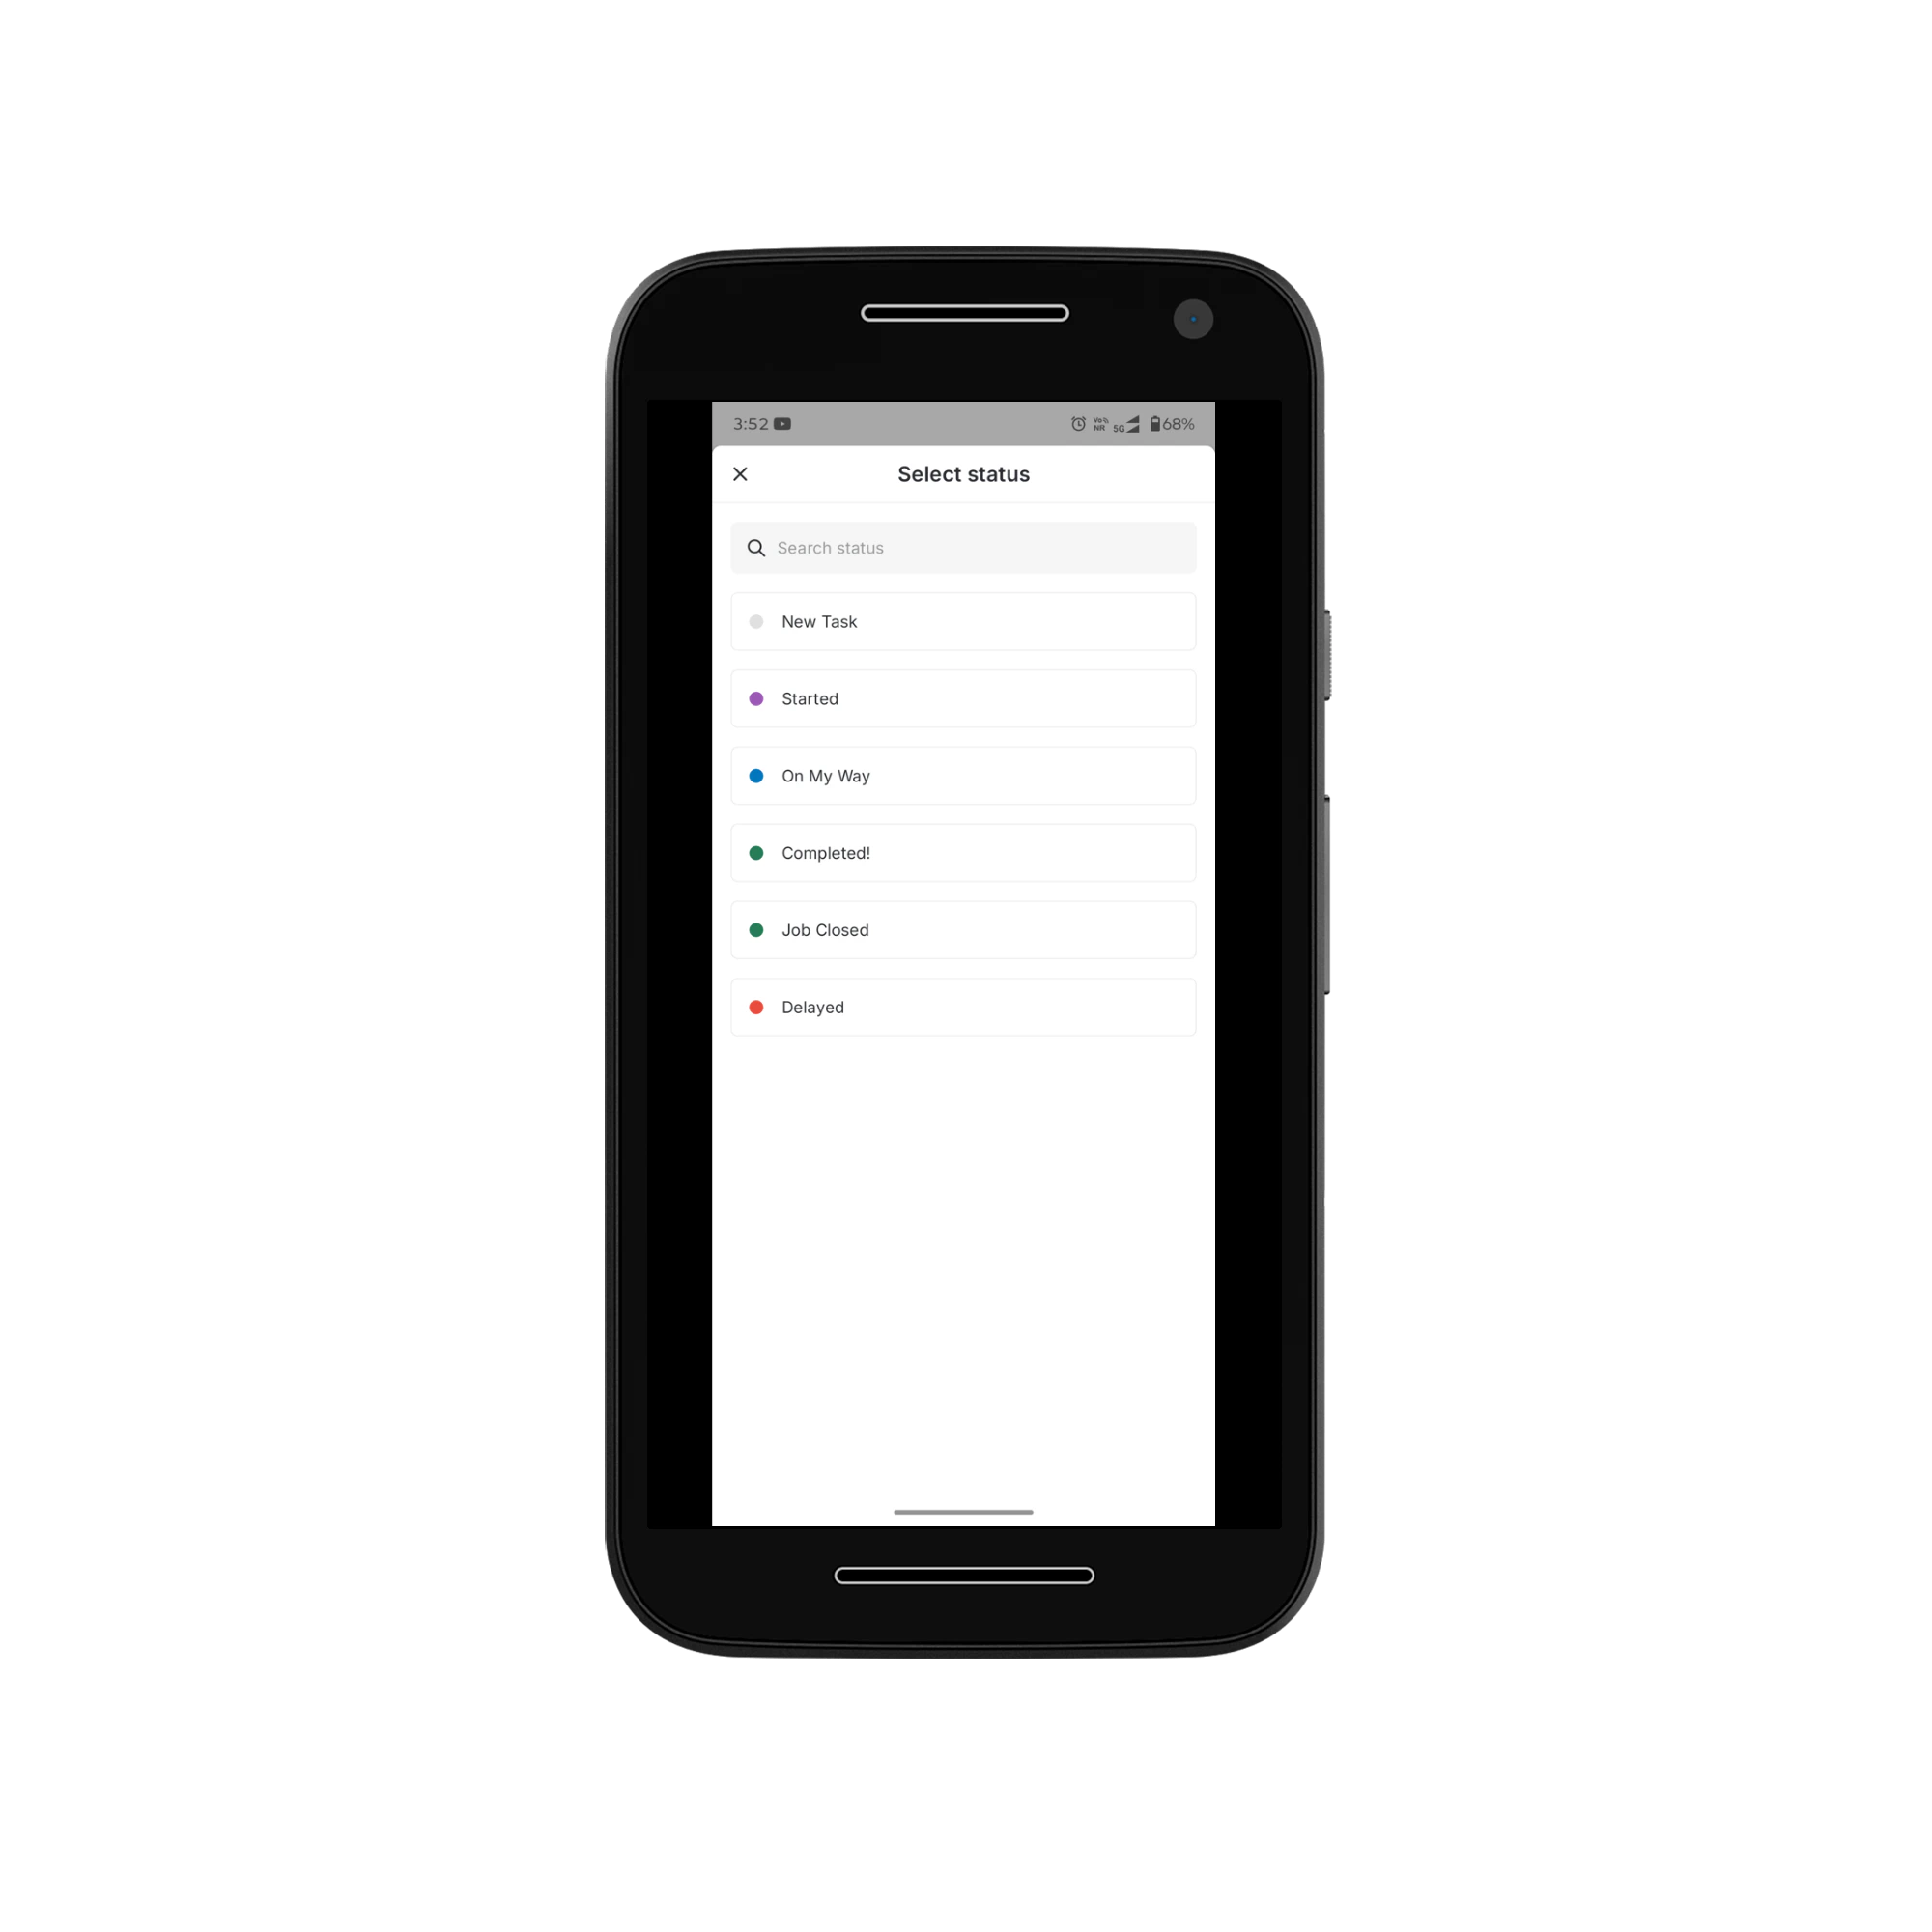 3. Complete the checklist if any are associated with the job status.
4. Tap **Submit** to confirm the update.
3. Complete the checklist if any are associated with the job status.
4. Tap **Submit** to confirm the update.
 **What Happens After Updating**
* The new status appears in the **Status Timeline**.
* Timestamp and user details are automatically recorded.
For more information on updating job status using the update status button, refer to this [article](https://docs.zuper.co/Timesheets_Management/Timelogs/Log_time#updating-job-status-via-the-update-status-action-button).
### Updating Job Status with Timelog
If your organization has enabled the Timelog feature, you can log both travel time and labor time while updating job status. This ensures flexible and accurate time tracking throughout the job.
When you begin traveling to the job site or performing related tasks (such as picking up materials), tap **On My Way** to start logging your travel time.
**What Happens After Updating**
* The new status appears in the **Status Timeline**.
* Timestamp and user details are automatically recorded.
For more information on updating job status using the update status button, refer to this [article](https://docs.zuper.co/Timesheets_Management/Timelogs/Log_time#updating-job-status-via-the-update-status-action-button).
### Updating Job Status with Timelog
If your organization has enabled the Timelog feature, you can log both travel time and labor time while updating job status. This ensures flexible and accurate time tracking throughout the job.
When you begin traveling to the job site or performing related tasks (such as picking up materials), tap **On My Way** to start logging your travel time.
 For the complete steps, refer to the detailed guide [here](https://docs.zuper.co/Timesheets_Management/Timelogs/Log_time).
### Viewing Timelog Summary
You can view a detailed breakdown of travel, labor, and break times associated with a job. This view helps see the time spent at each job stage and clarifies the total time logged.
For more information on viewing the timelog summary, refer to this [article](https://docs.zuper.co/Timesheets_Management/Timelogs/Log_time#viewing-timelog-summary-on-the-zuper-mobile-app).
# Collecting Payments
You can collect payments directly from **Job Details** → **Associated** tab → **Invoices**, provided this feature is enabled for your role.
For the complete steps, refer to the detailed guide [here](https://docs.zuper.co/Timesheets_Management/Timelogs/Log_time).
### Viewing Timelog Summary
You can view a detailed breakdown of travel, labor, and break times associated with a job. This view helps see the time spent at each job stage and clarifies the total time logged.
For more information on viewing the timelog summary, refer to this [article](https://docs.zuper.co/Timesheets_Management/Timelogs/Log_time#viewing-timelog-summary-on-the-zuper-mobile-app).
# Collecting Payments
You can collect payments directly from **Job Details** → **Associated** tab → **Invoices**, provided this feature is enabled for your role.
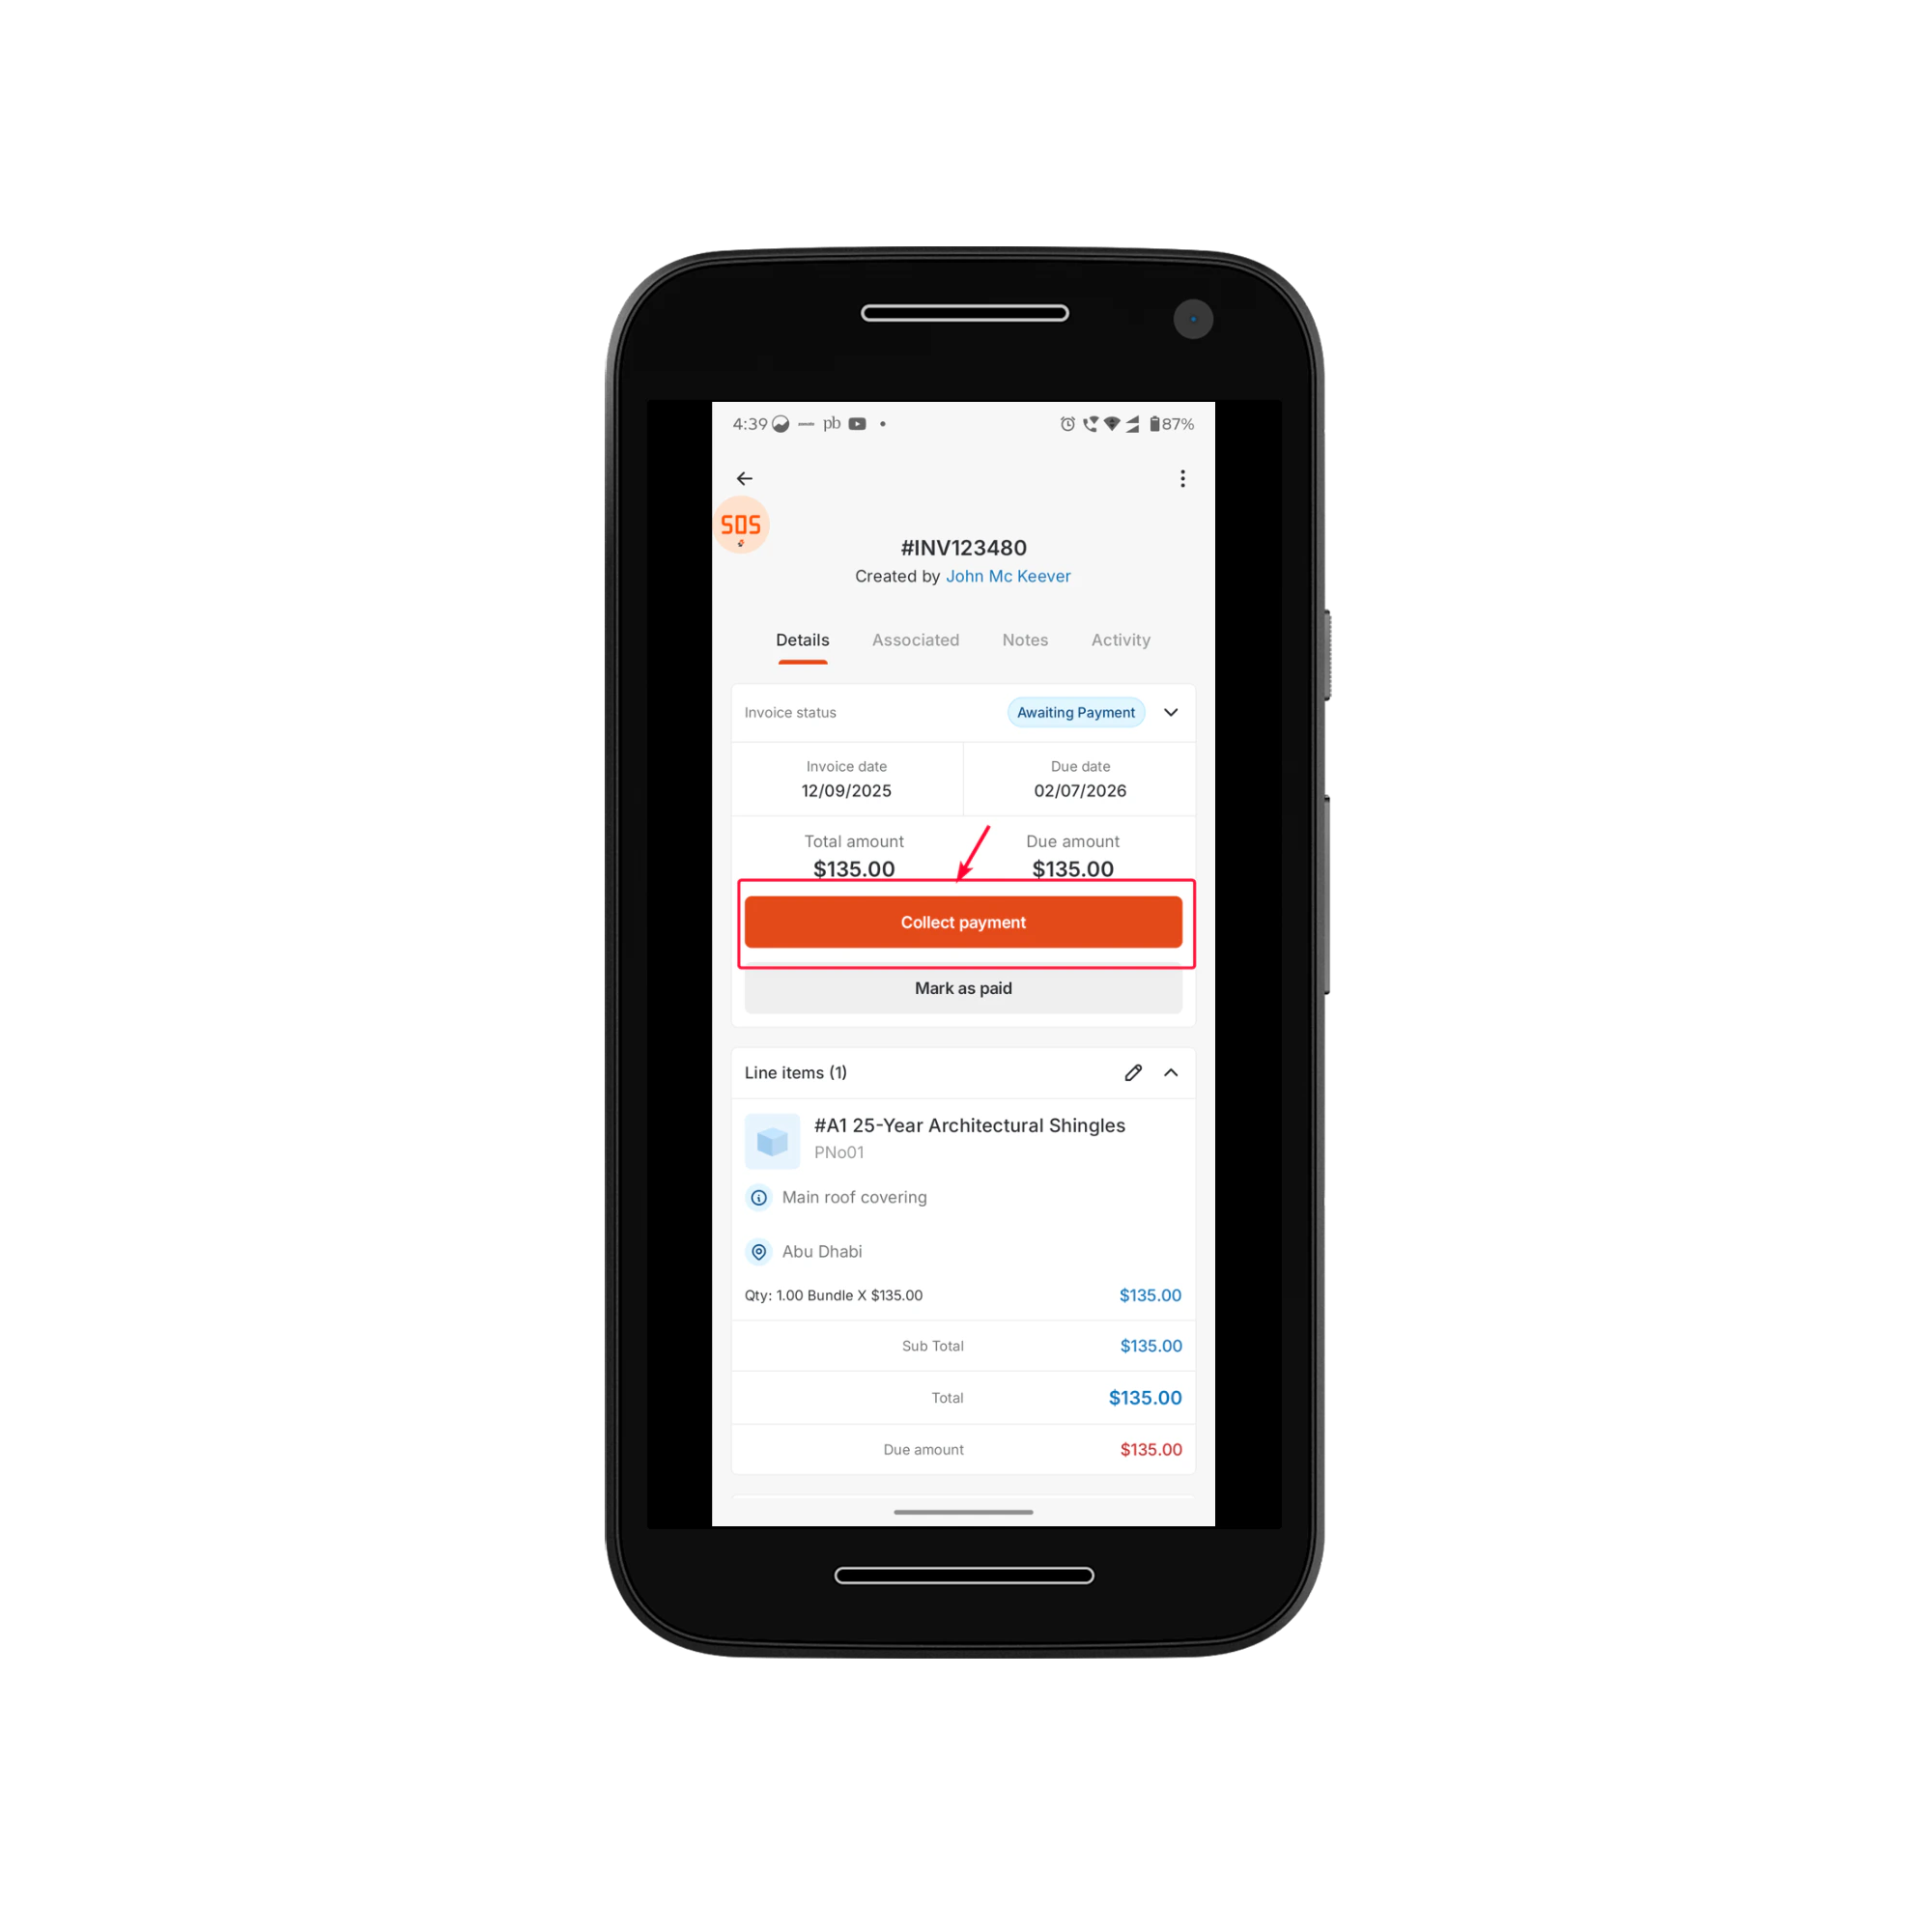 If the invoice status is **Awaiting Payment**, you can use the mobile app to record payments made by the customer- whether via Debit Card, STRIPE, Square, cash, or any other method supported by your organization. Once recorded, the payment is automatically applied to the associated invoice, ensuring accurate billing and accounting.
For the complete steps on collecting payments, refer to the detailed guide [here](https://docs.zuper.co/Accounting/Invoices/Recording_payments#to-record-a-payment).
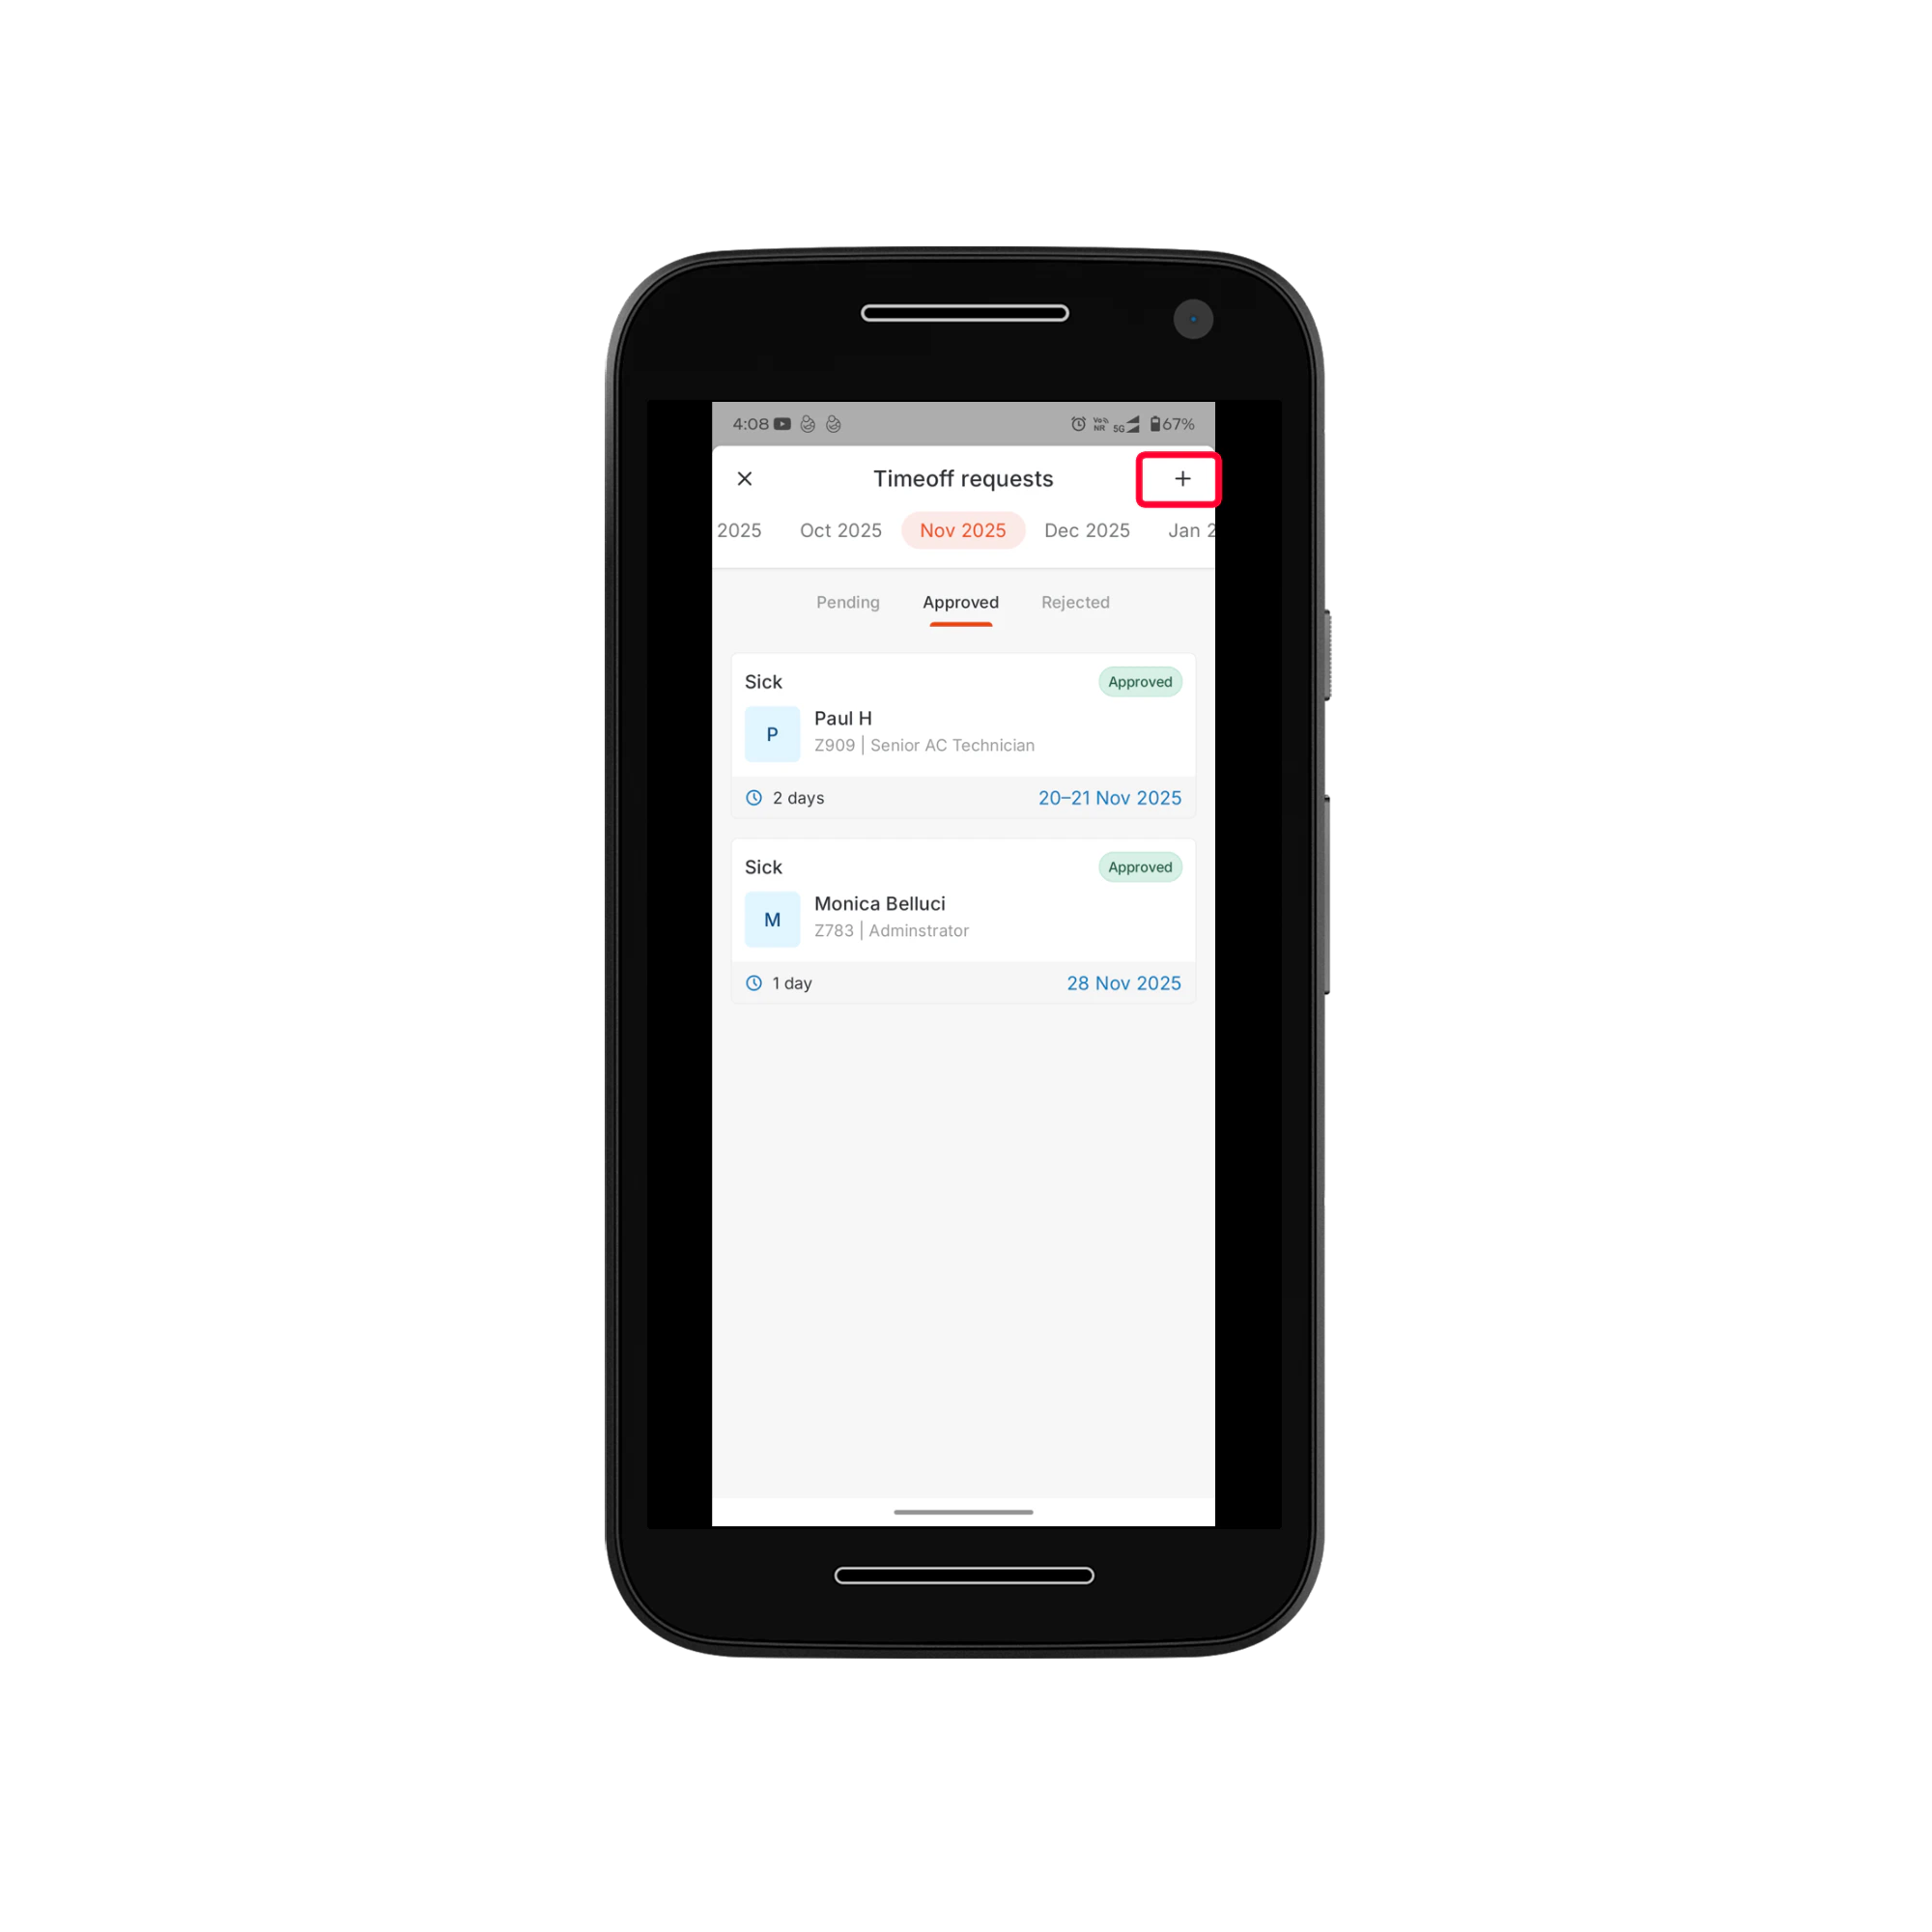
# Adding Timeoff Requests
This helps you manage leave requests efficiently, fully digitally, without any paperwork. With built-in workflows and approval steps, you can submit and track your time off directly through the **Timesheet** module.
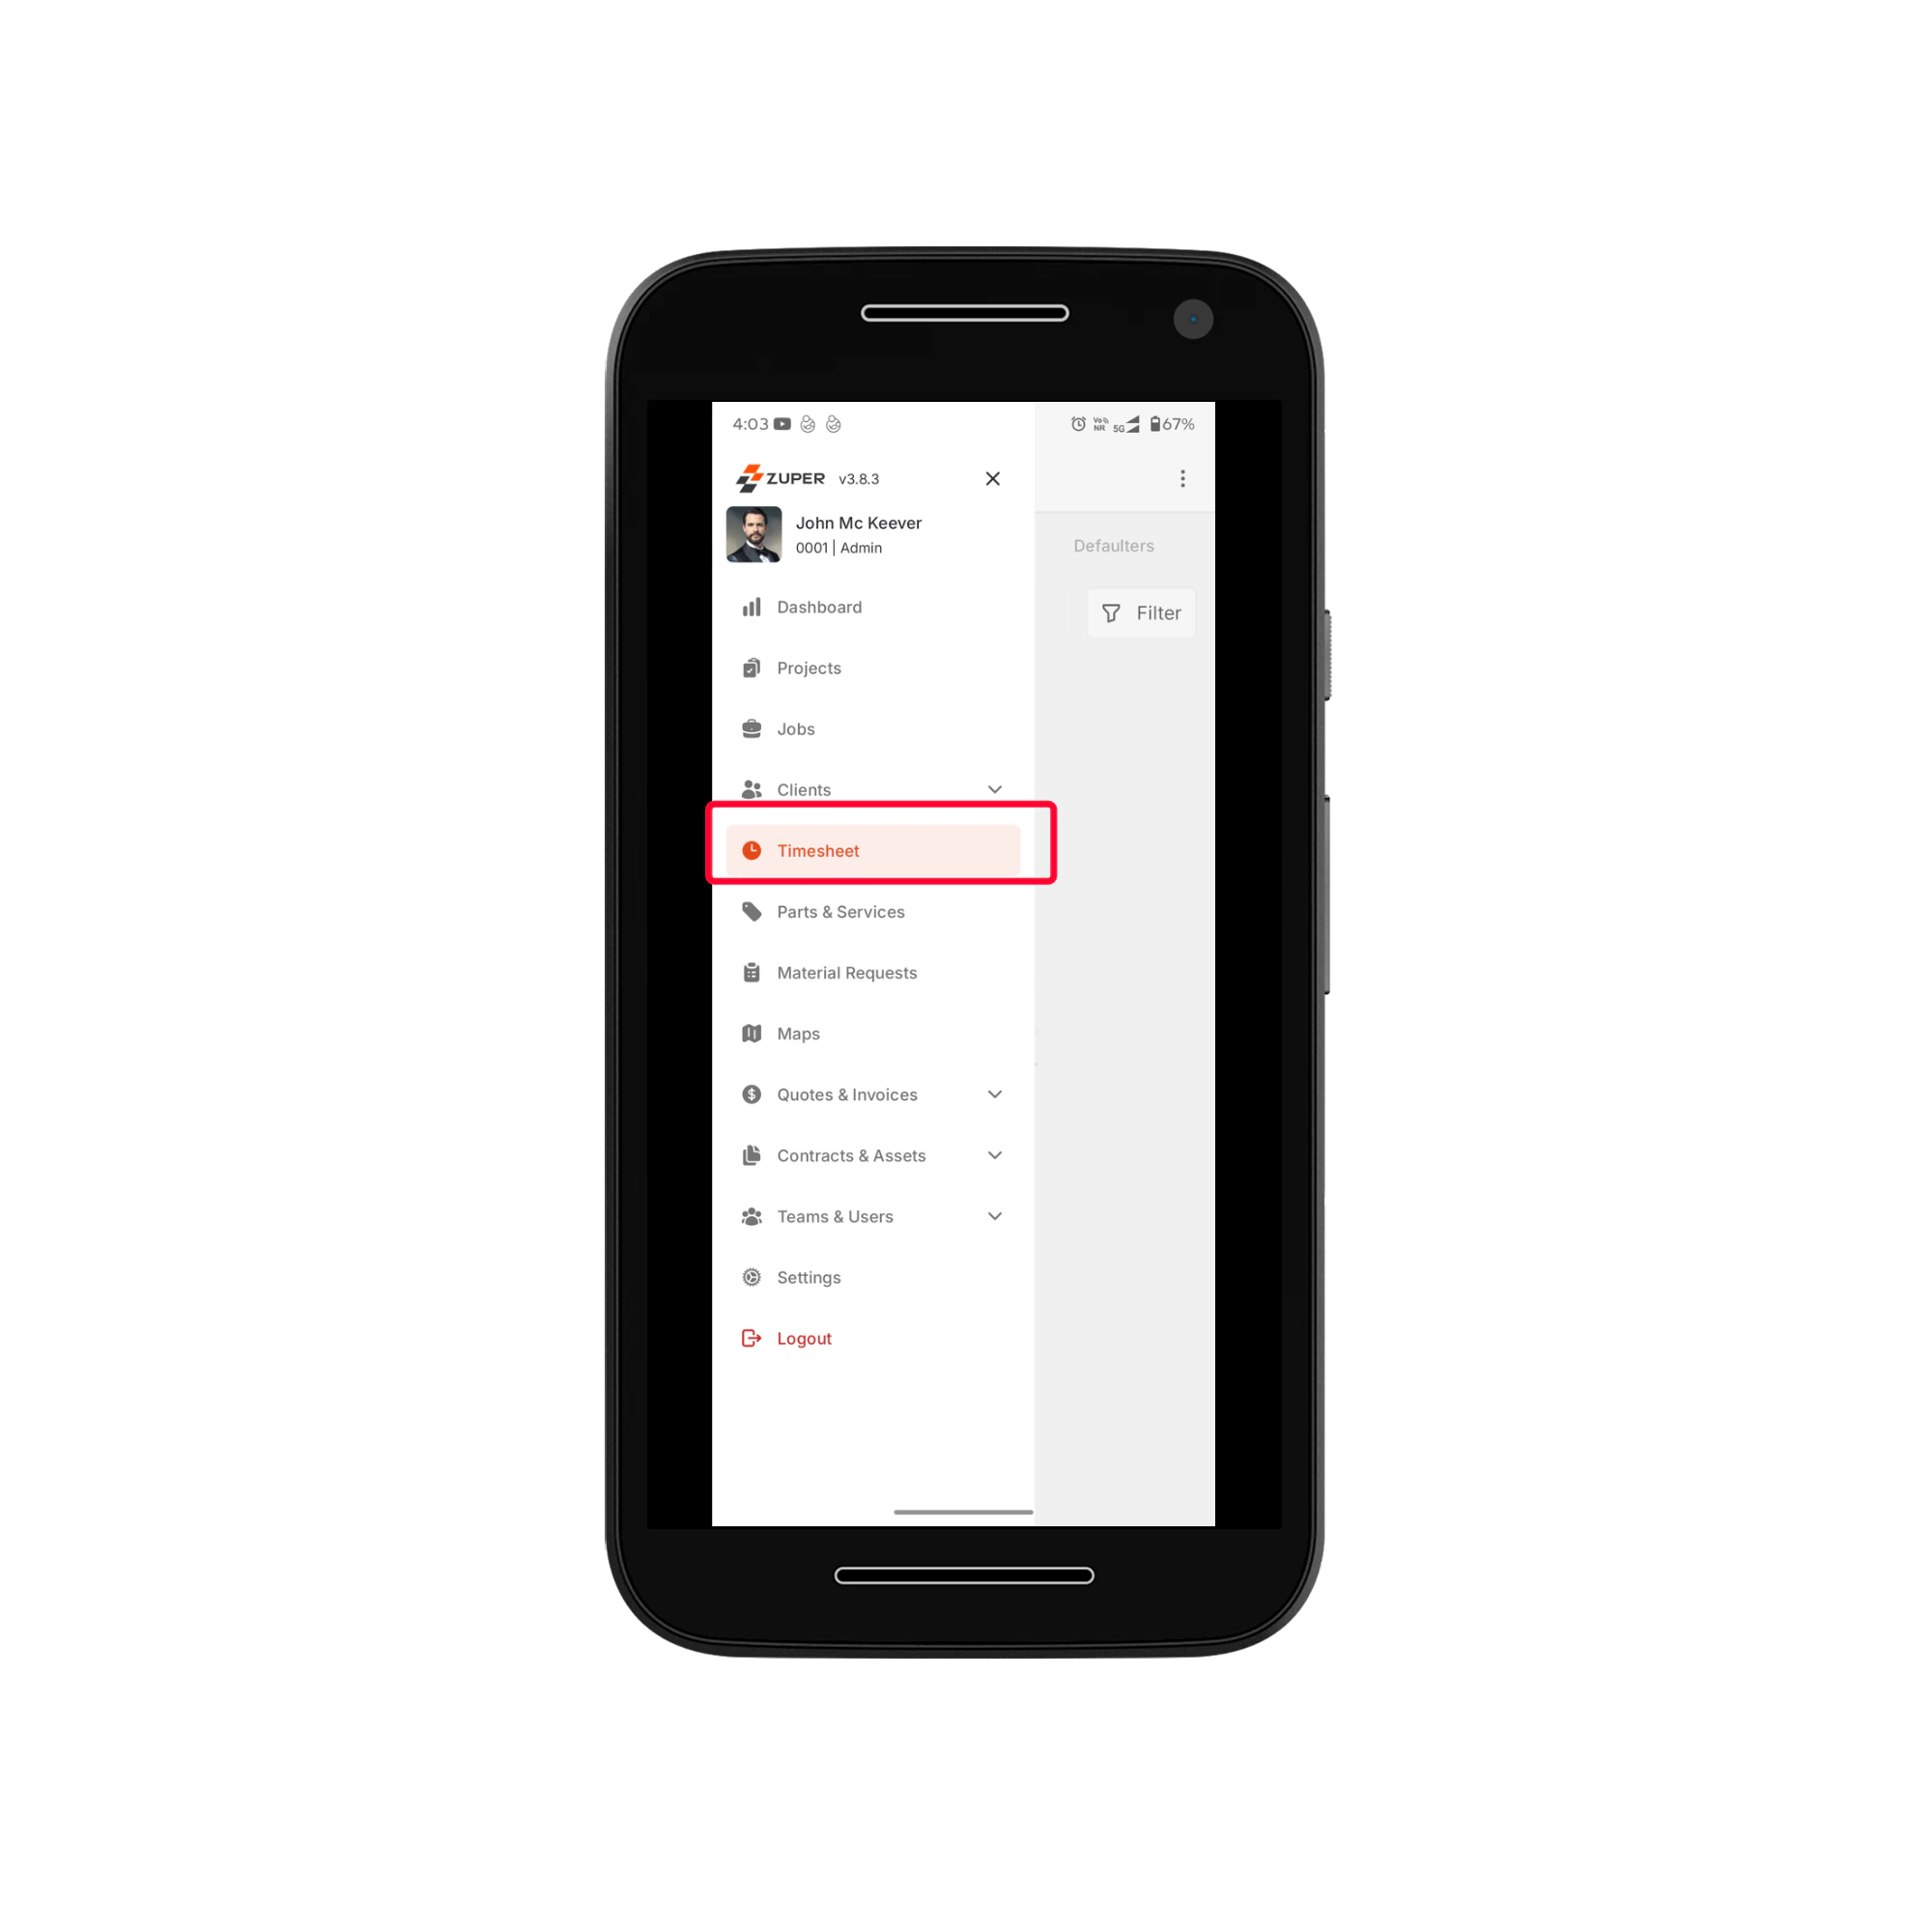
1. Tap the **Menu** icon (☰) and select **Timesheet**.
If the invoice status is **Awaiting Payment**, you can use the mobile app to record payments made by the customer- whether via Debit Card, STRIPE, Square, cash, or any other method supported by your organization. Once recorded, the payment is automatically applied to the associated invoice, ensuring accurate billing and accounting.
For the complete steps on collecting payments, refer to the detailed guide [here](https://docs.zuper.co/Accounting/Invoices/Recording_payments#to-record-a-payment).
# Adding Timeoff Requests
This helps you manage leave requests efficiently, fully digitally, without any paperwork. With built-in workflows and approval steps, you can submit and track your time off directly through the **Timesheet** module.
1. Tap the **Menu** icon (☰) and select **Timesheet**.
 2. Under the **All Timesheets** tab, you can see your submitted timesheets and their status.
3. Tap the **three-dot icon** () at the top-right corner and select **Timeoff requests** to view all submitted leave requests.
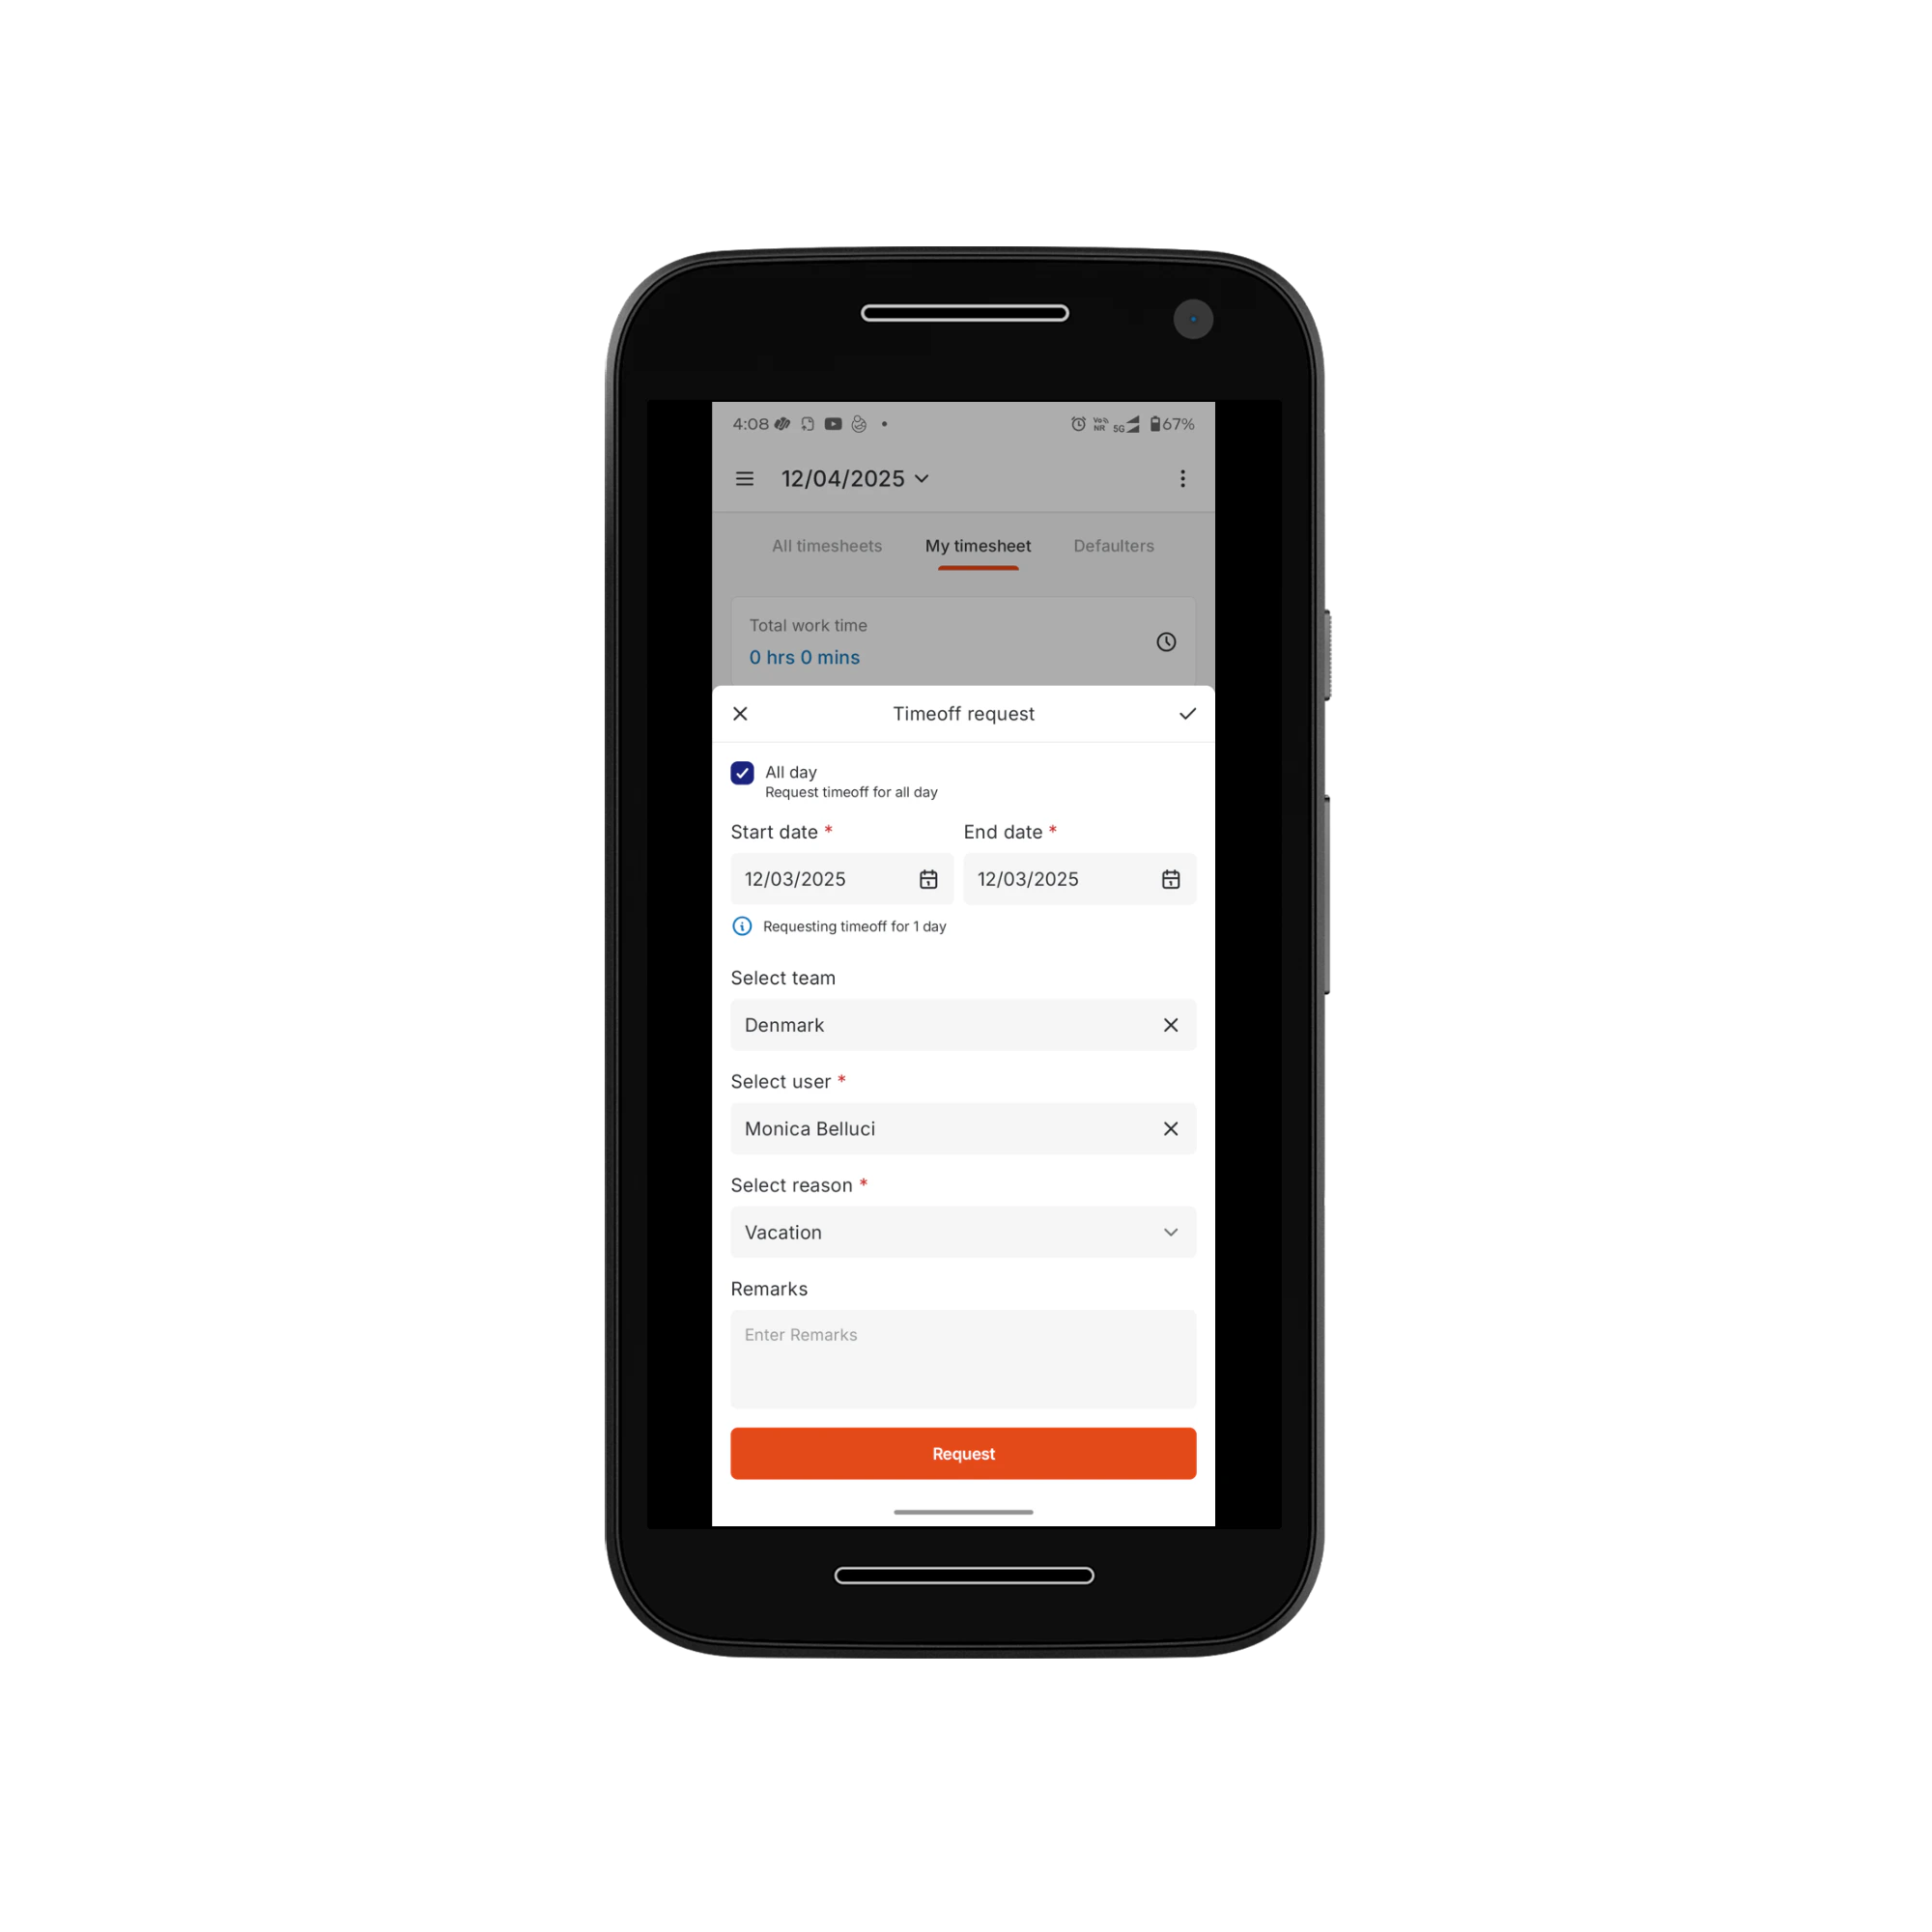
4. To add a New time-off request, tap the “+” icon at the top-right corner.
2. Under the **All Timesheets** tab, you can see your submitted timesheets and their status.
3. Tap the **three-dot icon** () at the top-right corner and select **Timeoff requests** to view all submitted leave requests.
4. To add a New time-off request, tap the “+” icon at the top-right corner.
 5. Fill in the **Timeoff Request** details, including date, reason, and so on.
6. Tap **Request** to submit your time off. Your request will be created successfully for the selected date.
5. Fill in the **Timeoff Request** details, including date, reason, and so on.
6. Tap **Request** to submit your time off. Your request will be created successfully for the selected date.
 7. Once submitted, you can track your Time-off Request Status.
* **Pending** – Requests waiting for approval.
* **Approved** – Requests that have been approved.
* **Rejected** – Requests that have been rejected.
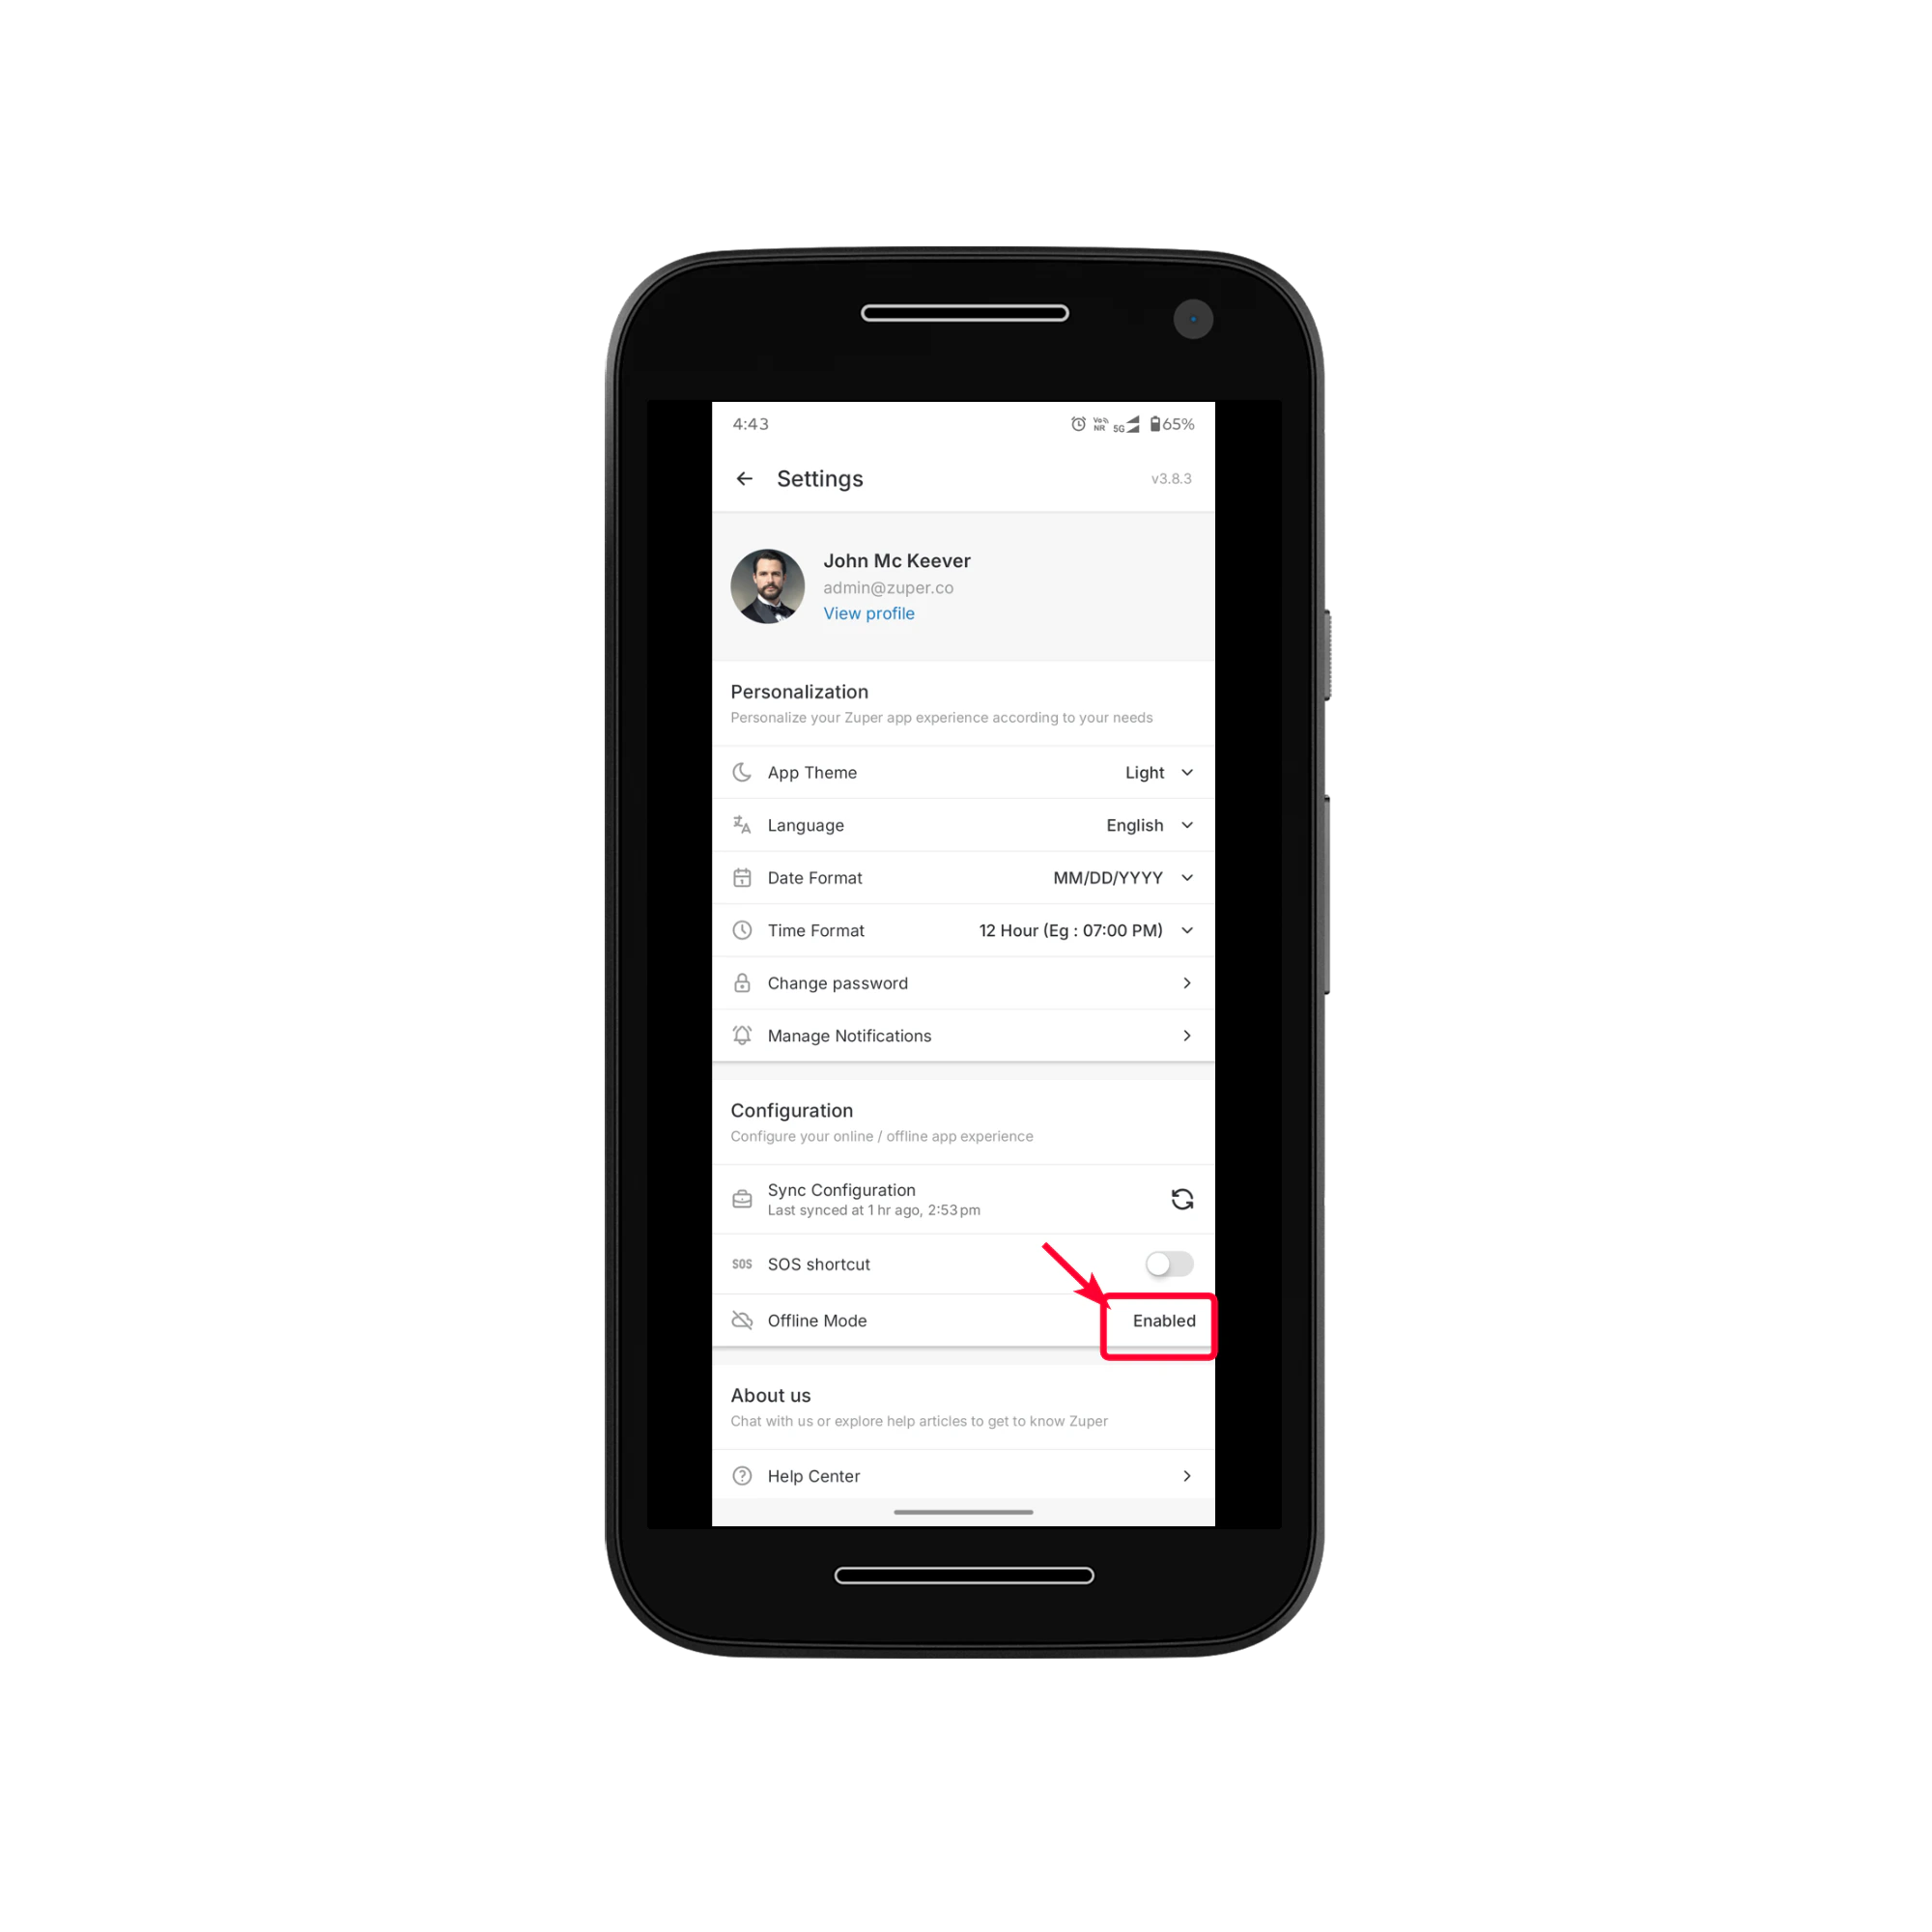
# Using the App in Offline Mode
The Zuper Mobile App supports an **Offline Mode**- allowing you to keep working even in areas with limited or no internet connectivity.
**Enabling Offline Mode**
* The offline feature must first be enabled for your organization via the Zuper Admin portal.
* Once enabled, you can turn on offline mode from the **Settings**>>**Configuration**>>**Offline Mode**.
7. Once submitted, you can track your Time-off Request Status.
* **Pending** – Requests waiting for approval.
* **Approved** – Requests that have been approved.
* **Rejected** – Requests that have been rejected.
# Using the App in Offline Mode
The Zuper Mobile App supports an **Offline Mode**- allowing you to keep working even in areas with limited or no internet connectivity.
**Enabling Offline Mode**
* The offline feature must first be enabled for your organization via the Zuper Admin portal.
* Once enabled, you can turn on offline mode from the **Settings**>>**Configuration**>>**Offline Mode**.
 * After switching on offline mode and when the necessary data is downloaded, the app status will show as **“Ready for offline usage.”**
**What Data is Available Offline**
When offline is enabled and primed, the app stores local copies of all relevant records tied to the user’s assigned jobs (for a window around ±3 days). This includes: job details, related customers/organizations, assets, properties, contracts, parts & services, and routes for assigned work.
However, note that some modules are **not** primed offline — for example, quotes, invoices, and other unrelated records.
**What You Can Do Offline**
While offline, you can
* View assigned jobs and job details (with keyword search for those jobs)
* Update job status and checklists (including uploading pictures as part of the checklist)
* Add job notes and attachments (photos/videos/documents) tied to a job.
* View and manage service tasks assigned to jobs — including viewing associated assets, filling inspection forms, viewing submitted forms, and updating task status. If a service task was unassigned, updating it offline will auto-assign it to the technician who updated it.
* View cached data about customers, assets, organizations, properties, parts & services relevant to their assigned jobs.
Once your device reconnects to the internet, all offline changes (status updates, notes, checklist completions, service-task updates) are queued and automatically synced with the backend. The app dashboard shows the upload status to help you track pending syncs.
**⚠️ Limitations & Considerations**
* Only records linked to jobs assigned to the user are primed offline. Even if a user is an Admin or Team Lead, jobs not assigned to them are **not** available offline.
* Only up to 2 levels of associated records are primed. For example, jobs → customers → organizations/assets; but deeper linked records or unrelated modules are not available offline.
* Some features are **not** supported offline: e.g., accepting or rejecting new job assignments must be done online.
* Modules such as chat, notifications, and real-time updates do not work offline.
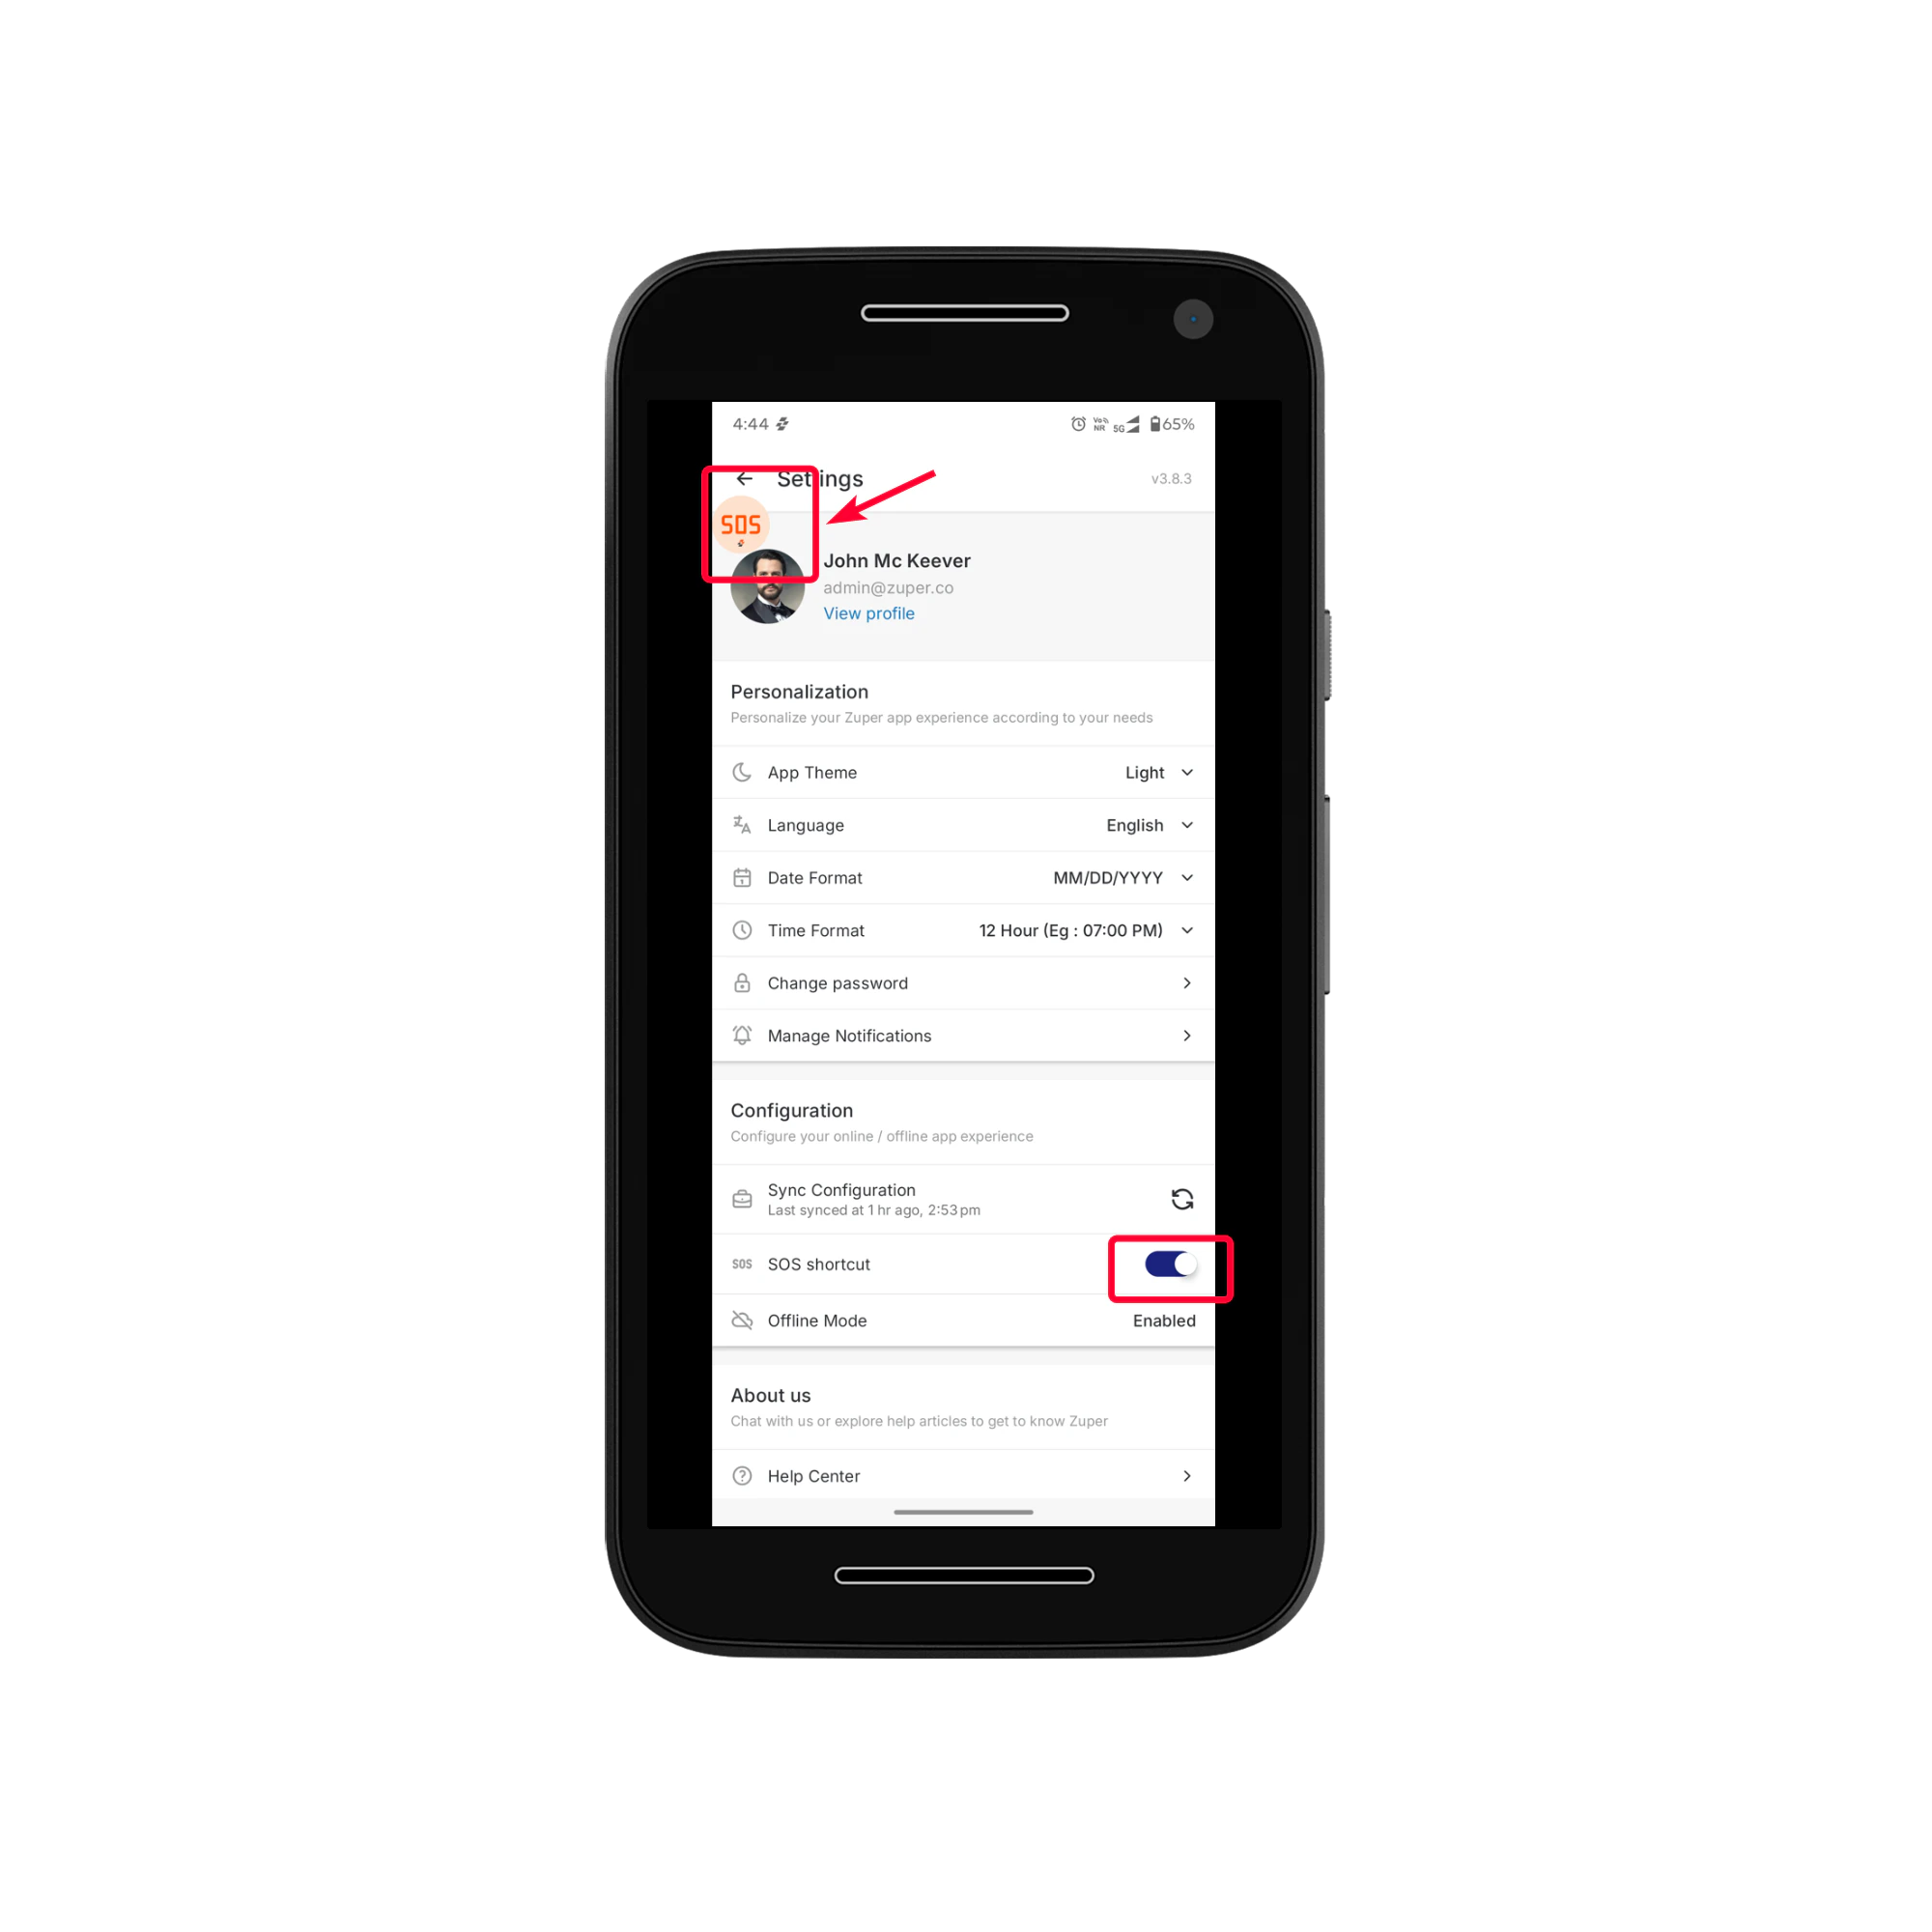
# Using the SOS Feature
The SOS feature in the Zuper Mobile App enables you to quickly alert your organization during emergencies. When triggered, the system automatically captures your current location and sends an SMS notification to the configured emergency contact, ensuring timely assistance.
**Enabling the SOS Shortcut**
Before using SOS, ensure the feature is enabled in your app settings.
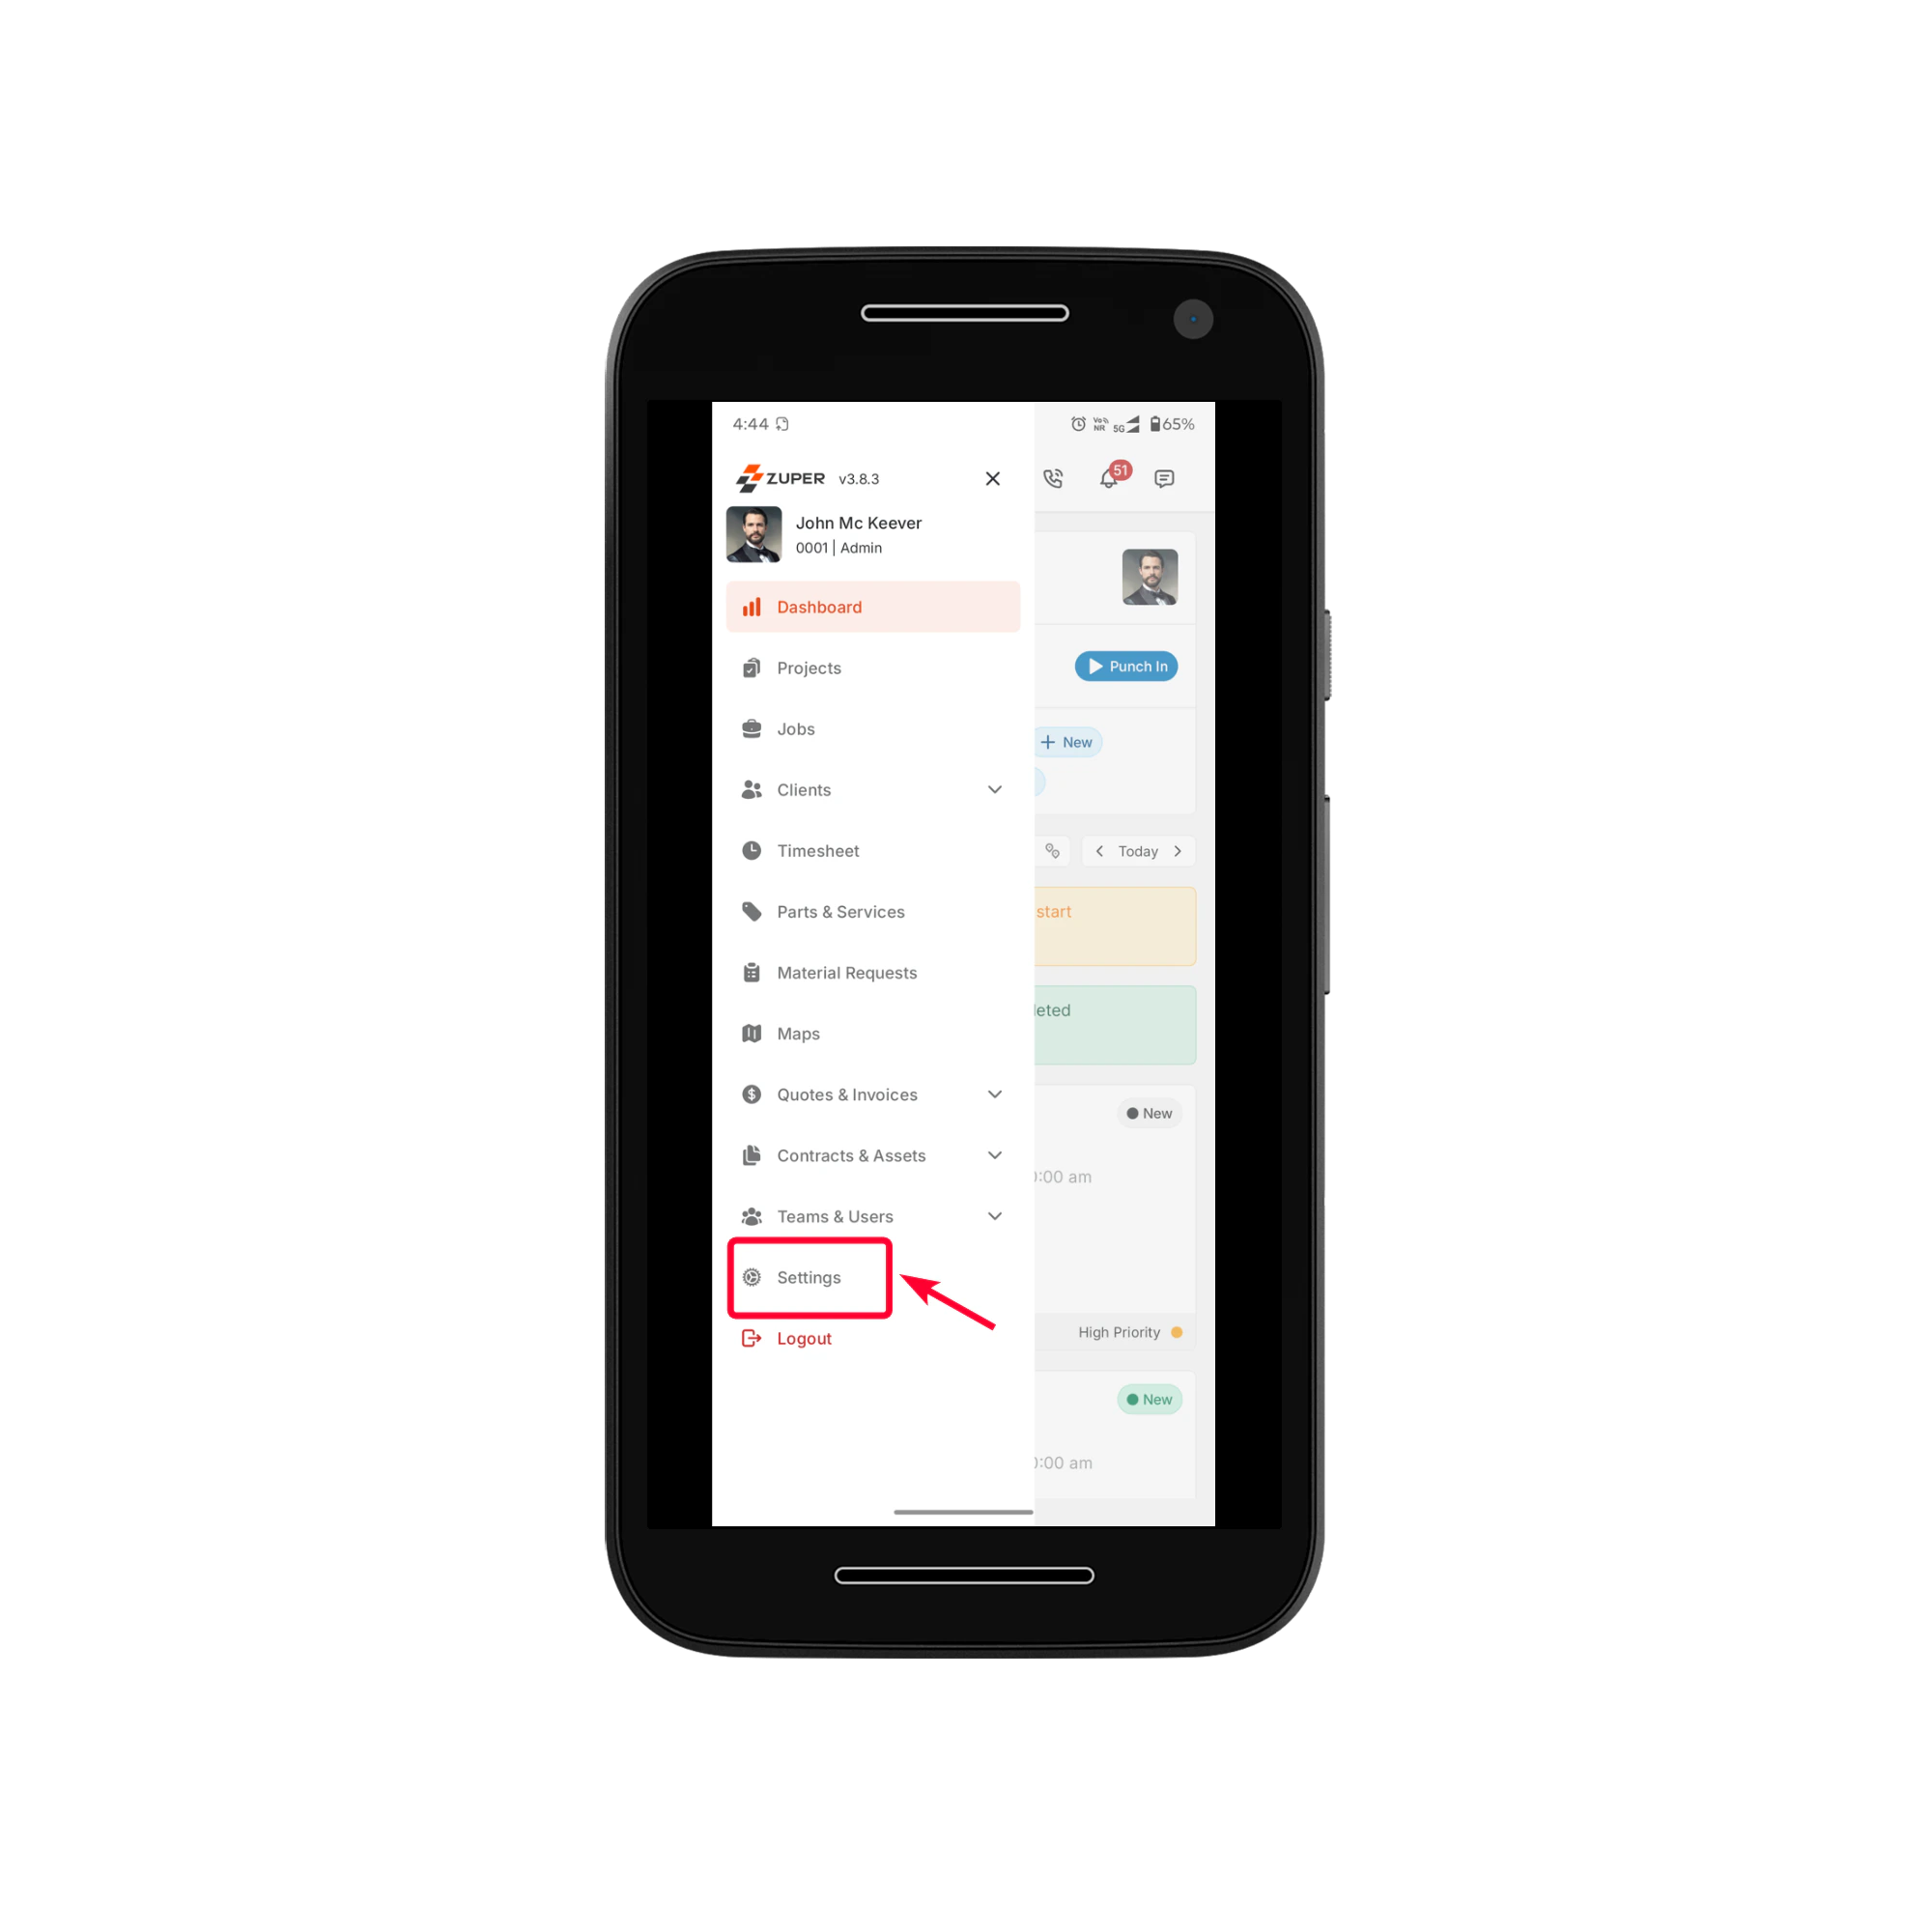
1. Go to **Settings** in the Zuper Mobile App.
* After switching on offline mode and when the necessary data is downloaded, the app status will show as **“Ready for offline usage.”**
**What Data is Available Offline**
When offline is enabled and primed, the app stores local copies of all relevant records tied to the user’s assigned jobs (for a window around ±3 days). This includes: job details, related customers/organizations, assets, properties, contracts, parts & services, and routes for assigned work.
However, note that some modules are **not** primed offline — for example, quotes, invoices, and other unrelated records.
**What You Can Do Offline**
While offline, you can
* View assigned jobs and job details (with keyword search for those jobs)
* Update job status and checklists (including uploading pictures as part of the checklist)
* Add job notes and attachments (photos/videos/documents) tied to a job.
* View and manage service tasks assigned to jobs — including viewing associated assets, filling inspection forms, viewing submitted forms, and updating task status. If a service task was unassigned, updating it offline will auto-assign it to the technician who updated it.
* View cached data about customers, assets, organizations, properties, parts & services relevant to their assigned jobs.
Once your device reconnects to the internet, all offline changes (status updates, notes, checklist completions, service-task updates) are queued and automatically synced with the backend. The app dashboard shows the upload status to help you track pending syncs.
**⚠️ Limitations & Considerations**
* Only records linked to jobs assigned to the user are primed offline. Even if a user is an Admin or Team Lead, jobs not assigned to them are **not** available offline.
* Only up to 2 levels of associated records are primed. For example, jobs → customers → organizations/assets; but deeper linked records or unrelated modules are not available offline.
* Some features are **not** supported offline: e.g., accepting or rejecting new job assignments must be done online.
* Modules such as chat, notifications, and real-time updates do not work offline.
# Using the SOS Feature
The SOS feature in the Zuper Mobile App enables you to quickly alert your organization during emergencies. When triggered, the system automatically captures your current location and sends an SMS notification to the configured emergency contact, ensuring timely assistance.
**Enabling the SOS Shortcut**
Before using SOS, ensure the feature is enabled in your app settings.
1. Go to **Settings** in the Zuper Mobile App.
 2. Under **Configuration**, toggle the **SOS Shortcut** on.
3. Once toggled on, the **SOS icon** will appear on the mobile device for quick access.
2. Under **Configuration**, toggle the **SOS Shortcut** on.
3. Once toggled on, the **SOS icon** will appear on the mobile device for quick access.
 **Triggering an SOS Alert**
In case of an emergency, you can quickly raise an alert:
1. **Double-tap** the SOS icon displayed over the app.
2. The app automatically captures your **current GPS location**.
3. An SMS alert is sent to the emergency phone number configured by your organization. The message includes your name, phone number, and exact location with a clickable link.
**Triggering an SOS Alert**
In case of an emergency, you can quickly raise an alert:
1. **Double-tap** the SOS icon displayed over the app.
2. The app automatically captures your **current GPS location**.
3. An SMS alert is sent to the emergency phone number configured by your organization. The message includes your name, phone number, and exact location with a clickable link.
 This helps your team respond promptly and accurately.
**Note**
* SOS will be available only if your **organization has enabled this feature**.
* SMS delivery depends on your mobile network availability.
* The SOS icon will appear only after you enable the **SOS shortcut** under **Settings → Configuration**.
***
This helps your team respond promptly and accurately.
**Note**
* SOS will be available only if your **organization has enabled this feature**.
* SMS delivery depends on your mobile network availability.
* The SOS icon will appear only after you enable the **SOS shortcut** under **Settings → Configuration**.
***